


- Katılım
- 1 Haz 2014
- Mesajlar
- 284
- Tepkime puanı
- 263
- Puanları
- 63
Configure VPN. Mac OSX
I will make a reservation right away - VPN services are usually paid. You pay either for the used traffic, or for the time of use (day, week, month, year) of the service.
Below I will give a list of verified servers that do not exactly store information about you, are not located in the Russian Federation and accept payment in bitcoins.
1. Prices for anonymous VPN at Proxy.sh price from 2 dollars per month
2. Trusted Security Privacy and Anonymity Service Provider | BolehVPN - 10 dollars a month
3. IPredator - VPN - $ 8 per month
4. NordVPN: Best VPN Service Provider | # 1 Editors' Choice - 10 dollars a month
five. Mullvad - $ 8 per month
6. VPN Pricing - PPTP, SSTP, L2TP and OpenVPN Access: EarthVPN - 4 dollars a month
7. AirVPN - The air to breathe the real Internet - 10 dollars a month
8. blackVPN - Get The Premium VPN Service - 12 dollars a month
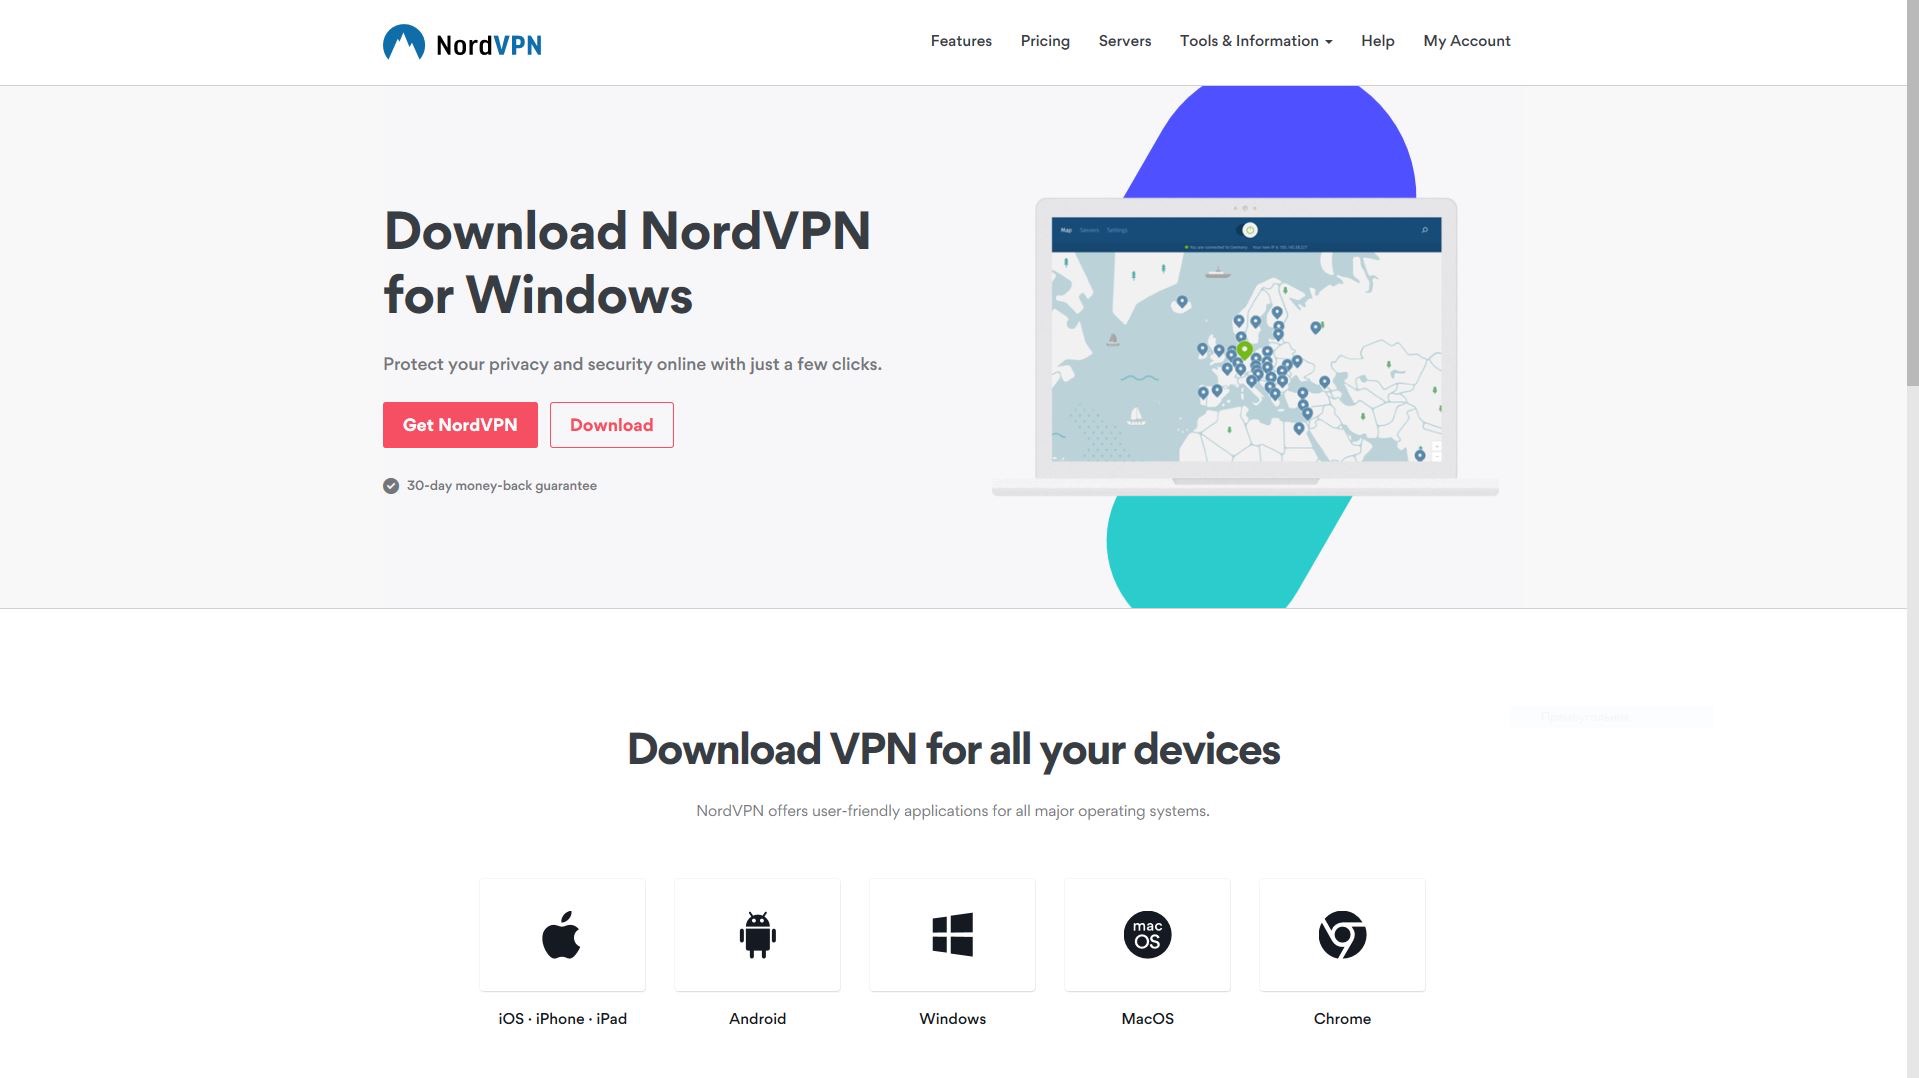
As an example, let's take VPN settings from NordVPN.
Macosx
Using a ready-made client from a VPN service provider.
1) Download the client from the link: Download VPN Client: Simple to Set Up & Easy to Use Software! | NordVPN
2) Open the downloaded file.
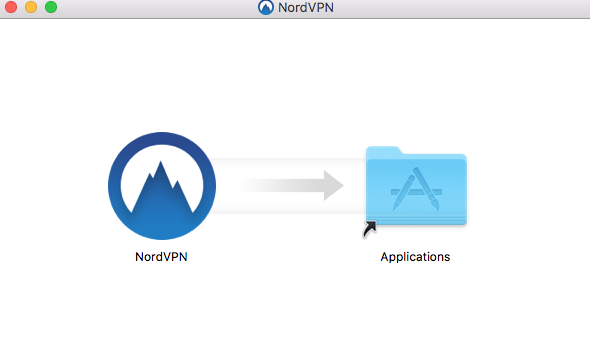
3) Move to the Programs folder.
4) We allow the program to make changes.
5) Enter the registration data and use!

VPN setup through OpenVPN:
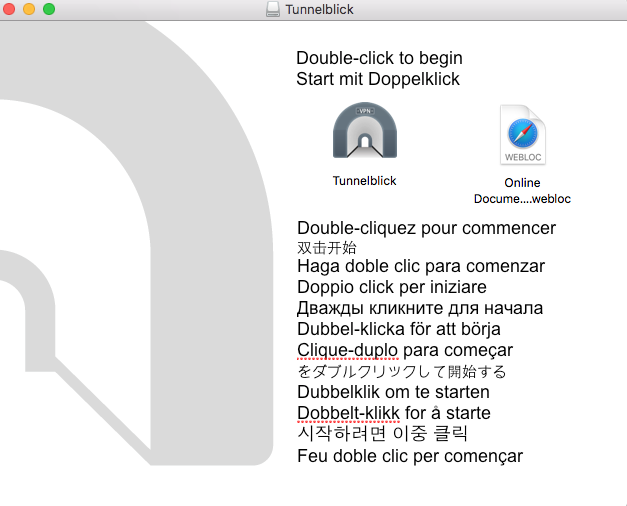
1) Download the Tunnelblick client. Here is the link: Downloads - Tunnelblick | Free open source OpenVPN VPN client server software for Mac OS X and macOS
2) Download the server configuration files for Mac OSX from your VPN provider.
3) Open the downloaded earlier Tunnelblick.
4) Click on the Tunnelblick icon.
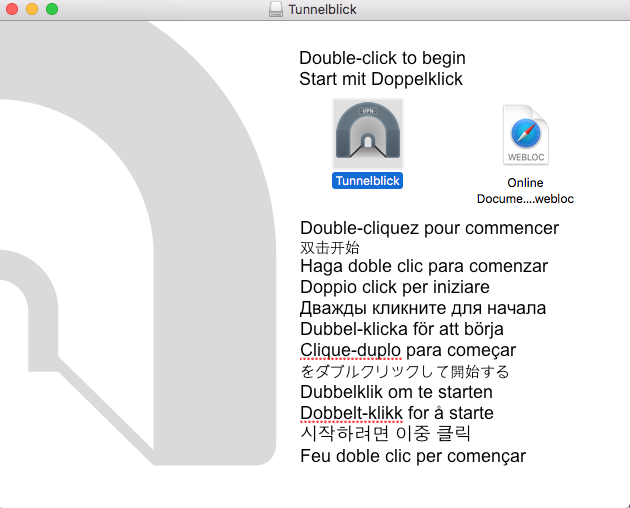
5) Install the application.
6) After Tunnelblick is installed, exit it.
7) Unpack the previously downloaded archive with the configurations. If you don’t have an archiver, you can download the Keka application to extract the files.
8) VERY IMPORTANT: Make sure you exit Tunnelblick for sure - otherwise the import of configuration files will not happen when the application is running.
9) Select all Mac OS configuration files and click on one of them. By doing this, you will add a list of servers to Tunnelblick.
10) Find the Tunnelblick icon in the upper right corner and click on it. A list of servers to which you can connect will be displayed.
11) Connect to one of the servers.
12) Enter your username / password that you used when registering with your VPN provider.
13) Done! You are gorgeous!
Configure VPN over L2TP / IPSec:
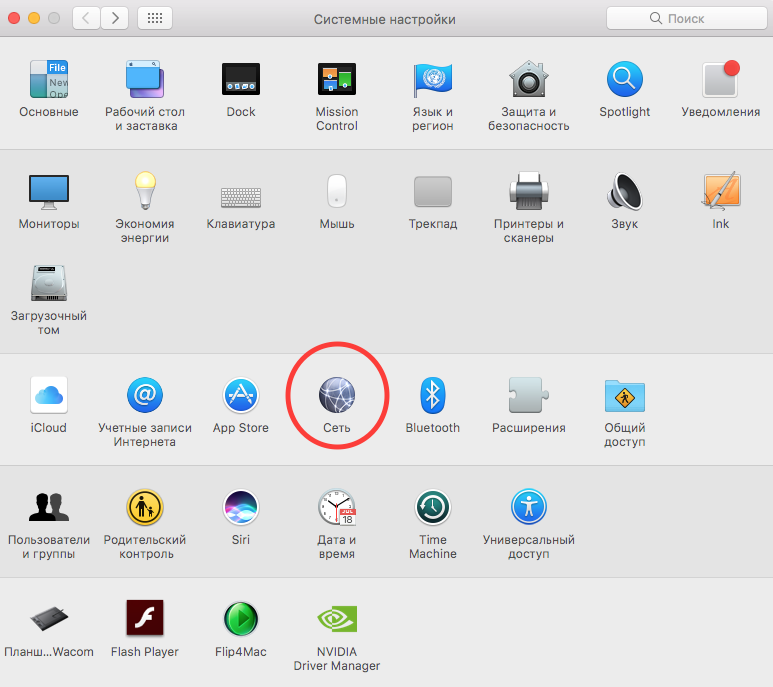
1) Click on Apple in the upper left corner. Then click on System Preferences.
2) In System Preferences, click Network.
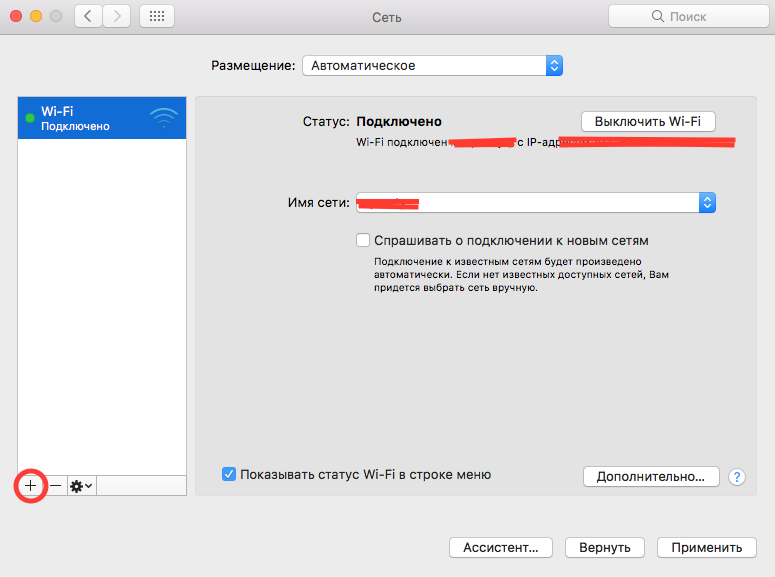
3) In the window that opens, click on the + icon in the lower left corner.
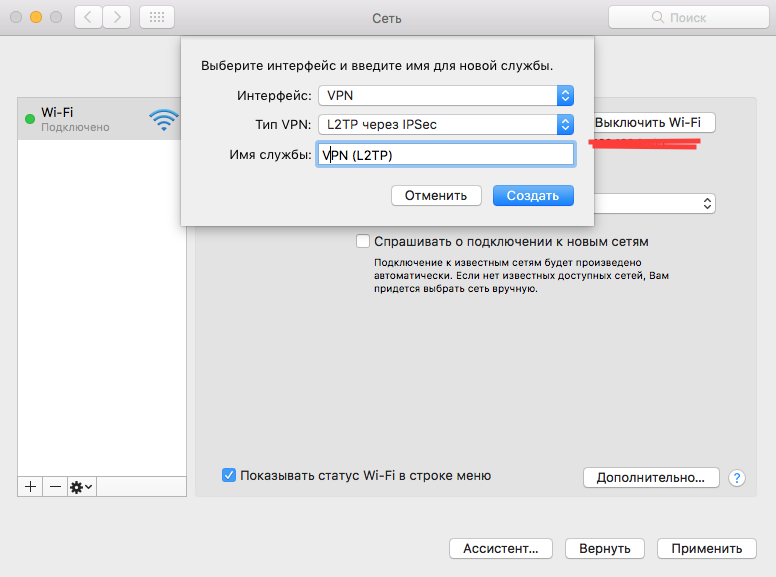
4) A new connection window will open. In the Interface tab, select VPN. In the VPN Connection Type tab, select L2TP via IPSec. In the Service Name tab, write the name you like. Next, click Create.
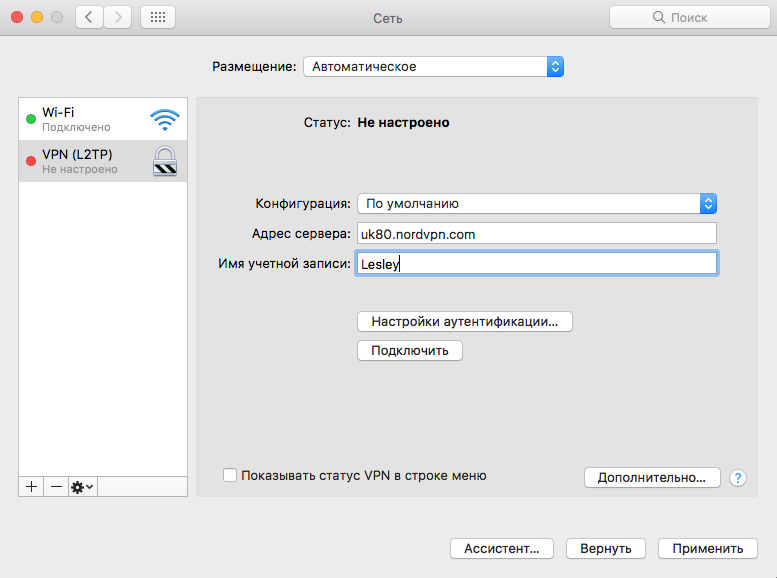
5) A window for setting up a new VPN connection will open. We leave the configuration by default. In the Server address, write the name or IP address of the server of your VPN provider (you can see the list of IP addresses on the site of your VPN provider). In the Account Name we write the login that was used when registering with your VPN provider.
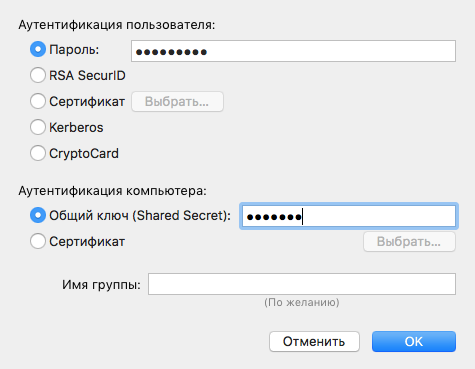
6) Click on Authentication Settings ...
Enter your password that you used when registering with your VPN provider in the Password field.
Under Computer Authentication, select the Shared Secret position and enter the key of your VPN provider. Click OK.
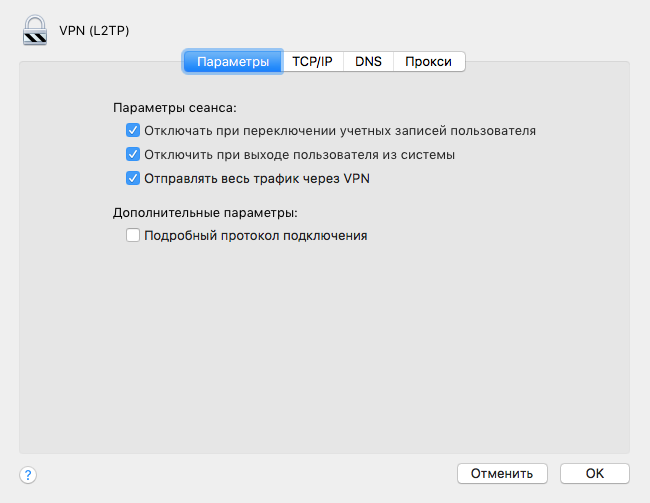
7) Click Advanced. Check the box for Send all traffic via VPN. Click OK.
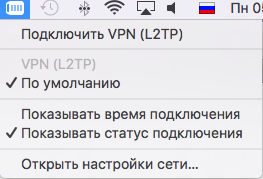
8) Now you can use a VPN. Also in the connection settings you can check the Show VPN status in the menu bar.
(C) Lesley
I will make a reservation right away - VPN services are usually paid. You pay either for the used traffic, or for the time of use (day, week, month, year) of the service.
Below I will give a list of verified servers that do not exactly store information about you, are not located in the Russian Federation and accept payment in bitcoins.
1. Prices for anonymous VPN at Proxy.sh price from 2 dollars per month
2. Trusted Security Privacy and Anonymity Service Provider | BolehVPN - 10 dollars a month
3. IPredator - VPN - $ 8 per month
4. NordVPN: Best VPN Service Provider | # 1 Editors' Choice - 10 dollars a month
five. Mullvad - $ 8 per month
6. VPN Pricing - PPTP, SSTP, L2TP and OpenVPN Access: EarthVPN - 4 dollars a month
7. AirVPN - The air to breathe the real Internet - 10 dollars a month
8. blackVPN - Get The Premium VPN Service - 12 dollars a month
As an example, let's take VPN settings from NordVPN.
Macosx
Using a ready-made client from a VPN service provider.
1) Download the client from the link: Download VPN Client: Simple to Set Up & Easy to Use Software! | NordVPN
2) Open the downloaded file.
3) Move to the Programs folder.
4) We allow the program to make changes.
5) Enter the registration data and use!
VPN setup through OpenVPN:
1) Download the Tunnelblick client. Here is the link: Downloads - Tunnelblick | Free open source OpenVPN VPN client server software for Mac OS X and macOS
2) Download the server configuration files for Mac OSX from your VPN provider.
3) Open the downloaded earlier Tunnelblick.
4) Click on the Tunnelblick icon.
5) Install the application.
6) After Tunnelblick is installed, exit it.
7) Unpack the previously downloaded archive with the configurations. If you don’t have an archiver, you can download the Keka application to extract the files.
8) VERY IMPORTANT: Make sure you exit Tunnelblick for sure - otherwise the import of configuration files will not happen when the application is running.
9) Select all Mac OS configuration files and click on one of them. By doing this, you will add a list of servers to Tunnelblick.
10) Find the Tunnelblick icon in the upper right corner and click on it. A list of servers to which you can connect will be displayed.
11) Connect to one of the servers.
12) Enter your username / password that you used when registering with your VPN provider.
13) Done! You are gorgeous!
Configure VPN over L2TP / IPSec:
1) Click on Apple in the upper left corner. Then click on System Preferences.
2) In System Preferences, click Network.
3) In the window that opens, click on the + icon in the lower left corner.
4) A new connection window will open. In the Interface tab, select VPN. In the VPN Connection Type tab, select L2TP via IPSec. In the Service Name tab, write the name you like. Next, click Create.
5) A window for setting up a new VPN connection will open. We leave the configuration by default. In the Server address, write the name or IP address of the server of your VPN provider (you can see the list of IP addresses on the site of your VPN provider). In the Account Name we write the login that was used when registering with your VPN provider.
6) Click on Authentication Settings ...
Enter your password that you used when registering with your VPN provider in the Password field.
Under Computer Authentication, select the Shared Secret position and enter the key of your VPN provider. Click OK.
7) Click Advanced. Check the box for Send all traffic via VPN. Click OK.
8) Now you can use a VPN. Also in the connection settings you can check the Show VPN status in the menu bar.
(C) Lesley
 Original message
Настраиваем VPN. Mac OSX.
Оговорюсь сразу - VPN-сервисы, как правило, платные. Вы платите или за используемый трафик, или за время использования (день, неделя, месяц, год) сервиса.
Ниже я приведу список проверенных серверов, которые точно не хранят информацию о Вас, находятся не на территории РФ и принимают оплату в биткоинах.
1. Prices for anonymous VPN at Proxy.sh цена от 2 долларов в месяц
2. Trusted Security Privacy and Anonymity Service Provider | BolehVPN - 10 долларов в месяц
3. IPredator - VPN - 8 долларов в месяц
4. NordVPN: Best VPN Service Provider | #1 Editors' Choice - 10 долларов в месяц
5. Mullvad - 8 долларов в месяц
6. VPN Pricing - PPTP, SSTP, L2TP and OpenVPN Access : EarthVPN - 4 доллара в месяц
7. AirVPN - The air to breathe the real Internet - 10 долларов в месяц
8. blackVPN – Get The Premium VPN Service - 12 долларов в месяц
За пример возьмем настройку VPN от NordVPN.
MacOSX
Использование готового клиента от поставщика VPN услуг.
1) Скачиваем клиент по ссылке: Download VPN Client: Simple to Set Up & Easy to Use Software! | NordVPN
2) Открываем скаченный файл.
3) Переносим в папку Программы.
4) Разрешаем программе вносить изменения.
5) Вводим регистрационные данные и пользуемся!
Настройка VPN через OpenVPN:
1) Скачиваем клиент Tunnelblick. Вот ссылка: Downloads - Tunnelblick | Free open source OpenVPN VPN client server software for Mac OS X and macOS
2) Скачиваем файлы конфигурации серверов для Mac OSX у вашего VPN провайдера.
3) Открываем скаченный раннее Tunnelblick.
4) Щелкаем по иконке Tunnelblick.
5) Устанавливаем приложение.
6) После того как Tunnelblick установился, выходим из него.
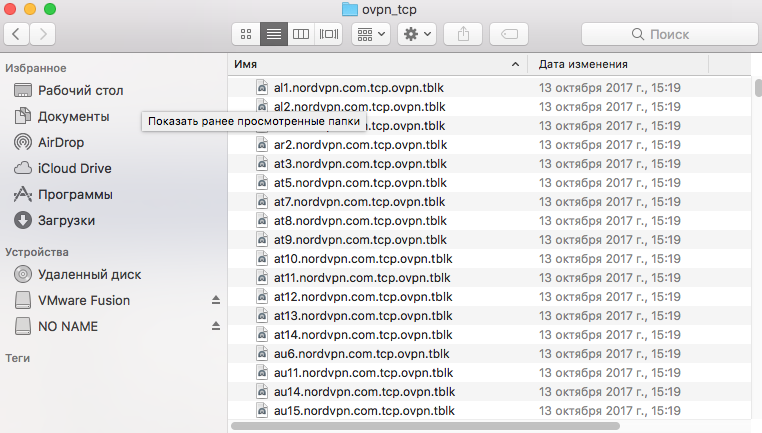
7) Распаковываем скаченный ранее архив с конфигурациями. Если у вас нет архиватора, то можете скачать приложение "Keka", чтобы извлечь файлы.
8) ОЧЕНЬ ВАЖНО: Убедитесь в том что вы точно вышли из Tunnelblick - в противном случае импорт файлов конфигураций не произойдет при работающем приложении.
9) Выберете все файлы конфигураций Mac OS и щелкните по одному из них. Сделав это, вы добавите список серверов в Tunnelblick.
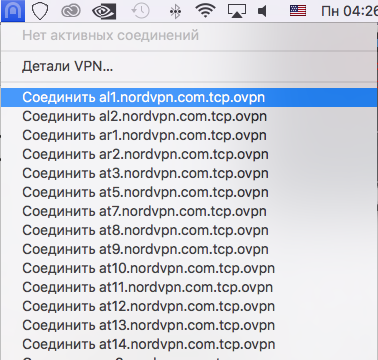
10) Найдите иконку Tunnelblick в правом верхнем углу и кликните на нее. Выйдет список серверов к которым вы сможете подключиться.
11) Подключитесь к одному из серверов.
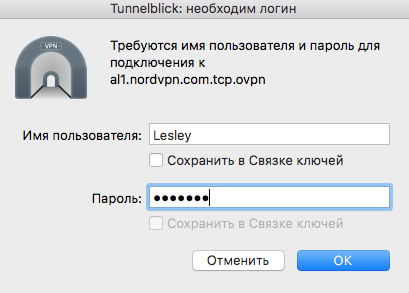
12) Введите свой логин/пароль, которые вы использовали при регистрации у своего VPN провайдера.
13) Готово! Вы восхитительны!
Настройка VPN через L2TP/IPSec:
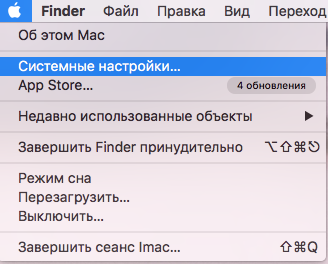
1) Нажмите на Яблоко в верхнем левом углу. Потом кликните Системные настройки.
2) В Системных настройках кликните Сеть.
3) В открывшемся окне кликните на иконку + в левом нижнем углу.
4) Откроется окно нового соединения. Во вкладке Интерфейс выбираем VPN. Во вкладке Тип соединения VPN выбираем L2TP через IPSec. Во вкладке Имя службы пишите имя какое вам нравится. Далее нажимайте Создать.
5) Откроется окно настройки нового VPN-соединения. Конфигурацию оставляем по умолчанию. В Адрес сервера пишем имя или IP-адрес сервера вашего VPN-провайдера (список IP-адресов вы можете посмотреть на сайте вашего VPN-провайдера). В Имя учетной записи пишем логин, который использовали при регистрации у вашего VPN-провайдера.
6) Кликаем на Настройки аутентификации...
Вводите свой пароль, который использовали при регистрации у вашего VPN-провайдера в поле Пароль.
Под Аутентификация компьютера выбираем позицию Общий ключ (Shared Secret) и вводите ключ вашего VPN-провайдера. Нажимаете ОК.
7) Кликаем Дополнительно. Ставим галочку на Отправлять весь трафик через VPN. Нажимаем ОК.
8) Теперь вы можете использовать VPN. Также в настройках соединения вы можете поставить галочку на Показывать статус VPN в строке меню.
(С)Lesley
Оговорюсь сразу - VPN-сервисы, как правило, платные. Вы платите или за используемый трафик, или за время использования (день, неделя, месяц, год) сервиса.
Ниже я приведу список проверенных серверов, которые точно не хранят информацию о Вас, находятся не на территории РФ и принимают оплату в биткоинах.
1. Prices for anonymous VPN at Proxy.sh цена от 2 долларов в месяц
2. Trusted Security Privacy and Anonymity Service Provider | BolehVPN - 10 долларов в месяц
3. IPredator - VPN - 8 долларов в месяц
4. NordVPN: Best VPN Service Provider | #1 Editors' Choice - 10 долларов в месяц
5. Mullvad - 8 долларов в месяц
6. VPN Pricing - PPTP, SSTP, L2TP and OpenVPN Access : EarthVPN - 4 доллара в месяц
7. AirVPN - The air to breathe the real Internet - 10 долларов в месяц
8. blackVPN – Get The Premium VPN Service - 12 долларов в месяц
За пример возьмем настройку VPN от NordVPN.
MacOSX
Использование готового клиента от поставщика VPN услуг.
1) Скачиваем клиент по ссылке: Download VPN Client: Simple to Set Up & Easy to Use Software! | NordVPN
2) Открываем скаченный файл.
3) Переносим в папку Программы.
4) Разрешаем программе вносить изменения.
5) Вводим регистрационные данные и пользуемся!
Настройка VPN через OpenVPN:
1) Скачиваем клиент Tunnelblick. Вот ссылка: Downloads - Tunnelblick | Free open source OpenVPN VPN client server software for Mac OS X and macOS
2) Скачиваем файлы конфигурации серверов для Mac OSX у вашего VPN провайдера.
3) Открываем скаченный раннее Tunnelblick.
4) Щелкаем по иконке Tunnelblick.
5) Устанавливаем приложение.
6) После того как Tunnelblick установился, выходим из него.
7) Распаковываем скаченный ранее архив с конфигурациями. Если у вас нет архиватора, то можете скачать приложение "Keka", чтобы извлечь файлы.
8) ОЧЕНЬ ВАЖНО: Убедитесь в том что вы точно вышли из Tunnelblick - в противном случае импорт файлов конфигураций не произойдет при работающем приложении.
9) Выберете все файлы конфигураций Mac OS и щелкните по одному из них. Сделав это, вы добавите список серверов в Tunnelblick.
10) Найдите иконку Tunnelblick в правом верхнем углу и кликните на нее. Выйдет список серверов к которым вы сможете подключиться.
11) Подключитесь к одному из серверов.
12) Введите свой логин/пароль, которые вы использовали при регистрации у своего VPN провайдера.
13) Готово! Вы восхитительны!
Настройка VPN через L2TP/IPSec:
1) Нажмите на Яблоко в верхнем левом углу. Потом кликните Системные настройки.
2) В Системных настройках кликните Сеть.
3) В открывшемся окне кликните на иконку + в левом нижнем углу.
4) Откроется окно нового соединения. Во вкладке Интерфейс выбираем VPN. Во вкладке Тип соединения VPN выбираем L2TP через IPSec. Во вкладке Имя службы пишите имя какое вам нравится. Далее нажимайте Создать.
5) Откроется окно настройки нового VPN-соединения. Конфигурацию оставляем по умолчанию. В Адрес сервера пишем имя или IP-адрес сервера вашего VPN-провайдера (список IP-адресов вы можете посмотреть на сайте вашего VPN-провайдера). В Имя учетной записи пишем логин, который использовали при регистрации у вашего VPN-провайдера.
6) Кликаем на Настройки аутентификации...
Вводите свой пароль, который использовали при регистрации у вашего VPN-провайдера в поле Пароль.
Под Аутентификация компьютера выбираем позицию Общий ключ (Shared Secret) и вводите ключ вашего VPN-провайдера. Нажимаете ОК.
7) Кликаем Дополнительно. Ставим галочку на Отправлять весь трафик через VPN. Нажимаем ОК.
8) Теперь вы можете использовать VPN. Также в настройках соединения вы можете поставить галочку на Показывать статус VPN в строке меню.
(С)Lesley