


- Katılım
- 1 Haz 2014
- Mesajlar
- 284
- Tepkime puanı
- 263
- Puanları
- 63
Configure VPN on the router.
You can purchase a VPN on our project or find out a list of trusted VPN services from our bot!
TP-Link.
L2TP
1) Go to the settings of the router. You can access the settings by visiting the local IP address of your router from your web browser. The two most common default local IP addresses that most routers have - 192.168.1.1 or 192.168.0.1 - you can access them by opening in your browser https://192.168.1.1 or https://192.168.0.1 . The default IP address, username and password are listed in the user guide for your router or on the device itself.
2) We make the way Network -> WAN or Internet -> Basic .
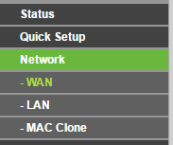
3) Choose the type of connection L2TP / Russia L2TP .

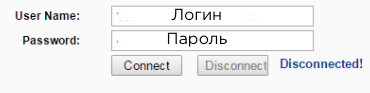
4) Enter your username / password VPN account.
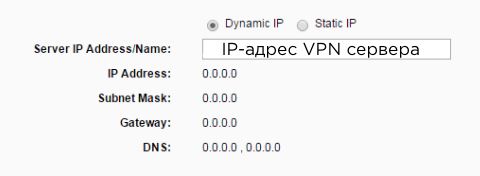
five) Enable dynamic IP . We write the IP address of the VPN server.
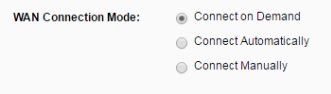
6) Select item "Connect on Demand" .
7) Done!
PPTP
1) Go to the settings of the router. You can access the settings by visiting the local IP address of your router from your web browser. The two most common default local IP addresses that most routers have - 192.168.1.1 or 192.168.0.1 - you can access them by opening in your browser https://192.168.1.1 or https://192.168.0.1 . The default IP address, username and password are listed in the user guide for your router or on the device itself.
2) We make the way Network -> WAN or Internet -> Basic .
3) Choose the type of connection PPTP / Russia PPTP.

4) Enter your username / password VPN account.
five) Enable dynamic IP . We write the IP address of the VPN server.
6) Choose automatic connection.
7) Done!
D-Link
L2TP
1) Go to the settings of the router. You can access the settings by visiting the local IP address of your router from your web browser. The two most common default local IP addresses that most routers have - 192.168.1.1 or 192.168.0.1 - you can access them by opening in your browser https://192.168.1.1 or https://192.168.0.1 . The default IP address, username and password are listed in the user guide for your router or on the device itself.
2) We go to Settings -> Internet .
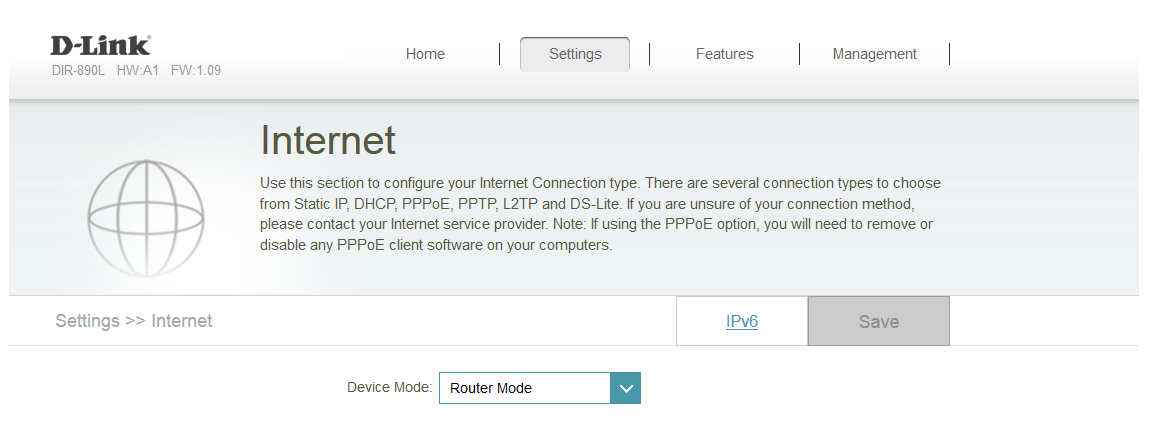
3) Choose the type of connection PPTP .
4) Turn on dynamic IP.

5) We write the IP address of the VPN server. Enter your username / password VPN account.
6) Turn on automatic connection.
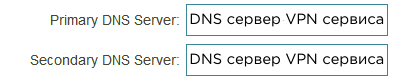
7) We write the DNS server of your VPN service.
8) Save the settings and you're done!
PPTP
1) Go to the settings of the router. You can access the settings by visiting the local IP address of your router from your web browser. The two most common default local IP addresses that most routers have - 192.168.1.1 or 192.168.0.1 - you can access them by opening in your browser https://192.168.1.1 or https://192.168.0.1 . The default IP address, username and password are listed in the user guide for your router or on the device itself.
2) We go to Settings -> Internet .
3) Choose the type of connection L2TP .

4) Turn on dynamic IP.
5) We write the IP address of the VPN server. Enter your username / password VPN account.

6) Turn on automatic connection.
7) We write the DNS server of your VPN service.
8) Save the settings and you're done!
AsusWRT.
Openvpn
1) Go to the settings of the router. You can access the settings by visiting the local IP address of your router from your web browser. The two most common default local IP addresses that most routers have - 192.168.1.1 or 192.168.0.1 - you can access them by opening in your browser https://192.168.1.1 or https://192.168.0.1 . The default IP address, username and password are listed in the user guide for your router or on the device itself.
2) Go to the tab VPN .
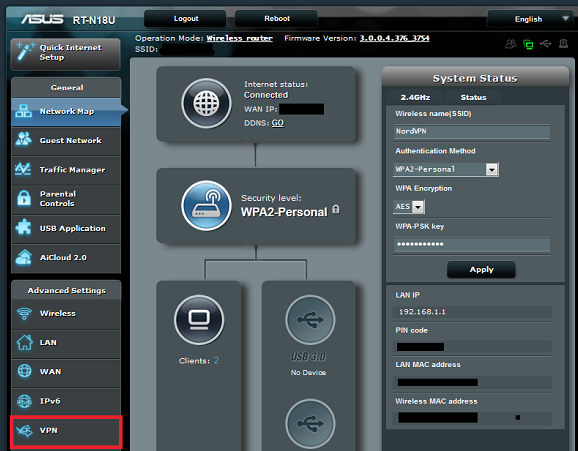
Further in VPN Client.
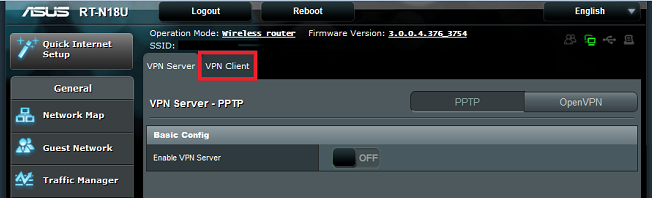
Add a new profile.
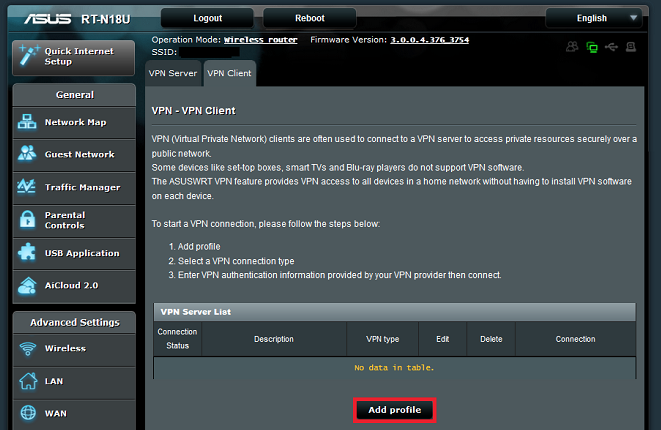
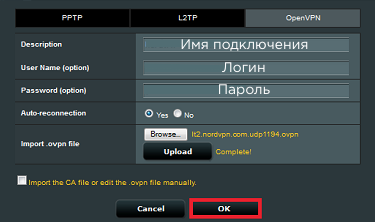
3) In the window that opens, select the type of connection OpenVPN. Next, we write the connection name, username / password. Click "Browse" and select the previously downloaded ovpn server configuration.

Click "Upload" and " OK " .
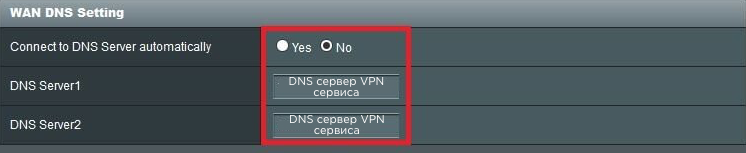
4) Go to the tab Wan . Turn off automatic connection to DNS servers and enter the DNS servers of your VPN service.
5) In the section VPN Client you will see the created connection. Now just connect to it. Please note that you can only create an OpenVPN connection, in order to make a new one, you need to delete or change the parameters of the previous one.

If you see a blue checkmark, then your VPN connection is established.

6) To disconnect the VPN connection, return to the router settings, then to " VPN Client. "

7) Done!
PPTP
1) Go to the settings of the router. You can access the settings by visiting the local IP address of your router from your web browser. The two most common default local IP addresses that most routers have - 192.168.1.1 or 192.168.0.1 - you can access them by opening in your browser https://192.168.1.1 or https://192.168.0.1 . The default IP address, username and password are listed in the user guide for your router or on the device itself.
2) Go to the tab VPN .
Further in VPN Client.
Add a new profile.
3) In the window that opens, select the type of connection PPTP Next, we write the name of the connection, the IP address of the VPN server, username / password. IN "PPTP Conection" put MPPE 128 .
4) In the section VPN Client you will see the created connection. Now just connect to it. Note that you can only create an OpenVPN connection, in order to make a new one, you need to delete or change the parameters of the previous one.
If you see a blue checkmark, then your VPN connection is established.
5) To disconnect the VPN connection, return to the router settings, then to " VPN Client. "
6) Done!
DD-WRT.
Openvpn
1) Go to the settings of the router. You can access the settings by visiting the local IP address of your router from your web browser. The two most common default local IP addresses that most routers have - 192.168.1.1 or 192.168.0.1 - you can access them by opening in your browser https://192.168.1.1 or https://192.168.0.1 . The default IP address, username and password are listed in the user guide for your router or on the device itself.
2) We go to Setup -> Basic Setup.
In section Network Address Server Settings (DHCP) We write the DNS servers of your VPN service. Also check the box "Use DNSMasq for DHCP", "Use DNSMasq for DNS", "DHCP-Authoritative" .
We click Save and Apply Settings .

3) Next, go to Setup -> IPv6 . Turn off IPv6 , then click on Save and Apply Settings .
4) Follow in Services -> VPN , in section OpenVPN Client write the following:
Start OpenVPN Client = Enable
Server IP / Name = VPN server address
Port = 1194
Tunnel device = TUN
Tunnel protocol = UDP
Encryption cipher = AES-256-CBC
Hash algoritm = SHA-1 (note some VPN services began to use the newer SHA-512 algorithm, if your connection to SHA-1 does not work, set SHA-512).
User Pass Authentication = Enable
Username, Password = login / password
Important: If you do not have fields "Username" and "Password" , fill in the remaining fields and proceed to the paragraph 4.1
Advanced options = Enable (additional settings will appear)
TLS Cipher = None
LZO Compression = Yes
NAT = Enable
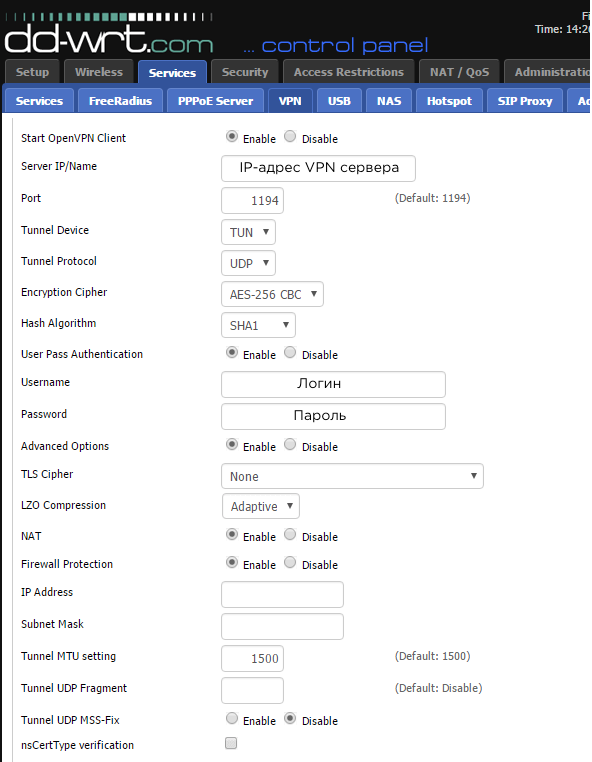
4.1 (Optional, depends on step 4.) If you are missing fields "Username" and "Password" we go to Administration -> Commands , and enter the following code:
echo "YOURUSERNAME
YOURPASSWORD "> /tmp/openvpncl/user.conf
/ usr / bin / killall openvpn
/ usr / sbin / openvpn --config /tmp/openvpncl/openvpn.conf --route-up /tmp/openvpncl/route-up.sh --down-pre /tmp/openvpncl/route-down.sh --daemon
Just replace YOURUSERNAME and YOURPASSWORD to your username and password, respectively. Click on Save Startup, return to the VPN tab.
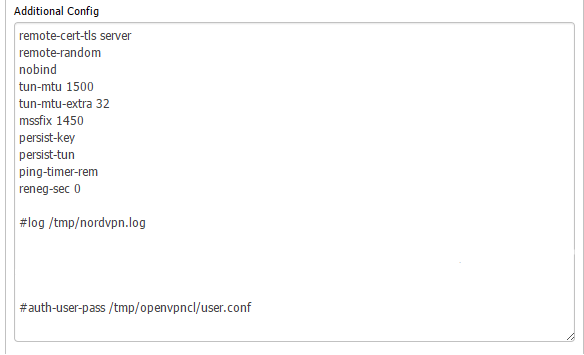
5) In the " Additional Config " register the following commands:
remote-cert-tls server
remote-random
nobind
tun-mtu 1500
tun-mtu-extra 32
mssfix 1450
persist-key
persist-tun
ping-timer-rem
reneg-sec 0
#log /tmp/vpn.log
# Delete the `#` in the line below if you did not have the login / password fields and you followed step 4.1:
# auth-user-pass /tmp/openvpncl/user.conf
6) Download CA and TLS certificates of your VPN server (you can find them on the VPN service website).
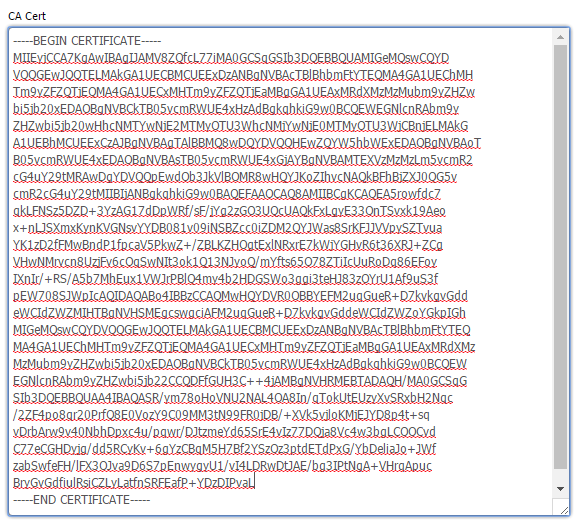
7) Open the file CA.crt your VPN server in any text editor.
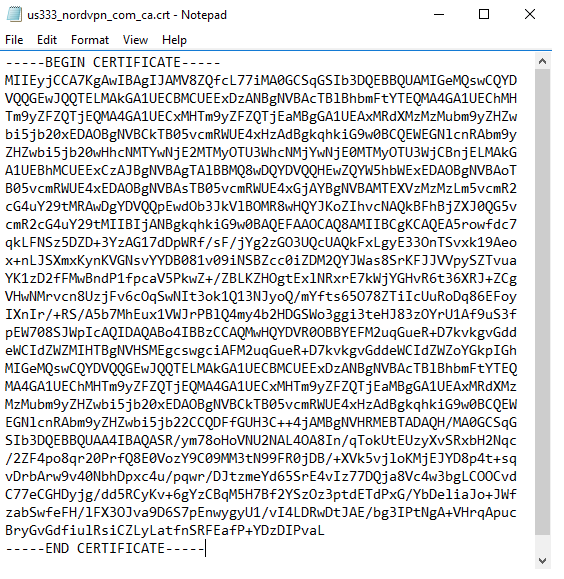
Copy it and paste into the field CA Cert. Make sure you copy all the text, including ----- BEGIN CERTIFICATE ----- and ----- END CERTIFICATE -----.
8) Open the file TLS.key your VPN server in any text editor.
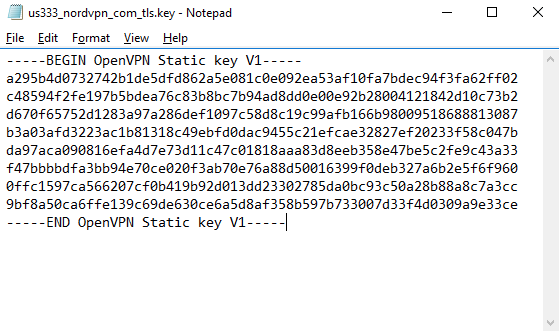
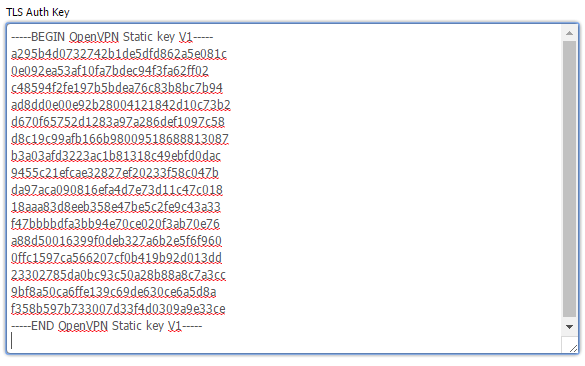
Copy it and paste into the field TLS Auth Key. Make sure you copy all the text, including ----- BEGIN OpenVPN Static key V1 ----- and ----- END OpenVPN Static key V1 -----.
9) After you have entered all the data, click on Save and Apply Settings .

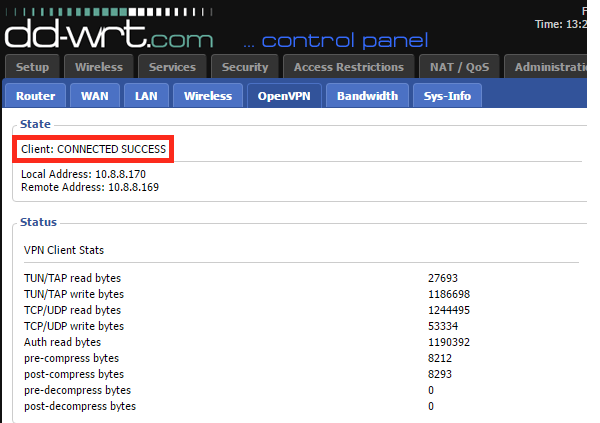
10) To verify that the VPN is working, go to Status -> OpenVPN. In section "State" , you should see the following message: "Client: CONNECTED SUCCESS"
11) To make an emergency switch, go to Administration -> Commands, write the following:
WAN_IF = `nvram get wan_iface`
iptables -I FORWARD -i br0 -o $ WAN_IF -j REJECT --reject-with icmp-host-prohibited
iptables -I FORWARD -i br0 -p tcp -o $ WAN_IF -j REJECT --reject-with tcp-reset
iptables -I FORWARD -i br0 -p udp -o $ WAN_IF -j REJECT --reject-with udp-reset
Then choose Save firewall , and go to Administration -> Management -> Reboot router.
12) Done!
L2TP
1) Go to the settings of the router. You can access the settings by visiting the local IP address of your router from your web browser. The two most common default local IP addresses that most routers have - 192.168.1.1 or 192.168.0.1 - you can access them by opening in your browser https://192.168.1.1 or https://192.168.0.1 . The default IP address, username and password are listed in the user guide for your router or on the device itself.
2) We go to Setup -> Basic Setup.
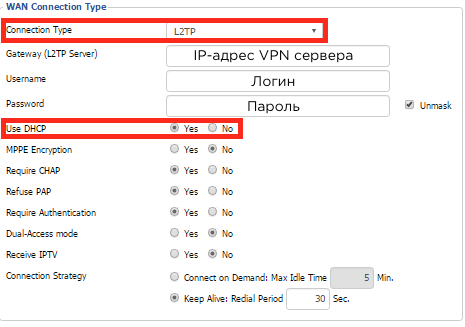
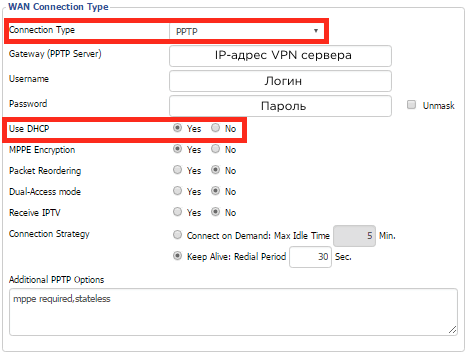
3) In the section "WAN Connection Type" write the following:
Connection type = L2TP
Gateway (L2TP Server) = VPN server IP address
Username / Password = login / password
Use DHCP = Yes
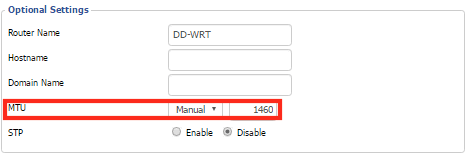
4) In the section "Optional Settings" in line " MTU " set values Manual and 1460 .
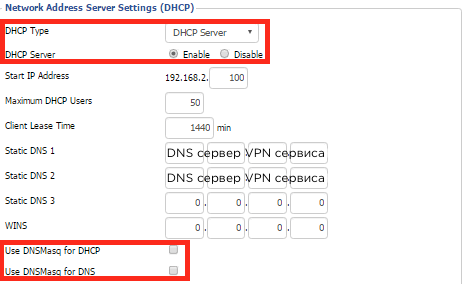
5) In the " Network Address Server Settings (DHCP) " We write the DNS servers of your VPN service. Also uncheck the box with "Use DNSMasq for DHCP" and "Use DNSMasq for DNS".
6) Click on Save and Apply Settings .

7) Done!
PPTP
1) Go to the settings of the router. You can access the settings by visiting the local IP address of your router from your web browser. The two most common default local IP addresses that most routers have - 192.168.1.1 or 192.168.0.1 - you can access them by opening in your browser https://192.168.1.1 or https://192.168.0.1 . The default IP address, username and password are listed in the user guide for your router or on the device itself.
2) We go to Setup -> Basic Setup.
3) In the section "WAN Connection Type" write the following:
Connection type = PPTP
Gateway (PPTP Server) = VPN server IP address
Username / Password = login / password
Use DHCP = Yes
4) In the section "Optional Settings" in line " MTU " set values Manual and 1460 .
5) In the " Network Address Server Settings (DHCP) " We write the DNS servers of your VPN service. Also uncheck the box with "Use DNSMasq for DHCP" and "Use DNSMasq for DNS".
6) Click on Save and Apply Settings .
7) Done!
(C) Lesley
You can purchase a VPN on our project or find out a list of trusted VPN services from our bot!
TP-Link.
L2TP
1) Go to the settings of the router. You can access the settings by visiting the local IP address of your router from your web browser. The two most common default local IP addresses that most routers have - 192.168.1.1 or 192.168.0.1 - you can access them by opening in your browser https://192.168.1.1 or https://192.168.0.1 . The default IP address, username and password are listed in the user guide for your router or on the device itself.
2) We make the way Network -> WAN or Internet -> Basic .
3) Choose the type of connection L2TP / Russia L2TP .
4) Enter your username / password VPN account.
five) Enable dynamic IP . We write the IP address of the VPN server.
6) Select item "Connect on Demand" .
7) Done!
PPTP
1) Go to the settings of the router. You can access the settings by visiting the local IP address of your router from your web browser. The two most common default local IP addresses that most routers have - 192.168.1.1 or 192.168.0.1 - you can access them by opening in your browser https://192.168.1.1 or https://192.168.0.1 . The default IP address, username and password are listed in the user guide for your router or on the device itself.
2) We make the way Network -> WAN or Internet -> Basic .
3) Choose the type of connection PPTP / Russia PPTP.
4) Enter your username / password VPN account.
five) Enable dynamic IP . We write the IP address of the VPN server.
6) Choose automatic connection.
7) Done!
D-Link
L2TP
1) Go to the settings of the router. You can access the settings by visiting the local IP address of your router from your web browser. The two most common default local IP addresses that most routers have - 192.168.1.1 or 192.168.0.1 - you can access them by opening in your browser https://192.168.1.1 or https://192.168.0.1 . The default IP address, username and password are listed in the user guide for your router or on the device itself.
2) We go to Settings -> Internet .
3) Choose the type of connection PPTP .
4) Turn on dynamic IP.
5) We write the IP address of the VPN server. Enter your username / password VPN account.
6) Turn on automatic connection.
7) We write the DNS server of your VPN service.
8) Save the settings and you're done!
PPTP
1) Go to the settings of the router. You can access the settings by visiting the local IP address of your router from your web browser. The two most common default local IP addresses that most routers have - 192.168.1.1 or 192.168.0.1 - you can access them by opening in your browser https://192.168.1.1 or https://192.168.0.1 . The default IP address, username and password are listed in the user guide for your router or on the device itself.
2) We go to Settings -> Internet .
3) Choose the type of connection L2TP .
4) Turn on dynamic IP.
5) We write the IP address of the VPN server. Enter your username / password VPN account.
6) Turn on automatic connection.
7) We write the DNS server of your VPN service.
8) Save the settings and you're done!
AsusWRT.
Openvpn
1) Go to the settings of the router. You can access the settings by visiting the local IP address of your router from your web browser. The two most common default local IP addresses that most routers have - 192.168.1.1 or 192.168.0.1 - you can access them by opening in your browser https://192.168.1.1 or https://192.168.0.1 . The default IP address, username and password are listed in the user guide for your router or on the device itself.
2) Go to the tab VPN .
Further in VPN Client.
Add a new profile.
3) In the window that opens, select the type of connection OpenVPN. Next, we write the connection name, username / password. Click "Browse" and select the previously downloaded ovpn server configuration.
Click "Upload" and " OK " .
4) Go to the tab Wan . Turn off automatic connection to DNS servers and enter the DNS servers of your VPN service.
5) In the section VPN Client you will see the created connection. Now just connect to it. Please note that you can only create an OpenVPN connection, in order to make a new one, you need to delete or change the parameters of the previous one.
If you see a blue checkmark, then your VPN connection is established.
6) To disconnect the VPN connection, return to the router settings, then to " VPN Client. "
7) Done!
PPTP
1) Go to the settings of the router. You can access the settings by visiting the local IP address of your router from your web browser. The two most common default local IP addresses that most routers have - 192.168.1.1 or 192.168.0.1 - you can access them by opening in your browser https://192.168.1.1 or https://192.168.0.1 . The default IP address, username and password are listed in the user guide for your router or on the device itself.
2) Go to the tab VPN .
Further in VPN Client.
Add a new profile.
3) In the window that opens, select the type of connection PPTP Next, we write the name of the connection, the IP address of the VPN server, username / password. IN "PPTP Conection" put MPPE 128 .
4) In the section VPN Client you will see the created connection. Now just connect to it. Note that you can only create an OpenVPN connection, in order to make a new one, you need to delete or change the parameters of the previous one.
If you see a blue checkmark, then your VPN connection is established.
5) To disconnect the VPN connection, return to the router settings, then to " VPN Client. "
6) Done!
DD-WRT.
Openvpn
1) Go to the settings of the router. You can access the settings by visiting the local IP address of your router from your web browser. The two most common default local IP addresses that most routers have - 192.168.1.1 or 192.168.0.1 - you can access them by opening in your browser https://192.168.1.1 or https://192.168.0.1 . The default IP address, username and password are listed in the user guide for your router or on the device itself.
2) We go to Setup -> Basic Setup.
In section Network Address Server Settings (DHCP) We write the DNS servers of your VPN service. Also check the box "Use DNSMasq for DHCP", "Use DNSMasq for DNS", "DHCP-Authoritative" .
We click Save and Apply Settings .
3) Next, go to Setup -> IPv6 . Turn off IPv6 , then click on Save and Apply Settings .
4) Follow in Services -> VPN , in section OpenVPN Client write the following:
Start OpenVPN Client = Enable
Server IP / Name = VPN server address
Port = 1194
Tunnel device = TUN
Tunnel protocol = UDP
Encryption cipher = AES-256-CBC
Hash algoritm = SHA-1 (note some VPN services began to use the newer SHA-512 algorithm, if your connection to SHA-1 does not work, set SHA-512).
User Pass Authentication = Enable
Username, Password = login / password
Important: If you do not have fields "Username" and "Password" , fill in the remaining fields and proceed to the paragraph 4.1
Advanced options = Enable (additional settings will appear)
TLS Cipher = None
LZO Compression = Yes
NAT = Enable
4.1 (Optional, depends on step 4.) If you are missing fields "Username" and "Password" we go to Administration -> Commands , and enter the following code:
echo "YOURUSERNAME
YOURPASSWORD "> /tmp/openvpncl/user.conf
/ usr / bin / killall openvpn
/ usr / sbin / openvpn --config /tmp/openvpncl/openvpn.conf --route-up /tmp/openvpncl/route-up.sh --down-pre /tmp/openvpncl/route-down.sh --daemon
Just replace YOURUSERNAME and YOURPASSWORD to your username and password, respectively. Click on Save Startup, return to the VPN tab.
5) In the " Additional Config " register the following commands:
remote-cert-tls server
remote-random
nobind
tun-mtu 1500
tun-mtu-extra 32
mssfix 1450
persist-key
persist-tun
ping-timer-rem
reneg-sec 0
#log /tmp/vpn.log
# Delete the `#` in the line below if you did not have the login / password fields and you followed step 4.1:
# auth-user-pass /tmp/openvpncl/user.conf
6) Download CA and TLS certificates of your VPN server (you can find them on the VPN service website).
7) Open the file CA.crt your VPN server in any text editor.
Copy it and paste into the field CA Cert. Make sure you copy all the text, including ----- BEGIN CERTIFICATE ----- and ----- END CERTIFICATE -----.
8) Open the file TLS.key your VPN server in any text editor.
Copy it and paste into the field TLS Auth Key. Make sure you copy all the text, including ----- BEGIN OpenVPN Static key V1 ----- and ----- END OpenVPN Static key V1 -----.
9) After you have entered all the data, click on Save and Apply Settings .
10) To verify that the VPN is working, go to Status -> OpenVPN. In section "State" , you should see the following message: "Client: CONNECTED SUCCESS"
11) To make an emergency switch, go to Administration -> Commands, write the following:
WAN_IF = `nvram get wan_iface`
iptables -I FORWARD -i br0 -o $ WAN_IF -j REJECT --reject-with icmp-host-prohibited
iptables -I FORWARD -i br0 -p tcp -o $ WAN_IF -j REJECT --reject-with tcp-reset
iptables -I FORWARD -i br0 -p udp -o $ WAN_IF -j REJECT --reject-with udp-reset
Then choose Save firewall , and go to Administration -> Management -> Reboot router.
12) Done!
L2TP
1) Go to the settings of the router. You can access the settings by visiting the local IP address of your router from your web browser. The two most common default local IP addresses that most routers have - 192.168.1.1 or 192.168.0.1 - you can access them by opening in your browser https://192.168.1.1 or https://192.168.0.1 . The default IP address, username and password are listed in the user guide for your router or on the device itself.
2) We go to Setup -> Basic Setup.
3) In the section "WAN Connection Type" write the following:
Connection type = L2TP
Gateway (L2TP Server) = VPN server IP address
Username / Password = login / password
Use DHCP = Yes
4) In the section "Optional Settings" in line " MTU " set values Manual and 1460 .
5) In the " Network Address Server Settings (DHCP) " We write the DNS servers of your VPN service. Also uncheck the box with "Use DNSMasq for DHCP" and "Use DNSMasq for DNS".
6) Click on Save and Apply Settings .
7) Done!
PPTP
1) Go to the settings of the router. You can access the settings by visiting the local IP address of your router from your web browser. The two most common default local IP addresses that most routers have - 192.168.1.1 or 192.168.0.1 - you can access them by opening in your browser https://192.168.1.1 or https://192.168.0.1 . The default IP address, username and password are listed in the user guide for your router or on the device itself.
2) We go to Setup -> Basic Setup.
3) In the section "WAN Connection Type" write the following:
Connection type = PPTP
Gateway (PPTP Server) = VPN server IP address
Username / Password = login / password
Use DHCP = Yes
4) In the section "Optional Settings" in line " MTU " set values Manual and 1460 .
5) In the " Network Address Server Settings (DHCP) " We write the DNS servers of your VPN service. Also uncheck the box with "Use DNSMasq for DHCP" and "Use DNSMasq for DNS".
6) Click on Save and Apply Settings .
7) Done!
(C) Lesley
 Original message
Настройка VPN на роутере.
Вы можете приобрести VPN на нашем проекте или же узнать список проверенных VPN-сервисов у нашего бота!
TP-Link.
L2TP
1) Заходим в настройки роутера. Вы можете получить доступ к настройкам, посетив локальный IP-адрес вашего маршрутизатора из своего веб-браузера. Два наиболее распространенных локальных IP-адреса по умолчанию, которые имеют большинство маршрутизаторов, - 192.168.1.1 или 192.168.0.1 - вы можете получить к ним доступ, открыв в своем браузере https://192.168.1.1 или https://192.168.0.1. IP-адрес, имя пользователя и пароль по умолчанию указаны в руководстве пользователя вашего маршрутизатора или на самом устройстве.
2) Проделываем путь Network -> WAN или Internet -> Basic.
3) Выбираем тип соединения L2TP/Russia L2TP.
4) Вводим свой логин/пароль VPN аккаунта.
5) Включаем динамический IP. Пишем IP-адрес VPN сервера.
6) Выбираем пункт "Connect on Demand".
7) Готово!
PPTP
1) Заходим в настройки роутера. Вы можете получить доступ к настройкам, посетив локальный IP-адрес вашего маршрутизатора из своего веб-браузера. Два наиболее распространенных локальных IP-адреса по умолчанию, которые имеют большинство маршрутизаторов, - 192.168.1.1 или 192.168.0.1 - вы можете получить к ним доступ, открыв в своем браузере https://192.168.1.1 или https://192.168.0.1. IP-адрес, имя пользователя и пароль по умолчанию указаны в руководстве пользователя вашего маршрутизатора или на самом устройстве.
2) Проделываем путь Network -> WAN или Internet -> Basic.
3) Выбираем тип соединения PPTP/Russia PPTP.
4) Вводим свой логин/пароль VPN аккаунта.
5) Включаем динамический IP. Пишем IP-адрес VPN сервера.
6) Выбираем автоматическое подключение.
7) Готово!
D-Link.
L2TP
1) Заходим в настройки роутера. Вы можете получить доступ к настройкам, посетив локальный IP-адрес вашего маршрутизатора из своего веб-браузера. Два наиболее распространенных локальных IP-адреса по умолчанию, которые имеют большинство маршрутизаторов, - 192.168.1.1 или 192.168.0.1 - вы можете получить к ним доступ, открыв в своем браузере https://192.168.1.1 или https://192.168.0.1. IP-адрес, имя пользователя и пароль по умолчанию указаны в руководстве пользователя вашего маршрутизатора или на самом устройстве.
2) Идем в Settings -> Internet.
3) Выбираем тип соединения PPTP.
4) Включаем динамический IP.
5) Пишем IP-адрес VPN сервера. Вводим свой логин/пароль VPN аккаунта.
6) Включаем автоматическое подключение.
7) Пишем DNS сервера вашего VPN сервиса.
8) Сохраняете настройки и готово!
PPTP
1) Заходим в настройки роутера. Вы можете получить доступ к настройкам, посетив локальный IP-адрес вашего маршрутизатора из своего веб-браузера. Два наиболее распространенных локальных IP-адреса по умолчанию, которые имеют большинство маршрутизаторов, - 192.168.1.1 или 192.168.0.1 - вы можете получить к ним доступ, открыв в своем браузере https://192.168.1.1 или https://192.168.0.1. IP-адрес, имя пользователя и пароль по умолчанию указаны в руководстве пользователя вашего маршрутизатора или на самом устройстве.
2) Идем в Settings -> Internet.
3) Выбираем тип соединения L2TP.
4) Включаем динамический IP.
5) Пишем IP-адрес VPN сервера. Вводим свой логин/пароль VPN аккаунта.
6) Включаем автоматическое подключение.
7) Пишем DNS сервера вашего VPN сервиса.
8) Сохраняете настройки и готово!
AsusWRT.
OpenVPN
1) Заходим в настройки роутера. Вы можете получить доступ к настройкам, посетив локальный IP-адрес вашего маршрутизатора из своего веб-браузера. Два наиболее распространенных локальных IP-адреса по умолчанию, которые имеют большинство маршрутизаторов, - 192.168.1.1 или 192.168.0.1 - вы можете получить к ним доступ, открыв в своем браузере https://192.168.1.1 или https://192.168.0.1. IP-адрес, имя пользователя и пароль по умолчанию указаны в руководстве пользователя вашего маршрутизатора или на самом устройстве.
2) Переходим во вкладку VPN.
Далее в VPN Client.
Добавляем новый профиль.
3) В открывшемся окне выбираем тип соединения OpenVPN. Далее пишем имя подключения, логин/пароль. Жмем "Browse" и выбираем ранее скаченную конфигурацию сервера ovpn.
Жмем "Upload" и "OK".
4) Переходим во вкладку WAN. Выключаем автоматическое подключение к DNS серверам и вводим DNS серверы вашего VPN сервиса.
5) В разделе VPN Client вы увидите созданное соединение. Теперь просто подключайтесь к нему. Учтите, что вы можете создать только OpenVPN соединение, для того чтобы сделать новое, вам надо удалить или изменить параметры предыдущего.
Если вы видите синею галочку, значит ваше VPN соединение установлено.
6) Чтобы отключить VPN соединение, вернитесь в настройки маршрутизатора, далее в "VPN Client".
7) Готово!
PPTP
1) Заходим в настройки роутера. Вы можете получить доступ к настройкам, посетив локальный IP-адрес вашего маршрутизатора из своего веб-браузера. Два наиболее распространенных локальных IP-адреса по умолчанию, которые имеют большинство маршрутизаторов, - 192.168.1.1 или 192.168.0.1 - вы можете получить к ним доступ, открыв в своем браузере https://192.168.1.1 или https://192.168.0.1. IP-адрес, имя пользователя и пароль по умолчанию указаны в руководстве пользователя вашего маршрутизатора или на самом устройстве.
2) Переходим во вкладку VPN.
Далее в VPN Client.
Добавляем новый профиль.
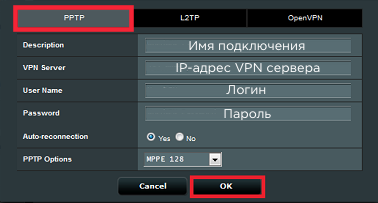
3) В открывшемся окне выбираем тип соединения PPTP. Далее пишем имя подключения, IP-адрес VPN сервера, логин/пароль. В "PPTP Conection" ставим MPPE 128.
4) В разделе VPN Client вы увидите созданное соединение. Теперь просто подключайтесь к нему. Учтите, что вы можете создать только OpenVPN соединение, для того чтобы сделать новое, вам надо удалить или изменить параметры предыдущего.
Если вы видите синею галочку, значит ваше VPN соединение установлено.
5) Чтобы отключить VPN соединение, вернитесь в настройки маршрутизатора, далее в "VPN Client".
6) Готово!
DD-WRT.
OpenVPN
1) Заходим в настройки роутера. Вы можете получить доступ к настройкам, посетив локальный IP-адрес вашего маршрутизатора из своего веб-браузера. Два наиболее распространенных локальных IP-адреса по умолчанию, которые имеют большинство маршрутизаторов, - 192.168.1.1 или 192.168.0.1 - вы можете получить к ним доступ, открыв в своем браузере https://192.168.1.1 или https://192.168.0.1. IP-адрес, имя пользователя и пароль по умолчанию указаны в руководстве пользователя вашего маршрутизатора или на самом устройстве.
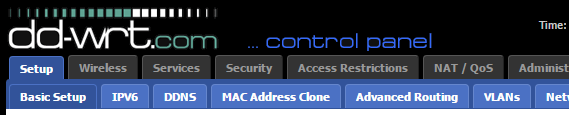
2) Идем в Setup -> Basic Setup.
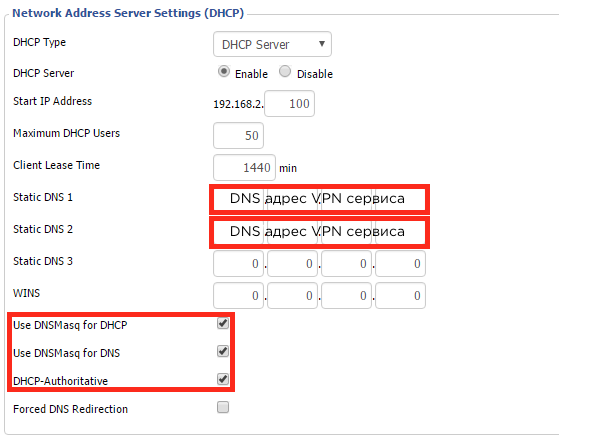
В разделе Network Address Server Settings (DHCP) пишем DNS серверы вашего VPN сервиса. Также ставим галочку на "Use DNSMasq for DHCP", "Use DNSMasq for DNS", "DHCP-Authoritative".
Кликаем Save и Apply Settings.
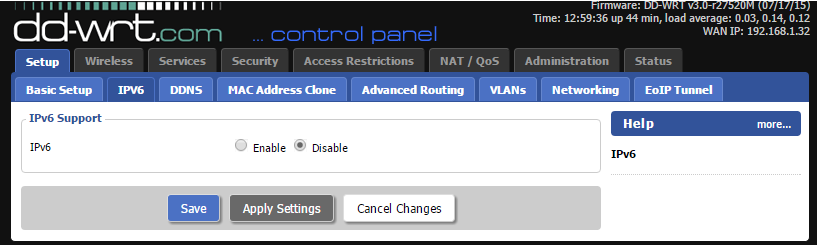
3) Далее идем в Setup -> IPv6. Выключаем IPv6, затем жмем на Save и Apply Settings.
4) Следуем в Services -> VPN, в разделе OpenVPN Client пишем следующее:
Start OpenVPN Client = Enable
Server IP/Name = Адрес VPN сервера
Port = 1194
Tunnel Device = TUN
Tunnel Protocol = UDP
Encryption Cipher = AES-256-CBC
Hash Algoritm = SHA-1 (учтите некоторые VPN сервисы стали использовать более новый алгоритм SHA-512, если у вас не работает соединение с SHA-1, поставьте SHA-512).
User Pass Authentication = Enable
Username, Password = логин/пароль
Важно: Если у вас отсутствуют поля "Username" и "Password", заполните оставшиеся поля и перейдите к выполнения пункта 4.1
Advanced Options = Enable (появятся дополнительные настройки)
TLS Cipher = None
LZO Compression = Yes
NAT = Enable
4.1 (Опционально, зависит от шага 4.) Если вас отсутствуют поля "Username" и "Password", идем в Administration -> Commands, и вводим следующий код:
echo "YOURUSERNAME
YOURPASSWORD" > /tmp/openvpncl/user.conf
/usr/bin/killall openvpn
/usr/sbin/openvpn --config /tmp/openvpncl/openvpn.conf --route-up /tmp/openvpncl/route-up.sh --down-pre /tmp/openvpncl/route-down.sh --daemon
Только замените "YOURUSERNAME" и "YOURPASSWORD" на свои логин и пароль соответственно. Кликаем на Save Startup, возвращаемся во вкладку VPN.
5) В окне "Additional Config" прописываем следующие команды:
remote-cert-tls server
remote-random
nobind
tun-mtu 1500
tun-mtu-extra 32
mssfix 1450
persist-key
persist-tun
ping-timer-rem
reneg-sec 0
#log /tmp/vpn.log
#Удалите `#` в линии ниже, если у вас не было полей логин/пароль и вы проследовали по шагу 4.1:
#auth-user-pass /tmp/openvpncl/user.conf
6) Скачайте CA и TLS сертификаты вашего VPN сервера (найти их можно на сайте VPN сервиса).
7) Откройте файл CA.crt вашего VPN сервера в любом текстовом редакторе.
Скопируйте его и вставьте в поле CA Cert. Убедитесь, что вы скопировали весь текст, включая -----BEGIN CERTIFICATE----- и -----END CERTIFICATE-----.
8) Откройте файл TLS.key вашего VPN сервера в любом текстовом редакторе.
Скопируйте его и вставьте в поле TLS Auth Key. Убедитесь, что вы скопировали весь текст, включая -----BEGIN OpenVPN Static key V1----- и -----END OpenVPN Static key V1-----.
9) После того, как вы ввели все данные, кликните на Save и Apply Settings.
10) Чтобы убедиться в работоспособности VPN, перейдите в Status -> OpenVPN. В разделе "State", вы должны увидеть следующее сообщение: "Client: CONNECTED SUCCESS"
11) Чтобы сделать аварийный выключатель, идем в Administration -> Commands, пишем следующее:
WAN_IF=`nvram get wan_iface`
iptables -I FORWARD -i br0 -o $WAN_IF -j REJECT --reject-with icmp-host-prohibited
iptables -I FORWARD -i br0 -p tcp -o $WAN_IF -j REJECT --reject-with tcp-reset
iptables -I FORWARD -i br0 -p udp -o $WAN_IF -j REJECT --reject-with udp-reset
Затем выбираем Save Firewall, и переходим в Administration -> Management -> Reboot router.
12) Готово!
L2TP
1) Заходим в настройки роутера. Вы можете получить доступ к настройкам, посетив локальный IP-адрес вашего маршрутизатора из своего веб-браузера. Два наиболее распространенных локальных IP-адреса по умолчанию, которые имеют большинство маршрутизаторов, - 192.168.1.1 или 192.168.0.1 - вы можете получить к ним доступ, открыв в своем браузере https://192.168.1.1 или https://192.168.0.1. IP-адрес, имя пользователя и пароль по умолчанию указаны в руководстве пользователя вашего маршрутизатора или на самом устройстве.
2) Идем в Setup -> Basic Setup.
3) В разделе "WAN Connection Type" пишем следующее:
Connection Type = L2TP
Gateway (L2TP Server) = IP-адрес VPN сервера
Username/Password = логин/пароль
Use DHCP = Yes
4) В разделе "Optional Settings" в строке "MTU" ставим значения Manual и 1460.
5) В разделе "Network Address Server Settings (DHCP)" пишем DNS серверы вашего VPN сервиса. Также убираем галочки с "Use DNSMasq for DHCP" и "Use DNSMasq for DNS".
6) Жмем на Save и Apply Settings.
7) Готово!
PPTP
1) Заходим в настройки роутера. Вы можете получить доступ к настройкам, посетив локальный IP-адрес вашего маршрутизатора из своего веб-браузера. Два наиболее распространенных локальных IP-адреса по умолчанию, которые имеют большинство маршрутизаторов, - 192.168.1.1 или 192.168.0.1 - вы можете получить к ним доступ, открыв в своем браузере https://192.168.1.1 или https://192.168.0.1. IP-адрес, имя пользователя и пароль по умолчанию указаны в руководстве пользователя вашего маршрутизатора или на самом устройстве.
2) Идем в Setup -> Basic Setup.
3) В разделе "WAN Connection Type" пишем следующее:
Connection Type = PPTP
Gateway (PPTP Server) = IP-адрес VPN сервера
Username/Password = логин/пароль
Use DHCP = Yes
4) В разделе "Optional Settings" в строке "MTU" ставим значения Manual и 1460.
5) В разделе "Network Address Server Settings (DHCP)" пишем DNS серверы вашего VPN сервиса. Также убираем галочки с "Use DNSMasq for DHCP" и "Use DNSMasq for DNS".
6) Жмем на Save и Apply Settings.
7) Готово!
(С)Lesley
Вы можете приобрести VPN на нашем проекте или же узнать список проверенных VPN-сервисов у нашего бота!
TP-Link.
L2TP
1) Заходим в настройки роутера. Вы можете получить доступ к настройкам, посетив локальный IP-адрес вашего маршрутизатора из своего веб-браузера. Два наиболее распространенных локальных IP-адреса по умолчанию, которые имеют большинство маршрутизаторов, - 192.168.1.1 или 192.168.0.1 - вы можете получить к ним доступ, открыв в своем браузере https://192.168.1.1 или https://192.168.0.1. IP-адрес, имя пользователя и пароль по умолчанию указаны в руководстве пользователя вашего маршрутизатора или на самом устройстве.
2) Проделываем путь Network -> WAN или Internet -> Basic.
3) Выбираем тип соединения L2TP/Russia L2TP.
4) Вводим свой логин/пароль VPN аккаунта.
5) Включаем динамический IP. Пишем IP-адрес VPN сервера.
6) Выбираем пункт "Connect on Demand".
7) Готово!
PPTP
1) Заходим в настройки роутера. Вы можете получить доступ к настройкам, посетив локальный IP-адрес вашего маршрутизатора из своего веб-браузера. Два наиболее распространенных локальных IP-адреса по умолчанию, которые имеют большинство маршрутизаторов, - 192.168.1.1 или 192.168.0.1 - вы можете получить к ним доступ, открыв в своем браузере https://192.168.1.1 или https://192.168.0.1. IP-адрес, имя пользователя и пароль по умолчанию указаны в руководстве пользователя вашего маршрутизатора или на самом устройстве.
2) Проделываем путь Network -> WAN или Internet -> Basic.
3) Выбираем тип соединения PPTP/Russia PPTP.
4) Вводим свой логин/пароль VPN аккаунта.
5) Включаем динамический IP. Пишем IP-адрес VPN сервера.
6) Выбираем автоматическое подключение.
7) Готово!
D-Link.
L2TP
1) Заходим в настройки роутера. Вы можете получить доступ к настройкам, посетив локальный IP-адрес вашего маршрутизатора из своего веб-браузера. Два наиболее распространенных локальных IP-адреса по умолчанию, которые имеют большинство маршрутизаторов, - 192.168.1.1 или 192.168.0.1 - вы можете получить к ним доступ, открыв в своем браузере https://192.168.1.1 или https://192.168.0.1. IP-адрес, имя пользователя и пароль по умолчанию указаны в руководстве пользователя вашего маршрутизатора или на самом устройстве.
2) Идем в Settings -> Internet.
3) Выбираем тип соединения PPTP.
4) Включаем динамический IP.
5) Пишем IP-адрес VPN сервера. Вводим свой логин/пароль VPN аккаунта.
6) Включаем автоматическое подключение.
7) Пишем DNS сервера вашего VPN сервиса.
8) Сохраняете настройки и готово!
PPTP
1) Заходим в настройки роутера. Вы можете получить доступ к настройкам, посетив локальный IP-адрес вашего маршрутизатора из своего веб-браузера. Два наиболее распространенных локальных IP-адреса по умолчанию, которые имеют большинство маршрутизаторов, - 192.168.1.1 или 192.168.0.1 - вы можете получить к ним доступ, открыв в своем браузере https://192.168.1.1 или https://192.168.0.1. IP-адрес, имя пользователя и пароль по умолчанию указаны в руководстве пользователя вашего маршрутизатора или на самом устройстве.
2) Идем в Settings -> Internet.
3) Выбираем тип соединения L2TP.
4) Включаем динамический IP.
5) Пишем IP-адрес VPN сервера. Вводим свой логин/пароль VPN аккаунта.
6) Включаем автоматическое подключение.
7) Пишем DNS сервера вашего VPN сервиса.
8) Сохраняете настройки и готово!
AsusWRT.
OpenVPN
1) Заходим в настройки роутера. Вы можете получить доступ к настройкам, посетив локальный IP-адрес вашего маршрутизатора из своего веб-браузера. Два наиболее распространенных локальных IP-адреса по умолчанию, которые имеют большинство маршрутизаторов, - 192.168.1.1 или 192.168.0.1 - вы можете получить к ним доступ, открыв в своем браузере https://192.168.1.1 или https://192.168.0.1. IP-адрес, имя пользователя и пароль по умолчанию указаны в руководстве пользователя вашего маршрутизатора или на самом устройстве.
2) Переходим во вкладку VPN.
Далее в VPN Client.
Добавляем новый профиль.
3) В открывшемся окне выбираем тип соединения OpenVPN. Далее пишем имя подключения, логин/пароль. Жмем "Browse" и выбираем ранее скаченную конфигурацию сервера ovpn.
Жмем "Upload" и "OK".
4) Переходим во вкладку WAN. Выключаем автоматическое подключение к DNS серверам и вводим DNS серверы вашего VPN сервиса.
5) В разделе VPN Client вы увидите созданное соединение. Теперь просто подключайтесь к нему. Учтите, что вы можете создать только OpenVPN соединение, для того чтобы сделать новое, вам надо удалить или изменить параметры предыдущего.
Если вы видите синею галочку, значит ваше VPN соединение установлено.
6) Чтобы отключить VPN соединение, вернитесь в настройки маршрутизатора, далее в "VPN Client".
7) Готово!
PPTP
1) Заходим в настройки роутера. Вы можете получить доступ к настройкам, посетив локальный IP-адрес вашего маршрутизатора из своего веб-браузера. Два наиболее распространенных локальных IP-адреса по умолчанию, которые имеют большинство маршрутизаторов, - 192.168.1.1 или 192.168.0.1 - вы можете получить к ним доступ, открыв в своем браузере https://192.168.1.1 или https://192.168.0.1. IP-адрес, имя пользователя и пароль по умолчанию указаны в руководстве пользователя вашего маршрутизатора или на самом устройстве.
2) Переходим во вкладку VPN.
Далее в VPN Client.
Добавляем новый профиль.
3) В открывшемся окне выбираем тип соединения PPTP. Далее пишем имя подключения, IP-адрес VPN сервера, логин/пароль. В "PPTP Conection" ставим MPPE 128.
4) В разделе VPN Client вы увидите созданное соединение. Теперь просто подключайтесь к нему. Учтите, что вы можете создать только OpenVPN соединение, для того чтобы сделать новое, вам надо удалить или изменить параметры предыдущего.
Если вы видите синею галочку, значит ваше VPN соединение установлено.
5) Чтобы отключить VPN соединение, вернитесь в настройки маршрутизатора, далее в "VPN Client".
6) Готово!
DD-WRT.
OpenVPN
1) Заходим в настройки роутера. Вы можете получить доступ к настройкам, посетив локальный IP-адрес вашего маршрутизатора из своего веб-браузера. Два наиболее распространенных локальных IP-адреса по умолчанию, которые имеют большинство маршрутизаторов, - 192.168.1.1 или 192.168.0.1 - вы можете получить к ним доступ, открыв в своем браузере https://192.168.1.1 или https://192.168.0.1. IP-адрес, имя пользователя и пароль по умолчанию указаны в руководстве пользователя вашего маршрутизатора или на самом устройстве.
2) Идем в Setup -> Basic Setup.
В разделе Network Address Server Settings (DHCP) пишем DNS серверы вашего VPN сервиса. Также ставим галочку на "Use DNSMasq for DHCP", "Use DNSMasq for DNS", "DHCP-Authoritative".
Кликаем Save и Apply Settings.
3) Далее идем в Setup -> IPv6. Выключаем IPv6, затем жмем на Save и Apply Settings.
4) Следуем в Services -> VPN, в разделе OpenVPN Client пишем следующее:
Start OpenVPN Client = Enable
Server IP/Name = Адрес VPN сервера
Port = 1194
Tunnel Device = TUN
Tunnel Protocol = UDP
Encryption Cipher = AES-256-CBC
Hash Algoritm = SHA-1 (учтите некоторые VPN сервисы стали использовать более новый алгоритм SHA-512, если у вас не работает соединение с SHA-1, поставьте SHA-512).
User Pass Authentication = Enable
Username, Password = логин/пароль
Важно: Если у вас отсутствуют поля "Username" и "Password", заполните оставшиеся поля и перейдите к выполнения пункта 4.1
Advanced Options = Enable (появятся дополнительные настройки)
TLS Cipher = None
LZO Compression = Yes
NAT = Enable
4.1 (Опционально, зависит от шага 4.) Если вас отсутствуют поля "Username" и "Password", идем в Administration -> Commands, и вводим следующий код:
echo "YOURUSERNAME
YOURPASSWORD" > /tmp/openvpncl/user.conf
/usr/bin/killall openvpn
/usr/sbin/openvpn --config /tmp/openvpncl/openvpn.conf --route-up /tmp/openvpncl/route-up.sh --down-pre /tmp/openvpncl/route-down.sh --daemon
Только замените "YOURUSERNAME" и "YOURPASSWORD" на свои логин и пароль соответственно. Кликаем на Save Startup, возвращаемся во вкладку VPN.
5) В окне "Additional Config" прописываем следующие команды:
remote-cert-tls server
remote-random
nobind
tun-mtu 1500
tun-mtu-extra 32
mssfix 1450
persist-key
persist-tun
ping-timer-rem
reneg-sec 0
#log /tmp/vpn.log
#Удалите `#` в линии ниже, если у вас не было полей логин/пароль и вы проследовали по шагу 4.1:
#auth-user-pass /tmp/openvpncl/user.conf
6) Скачайте CA и TLS сертификаты вашего VPN сервера (найти их можно на сайте VPN сервиса).
7) Откройте файл CA.crt вашего VPN сервера в любом текстовом редакторе.
Скопируйте его и вставьте в поле CA Cert. Убедитесь, что вы скопировали весь текст, включая -----BEGIN CERTIFICATE----- и -----END CERTIFICATE-----.
8) Откройте файл TLS.key вашего VPN сервера в любом текстовом редакторе.
Скопируйте его и вставьте в поле TLS Auth Key. Убедитесь, что вы скопировали весь текст, включая -----BEGIN OpenVPN Static key V1----- и -----END OpenVPN Static key V1-----.
9) После того, как вы ввели все данные, кликните на Save и Apply Settings.
10) Чтобы убедиться в работоспособности VPN, перейдите в Status -> OpenVPN. В разделе "State", вы должны увидеть следующее сообщение: "Client: CONNECTED SUCCESS"
11) Чтобы сделать аварийный выключатель, идем в Administration -> Commands, пишем следующее:
WAN_IF=`nvram get wan_iface`
iptables -I FORWARD -i br0 -o $WAN_IF -j REJECT --reject-with icmp-host-prohibited
iptables -I FORWARD -i br0 -p tcp -o $WAN_IF -j REJECT --reject-with tcp-reset
iptables -I FORWARD -i br0 -p udp -o $WAN_IF -j REJECT --reject-with udp-reset
Затем выбираем Save Firewall, и переходим в Administration -> Management -> Reboot router.
12) Готово!
L2TP
1) Заходим в настройки роутера. Вы можете получить доступ к настройкам, посетив локальный IP-адрес вашего маршрутизатора из своего веб-браузера. Два наиболее распространенных локальных IP-адреса по умолчанию, которые имеют большинство маршрутизаторов, - 192.168.1.1 или 192.168.0.1 - вы можете получить к ним доступ, открыв в своем браузере https://192.168.1.1 или https://192.168.0.1. IP-адрес, имя пользователя и пароль по умолчанию указаны в руководстве пользователя вашего маршрутизатора или на самом устройстве.
2) Идем в Setup -> Basic Setup.
3) В разделе "WAN Connection Type" пишем следующее:
Connection Type = L2TP
Gateway (L2TP Server) = IP-адрес VPN сервера
Username/Password = логин/пароль
Use DHCP = Yes
4) В разделе "Optional Settings" в строке "MTU" ставим значения Manual и 1460.
5) В разделе "Network Address Server Settings (DHCP)" пишем DNS серверы вашего VPN сервиса. Также убираем галочки с "Use DNSMasq for DHCP" и "Use DNSMasq for DNS".
6) Жмем на Save и Apply Settings.
7) Готово!
PPTP
1) Заходим в настройки роутера. Вы можете получить доступ к настройкам, посетив локальный IP-адрес вашего маршрутизатора из своего веб-браузера. Два наиболее распространенных локальных IP-адреса по умолчанию, которые имеют большинство маршрутизаторов, - 192.168.1.1 или 192.168.0.1 - вы можете получить к ним доступ, открыв в своем браузере https://192.168.1.1 или https://192.168.0.1. IP-адрес, имя пользователя и пароль по умолчанию указаны в руководстве пользователя вашего маршрутизатора или на самом устройстве.
2) Идем в Setup -> Basic Setup.
3) В разделе "WAN Connection Type" пишем следующее:
Connection Type = PPTP
Gateway (PPTP Server) = IP-адрес VPN сервера
Username/Password = логин/пароль
Use DHCP = Yes
4) В разделе "Optional Settings" в строке "MTU" ставим значения Manual и 1460.
5) В разделе "Network Address Server Settings (DHCP)" пишем DNS серверы вашего VPN сервиса. Также убираем галочки с "Use DNSMasq for DHCP" и "Use DNSMasq for DNS".
6) Жмем на Save и Apply Settings.
7) Готово!
(С)Lesley