


- Joined
- Dec 12, 2017
- Messages
- 422
- Reaction score
- 451
- Points
- 193
A Wi-Fi jammer, or Wi-Fi jammer, is a gadget that is designed to disconnect wireless devices from a hotspot. Why is this needed? You can imagine both a friendly rally (a neighbor, of course, will be delighted when you rip off his porn video or, for example, a football match in the most interesting place), as well as a criminal application: an attacker can disconnect security cameras or other important equipment from the network. In this article, we will analyze what inexpensive options for hardware deauthenticators are, how to use them, and how to protect yourself from such attacks.
How does the "jammer"
Unlike real jammers, which interrupt the signal of the radio transmitter with their stronger signal, the de-authenticator works at the software level. It implements a denial of service attack by sending a deauthentication frame to the router on behalf of devices connected to the network. Since this frame is not encrypted in any way, it is enough for the jammer to output the MAC addresses of devices, after traffic on the network.
Typically, deauthentication is part of a comprehensive network attack. It is used to create an “evil double” access point or to intercept the handshake, which then allows you to decrypt the password. However, a jammer may be useful on its own.

WARNING
All of the tips reviewed are strongly recommended for educational purposes only. Blocking the transfer of data and the use of the considered means may be prosecuted. Penetration tests require the appropriate written confirmation from the customer. Remember that deauthorization data is stored in the logs of the router.
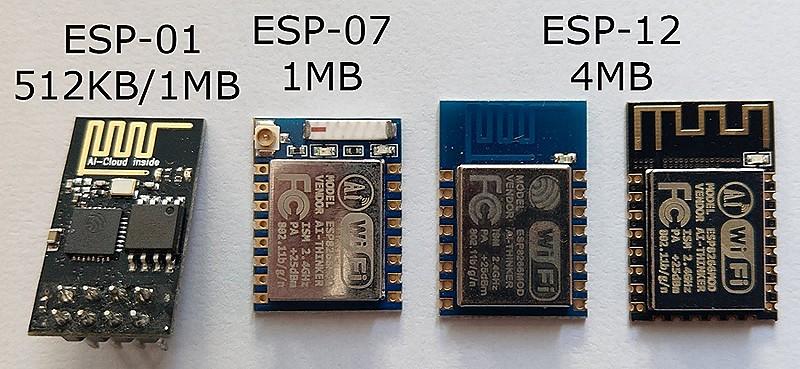
Recently, inexpensive and miniature boards with support for the NodeMCU software platform have gained great popularity. They are built on the ESP8266 module, which implements Wi-Fi operation according to the 802.11 b / g / n standard at a frequency of 2.4 GHz. Now there are two options for such boards: with the CP2102 chip of the American company Silicon Labs or with the Chinese CH340.
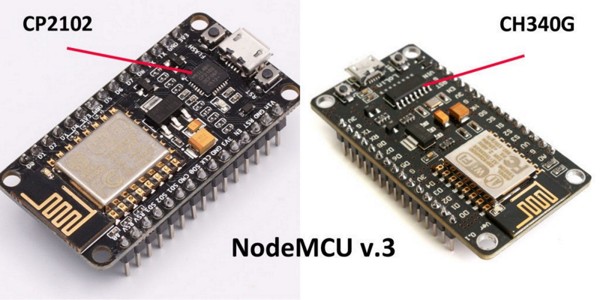 NodeMCU Versions
These boards are positioned as devices for prototyping: on their basis, craftsmen create automated systems controlled via Wi-Fi. The topic itself is quite exciting, but we are now interested in something else - the possibility of using NodeMCU to conduct attacks.
For full monitoring and injection of packages, the ESP8266 is unsuitable due to technical limitations, but it can be used as a deauthenticator - which led to the appearance of the corresponding firmware. Last year, a good person with the pseudonym Spacehuhn released the first one, but other versions have appeared since then with additional features. However, before moving on to software, we decide on the choice of iron.

INFO
If you choose more serious equipment for wardriving - with a monitoring mode and, perhaps, even the ability to carry out MiTM attacks on the network - then check out our last year FAQ on choosing tools for working with wireless networks .
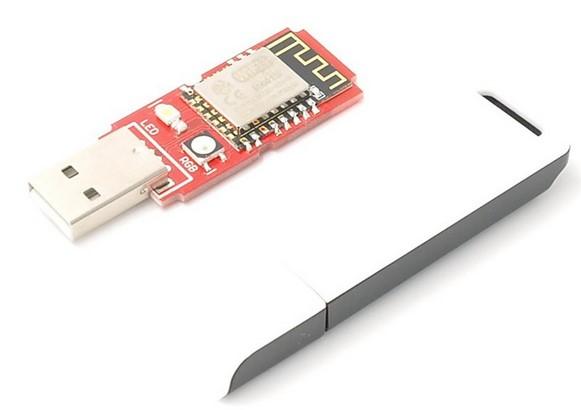
I will demonstrate the process using the example of a Chinese manufacturer Dstike board: it has ESP8266 on it and there are operating modes as client (P2P) and access points (soft-AP). You can control the board from a smartphone or any other device with Wi-Fi.
I note that the performance of the software does not depend on the chip or on the board - you can choose any option at your discretion. Dstike products alone have several options in different designs and for use in different situations. All of them are united by one thing - the ability to jam the network.
Varieties of Dstike Devices
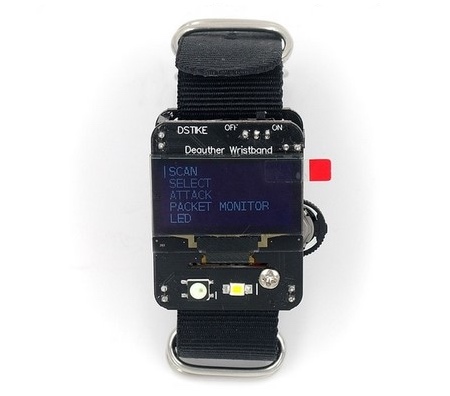
Deauther Wristband - bracelet with built-in display, battery and switch. Convenient device for quick access to the control panel.
 Portable jammer
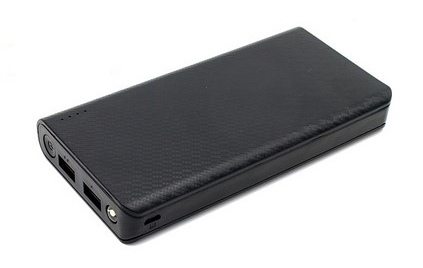
Deauther Power Bank - with a modified charge controller; management is carried out through a special panel. The controller has a connector for connecting an external antenna. Batteries are not included. This is an inconspicuous device that can be easily left somewhere and used remotely.
 Power bank
  Charge controller
Deauther OLED V3.5 - in this version you will additionally get a connector for connecting an external antenna and a battery holder for 18650 mAh. The device is controlled by buttons and a switch, and the output is sent to the screen, which allows you to use this option without additional equipment.
 Ready jammer with screen
The main advantage of these gadgets is the ability to select a specific network or all at once within the range of the device. I note just in case that a Wi-Fi password is not required to conduct attacks!
Install Deauther 2.0
Let's start with Deauther 2.0 - the very firmware that Spacehuhn developed. In his GitHub repository, you can select version for a specific board.
Files with the bin extension are compiled sketches. They need to be installed on the board through a special bootloader. But if you want, then in the archives with the source code you will find libraries and sketches that can be delivered through the Arduino IDE.
Download .bin
If you chose the option to download the binary, then first start the NodeMCU Flasher program. You can download it in the NodeMCU repository .
Install drivers for CP2102 either for CH340 . After that, connect the board to the computer, open the NodeMCU Flasher program, select the COM port in the device manager in the “Ports (COM and LPT)” section. Now go to the Config tab, click on the gear and select the downloaded .bin file.
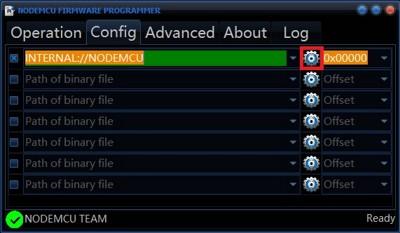 Program for firmware
After adding a file, its path will appear in the line on the left. Go to the Operation tab and click on Flash - the firmware will then be downloaded to the board.
Download via Arduino IDE
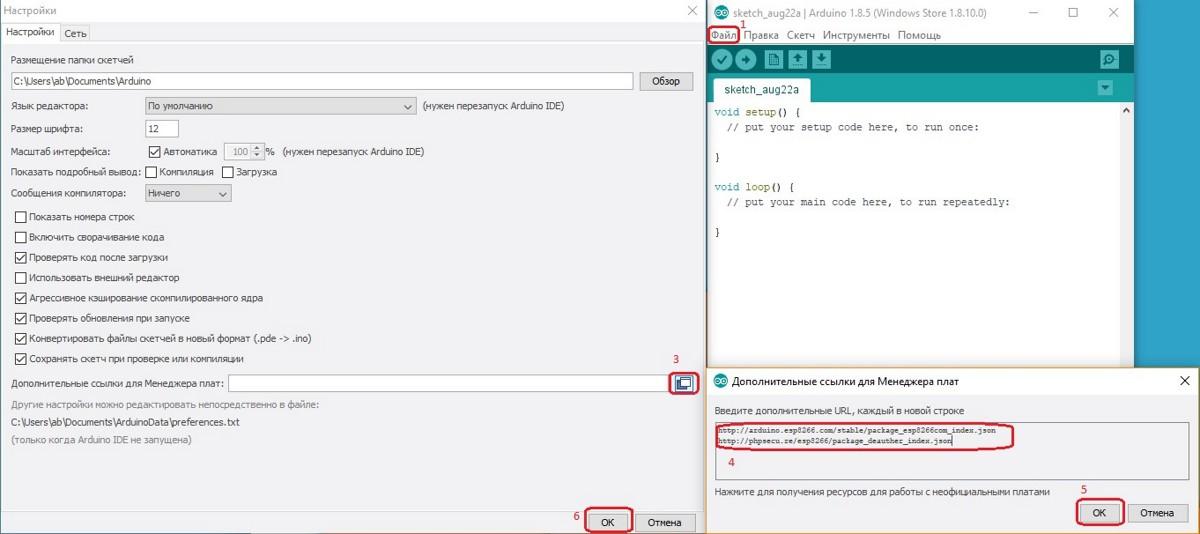
If you prefer to install through Arduino IDE , then the process is slightly different. First of all, just download the drivers ( CP2102 , CH340 ) Then we open the Arduino IDE and look for “Settings” in the “File” menu, click on “Add a link for the board manager” and insert two links:
 Adding links
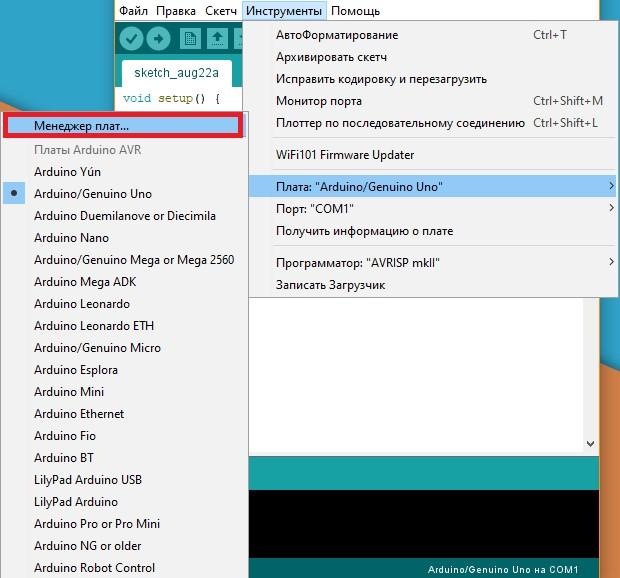
Open the “Tools” tab and select the “Board Manager” item from the “Board: ...” menu.
 Adding Boards
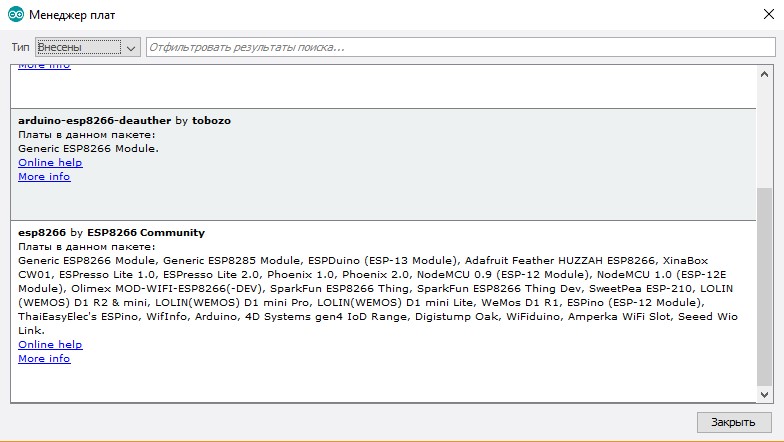
Select "Contributed" and install arduino-esp-8266-deauther and esp8266.
 Package Installation
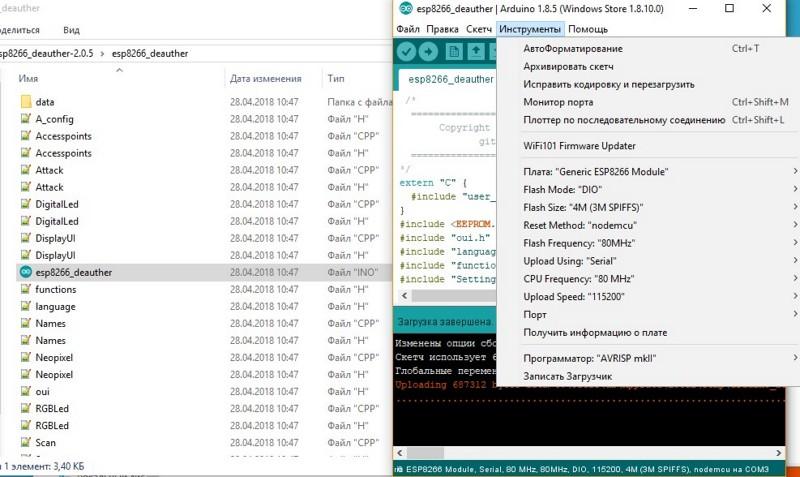
Open the folder with the sketch and libraries, go to the "Tools". The settings should be as in my screenshot.
In the “Fee” line, select the ESP8266 Deauther Modules from the list.
 Firmware Download
In the line Flash size, select your module. Set the firmware and memory size as in the picture below.
 Module Versions
Next, download the firmware.
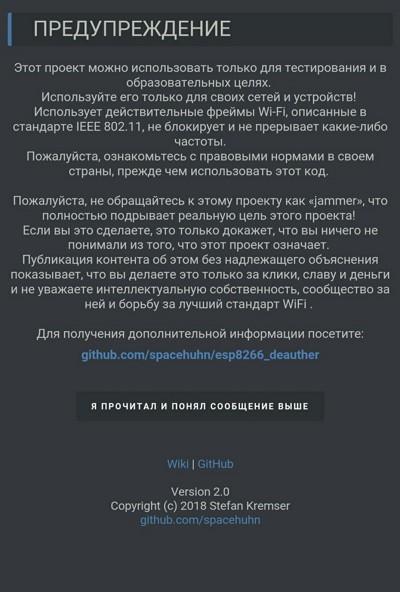
After switching on, the board will create an access point. Connect to it and go to the address 192.168.4.1 or deauth.me. You will be taken to the configurator and you will see a warning.
 Warning
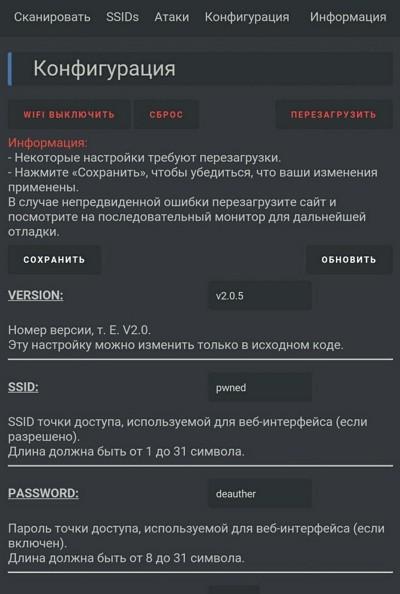
In the configuration section, on the LANG line, specify ru to enable the Russian language in the web interface. For the settings to take effect, you need to click on "Save" and reboot the device. Now it is ready for work, you can begin to spoil the life of neighbors.
Features and Settings Overview
Let's quickly go through the application and see what our scarf is now capable of.
 Settings
If you connect the jammer via the serial port, then using the commands you can control the jammer. This function can be disabled in the settings, if you remove the SERIAL checkmark.
Serial Port Control Commands
600 seconds after the start of attacks, they will automatically stop. If you do not want this to happen, you can manually set the timeout by setting the value in the ATTACKTIMEOUT menu: specify 0, and the attacks will stop automatically shutting down.
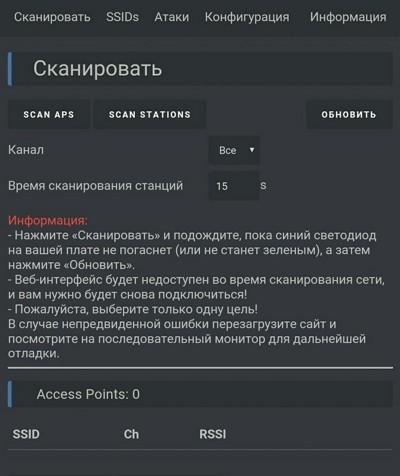
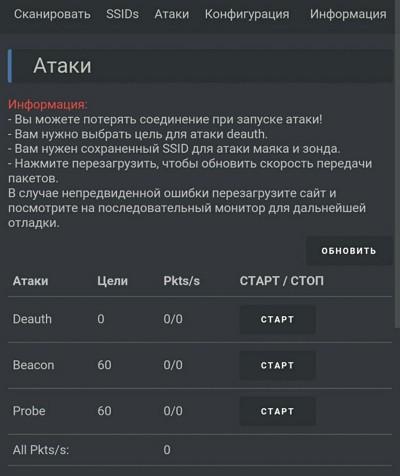
If you click Scan APs in the scan section, the jammer finds all Wi-Fi access points. You select one or several networks, and you can go to the attacks section. Deauth mode disconnects all devices from the selected network. Beacon mode allows you to create up to 60 access points simultaneously.
</b>
 <b>
<b>
Scanning and types of attacks
In the SSIDs section, access points are created for Beacon attacks.
</b> <b>Create Access Points
The firmware provides the ability to connect a display - for the version of the device with it. But if you wish, you can solder the screen and buttons to the board yourself, as well as provide autonomous power to turn it into an independent device.
Also, the developers of the firmware, in addition to the jammer itself, also sell a device that allows it to be detected.
</b> <b>Detector
Authors periodically update the firmware and add new features, so stay tuned!
</b> <b>Wi-PWN</b> <b>
Consider a similar firmware</b> <b>Wi-PWN</b> <b>developed by</b> <b>Sam Denti</b> <b>(samdenty99). He improved the creation of Spacehuhn and added the features of a deauthentication detector, and also created a companion Android app. As a result, using Wi-PWN is more convenient than Deauther 2.0.
After downloading and unpacking the archive, you will need to flash the board and install the application on the phone. In the folder you will find the program ESP8266Flasher. Launch it, select the COM port and, in the Config section, firmware (it is located along the path * \ Wi-PWN-master \ arduino \ Wi-PWN). Now click Flash in the Operation tab.
From the phone we connect to the board via Wi-Fi.
</b> <b>Wifi network
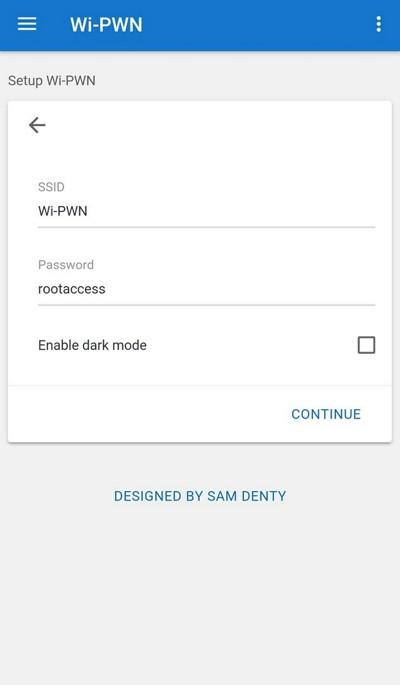
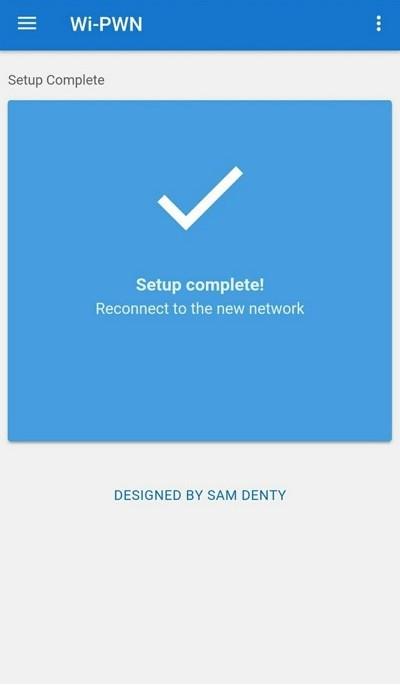
We open the downloaded application, agree with the rules, specify the network name and password. After setting up, we connect to the new Wi-Fi.
</b>
 <b>
<b>
Configure access point and complete installation
There are several tabs with speaking names in the application:
</b>
</b>
 <b>
<b>
</b> <b>WARNING</b> <b>
For stable operation of the device, I recommend attaching a radiator to the heating part of the device. Otherwise, the jammer may overheat and turn off.
</b> <b>A few words about protection</b> <b>
NodeMCU is a cheap, versatile, powerful and compact de-authentication solution. You can repeat the entire project quickly and effortlessly. And since anyone can do this, it’s nice to think about protection.
Most popular routers use IEEE 802.11b / g / n standards, which are prone to jamming. If you want to eliminate this possibility, then look for a router that supports 802.11w, which fully protects users from this attack.
Some routers have spam protection, but it only works with devices connected to the network, and the Wi-Fi jammer does not connect to the network. If your router has anti-spam protection, which works with unconnected devices, I advise you to activate it!
***
Source:</b> <b>How the Jammer Works - JustPaste.it</b>
How does the "jammer"
Unlike real jammers, which interrupt the signal of the radio transmitter with their stronger signal, the de-authenticator works at the software level. It implements a denial of service attack by sending a deauthentication frame to the router on behalf of devices connected to the network. Since this frame is not encrypted in any way, it is enough for the jammer to output the MAC addresses of devices, after traffic on the network.
Typically, deauthentication is part of a comprehensive network attack. It is used to create an “evil double” access point or to intercept the handshake, which then allows you to decrypt the password. However, a jammer may be useful on its own.
WARNING
All of the tips reviewed are strongly recommended for educational purposes only. Blocking the transfer of data and the use of the considered means may be prosecuted. Penetration tests require the appropriate written confirmation from the customer. Remember that deauthorization data is stored in the logs of the router.
Recently, inexpensive and miniature boards with support for the NodeMCU software platform have gained great popularity. They are built on the ESP8266 module, which implements Wi-Fi operation according to the 802.11 b / g / n standard at a frequency of 2.4 GHz. Now there are two options for such boards: with the CP2102 chip of the American company Silicon Labs or with the Chinese CH340.
These boards are positioned as devices for prototyping: on their basis, craftsmen create automated systems controlled via Wi-Fi. The topic itself is quite exciting, but we are now interested in something else - the possibility of using NodeMCU to conduct attacks.
For full monitoring and injection of packages, the ESP8266 is unsuitable due to technical limitations, but it can be used as a deauthenticator - which led to the appearance of the corresponding firmware. Last year, a good person with the pseudonym Spacehuhn released the first one, but other versions have appeared since then with additional features. However, before moving on to software, we decide on the choice of iron.
INFO
If you choose more serious equipment for wardriving - with a monitoring mode and, perhaps, even the ability to carry out MiTM attacks on the network - then check out our last year FAQ on choosing tools for working with wireless networks .
I will demonstrate the process using the example of a Chinese manufacturer Dstike board: it has ESP8266 on it and there are operating modes as client (P2P) and access points (soft-AP). You can control the board from a smartphone or any other device with Wi-Fi.
I note that the performance of the software does not depend on the chip or on the board - you can choose any option at your discretion. Dstike products alone have several options in different designs and for use in different situations. All of them are united by one thing - the ability to jam the network.
Varieties of Dstike Devices
Deauther Wristband - bracelet with built-in display, battery and switch. Convenient device for quick access to the control panel.
Deauther Power Bank - with a modified charge controller; management is carried out through a special panel. The controller has a connector for connecting an external antenna. Batteries are not included. This is an inconspicuous device that can be easily left somewhere and used remotely.
Charge controller Deauther OLED V3.5 - in this version you will additionally get a connector for connecting an external antenna and a battery holder for 18650 mAh. The device is controlled by buttons and a switch, and the output is sent to the screen, which allows you to use this option without additional equipment.
Ready jammer with screen The main advantage of these gadgets is the ability to select a specific network or all at once within the range of the device. I note just in case that a Wi-Fi password is not required to conduct attacks!
Install Deauther 2.0
Let's start with Deauther 2.0 - the very firmware that Spacehuhn developed. In his GitHub repository, you can select version for a specific board.
Files with the bin extension are compiled sketches. They need to be installed on the board through a special bootloader. But if you want, then in the archives with the source code you will find libraries and sketches that can be delivered through the Arduino IDE.
Download .bin
If you chose the option to download the binary, then first start the NodeMCU Flasher program. You can download it in the NodeMCU repository .
Install drivers for CP2102 either for CH340 . After that, connect the board to the computer, open the NodeMCU Flasher program, select the COM port in the device manager in the “Ports (COM and LPT)” section. Now go to the Config tab, click on the gear and select the downloaded .bin file.
Program for firmware After adding a file, its path will appear in the line on the left. Go to the Operation tab and click on Flash - the firmware will then be downloaded to the board.
Download via Arduino IDE
If you prefer to install through Arduino IDE , then the process is slightly different. First of all, just download the drivers ( CP2102 , CH340 ) Then we open the Arduino IDE and look for “Settings” in the “File” menu, click on “Add a link for the board manager” and insert two links:
- https://arduino.esp8266.com/stable/package_esp8266com_index.json
- https://phpsecu.re/esp8266/package_deauther_index.json
Adding links Open the “Tools” tab and select the “Board Manager” item from the “Board: ...” menu.
Adding Boards Select "Contributed" and install arduino-esp-8266-deauther and esp8266.
Open the folder with the sketch and libraries, go to the "Tools". The settings should be as in my screenshot.
In the “Fee” line, select the ESP8266 Deauther Modules from the list.
Firmware Download In the line Flash size, select your module. Set the firmware and memory size as in the picture below.
Module Versions Next, download the firmware.
After switching on, the board will create an access point. Connect to it and go to the address 192.168.4.1 or deauth.me. You will be taken to the configurator and you will see a warning.
Warning In the configuration section, on the LANG line, specify ru to enable the Russian language in the web interface. For the settings to take effect, you need to click on "Save" and reboot the device. Now it is ready for work, you can begin to spoil the life of neighbors.
Features and Settings Overview
Let's quickly go through the application and see what our scarf is now capable of.
Settings If you connect the jammer via the serial port, then using the commands you can control the jammer. This function can be disabled in the settings, if you remove the SERIAL checkmark.
Serial Port Control Commands
- scan [ <all/aps/stations> ] [-t <time> ] [-c <continue-time> ] [-ch <channel> ]
- show [selected] [ <all/aps/stations/names/ssids> ]
- select [ <all/aps/stations/names> ] [ <id> ]
- deselect [ <all/aps/stations/names> ] [ <id> ]
- add ssid <ssid> [-wpa2] [-cl <clones> ]
- add ssid -ap <id> [-cl <clones> ] [-f]
- add ssid -s [-f]
- add name <name> [-ap <id> ] [-s]
- add name <name> [-st <id> ] [-s]
- add name <name> [-m <mac> ] [-ch <channel> ] [-b <bssid> ] [-s]
- set name <id><newname>
- enable random <interval>
- disable random
- load [ <all/ssids/names/settings> ] [ <file> ]
- save [ <all/ssids/names/settings> ] [ <file> ]
- remove <ap/station/name/ssid><id>
- remove <ap/station/names/ssids> [all]
- attack [beacon] [deauth] [deauthall] [probe] [nooutput] [-t <timeout> ]
- attack status [ <on/off> ]
- stop <all/scan/attack>
- sysinfo
- clear
- format
- print <file> [ <lines> ]
- delete <file> [ <lineFrom> ] [ <lineTo> ]
- replace <file><line><new-content>
- copy <file><newfile>
- rename <file><newfile>
- run <file>
- write <file><commands>
- get <setting>
- set <setting><value>
- reset
- chicken
- reboot
- info
- // <comments>
- send deauth <apMac><stMac><rason><channel>
- send beacon <mac><ssid><ch> [wpa2]
- send probe <mac><ssid><ch>
- led <r><g> <b>[</b> <brightness> <b>]
</b> - <b>led <#rrggbb> [</b> <brightness> <b>]
</b> - <b>led</b> <enable/disable> <b>
</b> - <b>draw
</b> - <b>screen</b> <on/off> <b>
</b> - <b>screen mode</b> <menu/packetmonitor/buttontest/loading> <b>
</b>
600 seconds after the start of attacks, they will automatically stop. If you do not want this to happen, you can manually set the timeout by setting the value in the ATTACKTIMEOUT menu: specify 0, and the attacks will stop automatically shutting down.
If you click Scan APs in the scan section, the jammer finds all Wi-Fi access points. You select one or several networks, and you can go to the attacks section. Deauth mode disconnects all devices from the selected network. Beacon mode allows you to create up to 60 access points simultaneously.
</b>
 <b>
<b>Scanning and types of attacks
In the SSIDs section, access points are created for Beacon attacks.
</b>
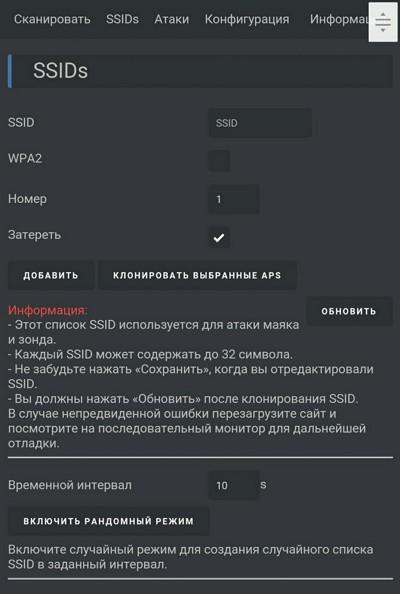 <b>Create Access Points
 The firmware provides the ability to connect a display - for the version of the device with it. But if you wish, you can solder the screen and buttons to the board yourself, as well as provide autonomous power to turn it into an independent device.
Also, the developers of the firmware, in addition to the jammer itself, also sell a device that allows it to be detected.
</b>
 <b>Detector
 Authors periodically update the firmware and add new features, so stay tuned!
</b> <b>Wi-PWN</b> <b>
Consider a similar firmware</b> <b>Wi-PWN</b> <b>developed by</b> <b>Sam Denti</b> <b>(samdenty99). He improved the creation of Spacehuhn and added the features of a deauthentication detector, and also created a companion Android app. As a result, using Wi-PWN is more convenient than Deauther 2.0.
After downloading and unpacking the archive, you will need to flash the board and install the application on the phone. In the folder you will find the program ESP8266Flasher. Launch it, select the COM port and, in the Config section, firmware (it is located along the path * \ Wi-PWN-master \ arduino \ Wi-PWN). Now click Flash in the Operation tab.
From the phone we connect to the board via Wi-Fi.
</b>
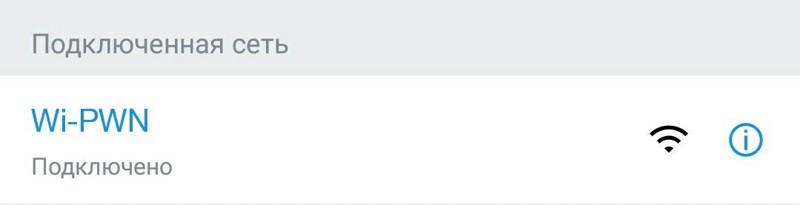 <b>Wifi network
 We open the downloaded application, agree with the rules, specify the network name and password. After setting up, we connect to the new Wi-Fi.
</b>
 <b>
<b>Configure access point and complete installation
There are several tabs with speaking names in the application:
</b>
- <b>
</b> - <b>Scan - section with search and selection of several access points;
</b> - <b>Users - the function of scanning a specific Wi-Fi for connections and creating your own "users";
</b> - <b>Attack - attacks are similar to the version of Spacehuhn, but when cloning networks, the maximum number of users is 48 instead of 60 (this was the same in earlier versions of Deauther);
</b> - <b>Detector - a function that allows you to scan channels and identify jammers;
</b> - <b>Settings - settings of the Wi-Fi server (name, network password). Here you can turn on the Wi-Fi client and configure the scan and attack settings.
</b>
</b>
</b> <b>WARNING</b> <b>
For stable operation of the device, I recommend attaching a radiator to the heating part of the device. Otherwise, the jammer may overheat and turn off.
</b> <b>A few words about protection</b> <b>
NodeMCU is a cheap, versatile, powerful and compact de-authentication solution. You can repeat the entire project quickly and effortlessly. And since anyone can do this, it’s nice to think about protection.
Most popular routers use IEEE 802.11b / g / n standards, which are prone to jamming. If you want to eliminate this possibility, then look for a router that supports 802.11w, which fully protects users from this attack.
Some routers have spam protection, but it only works with devices connected to the network, and the Wi-Fi jammer does not connect to the network. If your router has anti-spam protection, which works with unconnected devices, I advise you to activate it!
***
Source:</b> <b>How the Jammer Works - JustPaste.it</b>
 Original message
Wi-Fi jammer, или глушилка Wi-Fi, — это гаджет, который предназначен для отключения беспроводных устройств от хотспота. Зачем это нужно? Можешь вообразить себе как дружеский розыгрыш (сосед, конечно, обрадуется, когда ты оборвешь его порноролик или, например, футбольный матч на самом интересном месте), так и криминальное применение: злоумышленник может отключить от сети камеры слежения или другое важное оборудование. В этой статье мы разберем, какие есть недорогие варианты аппаратных деаутентификаторов, как ими пользоваться и как защититься от подобных атак.
Как работает «глушилка»
В отличие от настоящих глушилок, которые перебивают сигнал радиопередатчика своим более сильным сигналом, деаутентификатор работает на программном уровне. Он реализует атаку типа «отказ в обслуживании», отправляя на роутер фрейм деаутентификации от имени подключенных к сети устройств. Поскольку этот фрейм никак не шифруется, глушилке достаточно выведать MAC-адреса устройств, поснифав трафик в сети.
Обычно деаутентификация — это часть комплексной атаки на сеть. Она используется при создании «злого двойника» точки доступа либо для перехвата хендшейка, что затем позволяет расшифровать пароль. Однако глушилка может быть полезной и сама по себе.
WARNING
Все рассмотренные советы настоятельно рекомендуется использовать только в образовательных целях. Блокировка передачи данных и использование рассмотренных средств может преследоваться по закону. Для проведения тестов на проникновение требуется получить соответствующее письменное подтверждение заказчика. Помни, что данные о деавторизации сохраняются в логах роутера.
В последнее время большую популярность приобрели недорогие и миниатюрные платы с поддержкой программной платформы NodeMCU. Они построены на модуле ESP8266, который реализует работу с Wi-Fi по стандарту 802.11 b/g/n на частоте 2,4 ГГц. Сейчас встречается два варианта подобных плат: с чипом CP2102 американской компании Silicon Labs или с китайским CH340.
Версии NodeMCU
Эти платы позиционируются как устройства для прототипирования: на их основе умельцы создают автоматизированные системы, управляемые по Wi-Fi. Тема сама по себе довольно захватывающая, но нас сейчас интересует другое — возможность использования NodeMCU для проведения атак.
Для полноценного мониторинга и инъекции пакетов ESP8266 непригоден в силу технических ограничений, однако его можно использовать в качестве деаутентификатора — что и привело к появлению соответствующих прошивок. В прошлом году хороший человек с псевдонимом Spacehuhn зарелизил первую из них, но с тех пор появились и другие версии — с дополнительными возможностями. Впрочем, прежде чем переходить к софту, определимся с выбором железа.
INFO
Если ты выбираешь более серьезное оборудование для вардрайвинга — с режимом мониторинга и, может быть, даже возможностью проводить MiTM-атаки в сети, — то ознакомься с нашим прошлогодним FAQ по выбору инструментария для работы с беспроводными сетями.
Я буду демонстрировать процесс на примере платы китайского производителя Dstike: на ней стоит ESP8266 и есть режимы работы в качества клиента (P2P) и точки доступа (soft-AP). Управлять платой можно со смартфона или любого другого устройства с Wi-Fi.
Отмечу, что работоспособность программного обеспечения не зависит ни от чипа, ни от платы — ты можешь выбрать любой вариант по своему усмотрению. Одних только продуктов Dstike несколько вариантов в разном исполнении и для использования в разных ситуациях. Все их объединяет одно — возможность глушить сети.
Разновидности устройств Dstike
Deauther Wristband — браслет со встроенным дисплеем, батареей и переключателем. Удобное устройство для быстрого доступа к панели управления.
Портативный Jammer
Deauther Power Bank — с модифицированным контроллером заряда; управление осуществляется через специальную панель. На контроллере есть разъем для подключения внешней антенны. Аккумуляторы в комплект не входят. Это незаметное устройство, которое можно с легкостью оставить где-нибудь и использовать удаленно.
Power bank Контроллер заряда
Deauther OLED V3.5 — в этом варианте ты дополнительно получишь разъем для подключения внешней антенны и держатель для аккумулятора на 18650 мА · ч. Управляется устройство при помощи кнопок и переключателя, а вывод поступает на экран, что позволяет использовать этот вариант без дополнительного оборудования.
Готовый jammer с экраном
Главное преимущество этих гаджетов — в возможности выбора определенной сети или всех сразу в радиусе действия устройства. Отмечу на всякий случай, что для проведения атак пароль от Wi-Fi не потребуется!
Установка Deauther 2.0
Начнем с Deauther 2.0 — той самой прошивки, которую разработал Spacehuhn. В его репозитории на GitHub ты можешь выбрать версию для конкретной платы.
Файлы с расширением bin — это скомпилированные скетчи. Их нужно устанавливать на плату через специальный загрузчик. Но если захочешь, то в архивах с исходным кодом ты отыщешь библиотеки и скетчи, которые можно поставить через Arduino IDE.
Загрузка .bin
Если ты выбрал вариант с загрузкой бинарника, то для начала запускай программу NodeMCU Flasher. Скачать ее можно в репозитории NodeMCU.
Устанавливаем драйверы для CP2102 либо для CH340. После этого подключаем плату к компьютеру, открываем программу NodeMCU Flasher, выбираем порт COM в диспетчере устройств в разделе «Порты (COM и LPT)». Теперь переходим во вкладку Config, жмем на шестеренку и выбираем скачанный файл .bin.
Программа для прошивки
После добавления файла в строке слева появится его путь. Переходи во вкладку Operation и нажимай на Flash — прошивка после этого будет загружена в плату.
Загрузка через Arduino IDE
Если тебе удобнее устанавливать через Arduino IDE, то процесс слегка другой. Первым делом точно так же качаем драйверы (CP2102, CH340). Затем открываем Arduino IDE и в меню «Файл» ищем «Настройки», нажимаем на «Добавление ссылки для менеджера плат» и вставляем две ссылки:
Добавление ссылок
Открываем вкладку «Инструменты» и выбираем пункт «Менеджер плат» из меню «Плата: …».
Добавление плат
Выбираем «Внесены» и устанавливаем arduino-esp-8266-deauther и esp8266.
Установка пакетов
Открываем папку со скетчем и библиотеками, переходим в «Инструменты». Настройки должны стоять как у меня на скриншоте.
В строке «Плата» выбирай из списка ESP8266 Deauther Modules.
Загрузка прошивки
В строке Flash size выбираем свой модуль. Прошивку и объем памяти ставь как на картинке ниже.
Версии модулей
Далее загружаем прошивку.
После включения плата создаст точку доступа. Подключайся к ней и заходи по адресу 192.168.4.1 или deauth.me. Ты попадешь в конфигуратор и увидишь предупреждение.
Предупреждение
В разделе конфигурации в строке LANG указываем ru для включения русского языка в веб-интерфейсе. Чтобы настройки вступили в силу, нужно нажать на «Сохранить» и перезагрузить устройство. Теперь оно готово к работе, можно начинать портить жизнь соседям.
Обзор возможностей и настройки
Давай быстро пройдемся по приложению и посмотрим, на что теперь способна наша платка.
Настройки
Если подключить глушилку по последовательному порту, то с помощью команд можно управлять джеммером. Эту функцию можно отключить в настройках, если убрать галочку SERIAL.
Команды для управления по последовательному порту
Если в разделе сканирования нажать Scan APs, то глушилка находит все точки доступа Wi-Fi. Выбираешь одну или несколько сетей, и можно переходить в раздел атак. Режим Deauthотключает все устройства от выбранной сети. Режим Beacon позволяет создавать одновременно до 60 точек доступа.
Сканирование и виды атак
В разделе SSIDs создаются точки доступа для атаки Beacon.
Создание точек доступа
В прошивке предусмотрена возможность подключения дисплея — для версии устройства с ним. Но при желании ты можешь и сам припаять к плате экран и кнопки, а также обеспечить автономное питание, чтобы превратить ее в независимое устройство.
Также разработчики прошивки, помимо самого джеммера, продают и устройство, которое позволяет его обнаруживать.
Детектор
Авторы периодически обновляют прошивку и добавляют новые функции, так что следи за апдейтами!
Wi-PWN
Рассмотрим аналогичную прошивку Wi-PWN, которую разработал Сэм Денти (samdenty99). Он улучшил творение Spacehuhn и добавил функции детектора деаутентификации, а также создал сопутствующее приложение для Android. В итоге использовать Wi-PWN удобнее, чем Deauther 2.0.
После скачивания и распаковки архива потребуется прошить плату и установить приложение на телефон. В папке ты найдешь программу ESP8266Flasher. Запусти ее, выбирай COM-порт и в разделе Config — прошивку (она находится по пути *\Wi-PWN-master\arduino\Wi-PWN). Теперь жми Flash во вкладке Operation.
С телефона подключаемся к плате по Wi-Fi.
Сеть Wi-Fi
Открываем скачанное приложение, соглашаемся с правилами, указываем имя и пароль сети. После настройки подключаемся к новому Wi-Fi.
Настройка точки доступа и завершение установки
В приложении есть несколько вкладок с говорящими названиями:
WARNING
Для стабильной работы устройства рекомендую прикрепить радиатор к греющейся части устройства. В противном случае джеммер может перегреться и выключиться.
Пара слов о защите
NodeMCU — это дешевое, универсальное, мощное и компактное решение для деаутентификации. Повторить весь проект можно быстро и без особых усилий. А раз это может сделать кто угодно, то неплохо подумать и о защите.
Большинство популярных роутеров используют стандарты IEEE 802.11b/g/n, которые подвержены глушению. Если хочешь исключить такую вероятность, то ищи роутер с поддержкой стандарта 802.11w, который полностью защищает пользователей от этой атаки.
В некоторых роутерах есть защита от спама, но она работает только с подключенными к сети устройствами, а Wi-Fi jammer к сети не подключается. Если у твоего роутера есть защита от спама, которая работает и с неподключенными устройствами, то советую ее активировать!
***
Источник: Как работает «глушилка» - JustPaste.it
Как работает «глушилка»
В отличие от настоящих глушилок, которые перебивают сигнал радиопередатчика своим более сильным сигналом, деаутентификатор работает на программном уровне. Он реализует атаку типа «отказ в обслуживании», отправляя на роутер фрейм деаутентификации от имени подключенных к сети устройств. Поскольку этот фрейм никак не шифруется, глушилке достаточно выведать MAC-адреса устройств, поснифав трафик в сети.
Обычно деаутентификация — это часть комплексной атаки на сеть. Она используется при создании «злого двойника» точки доступа либо для перехвата хендшейка, что затем позволяет расшифровать пароль. Однако глушилка может быть полезной и сама по себе.
WARNING
Все рассмотренные советы настоятельно рекомендуется использовать только в образовательных целях. Блокировка передачи данных и использование рассмотренных средств может преследоваться по закону. Для проведения тестов на проникновение требуется получить соответствующее письменное подтверждение заказчика. Помни, что данные о деавторизации сохраняются в логах роутера.
В последнее время большую популярность приобрели недорогие и миниатюрные платы с поддержкой программной платформы NodeMCU. Они построены на модуле ESP8266, который реализует работу с Wi-Fi по стандарту 802.11 b/g/n на частоте 2,4 ГГц. Сейчас встречается два варианта подобных плат: с чипом CP2102 американской компании Silicon Labs или с китайским CH340.
Эти платы позиционируются как устройства для прототипирования: на их основе умельцы создают автоматизированные системы, управляемые по Wi-Fi. Тема сама по себе довольно захватывающая, но нас сейчас интересует другое — возможность использования NodeMCU для проведения атак.
Для полноценного мониторинга и инъекции пакетов ESP8266 непригоден в силу технических ограничений, однако его можно использовать в качестве деаутентификатора — что и привело к появлению соответствующих прошивок. В прошлом году хороший человек с псевдонимом Spacehuhn зарелизил первую из них, но с тех пор появились и другие версии — с дополнительными возможностями. Впрочем, прежде чем переходить к софту, определимся с выбором железа.
INFO
Если ты выбираешь более серьезное оборудование для вардрайвинга — с режимом мониторинга и, может быть, даже возможностью проводить MiTM-атаки в сети, — то ознакомься с нашим прошлогодним FAQ по выбору инструментария для работы с беспроводными сетями.
Я буду демонстрировать процесс на примере платы китайского производителя Dstike: на ней стоит ESP8266 и есть режимы работы в качества клиента (P2P) и точки доступа (soft-AP). Управлять платой можно со смартфона или любого другого устройства с Wi-Fi.
Отмечу, что работоспособность программного обеспечения не зависит ни от чипа, ни от платы — ты можешь выбрать любой вариант по своему усмотрению. Одних только продуктов Dstike несколько вариантов в разном исполнении и для использования в разных ситуациях. Все их объединяет одно — возможность глушить сети.
Разновидности устройств Dstike
Deauther Wristband — браслет со встроенным дисплеем, батареей и переключателем. Удобное устройство для быстрого доступа к панели управления.
Deauther Power Bank — с модифицированным контроллером заряда; управление осуществляется через специальную панель. На контроллере есть разъем для подключения внешней антенны. Аккумуляторы в комплект не входят. Это незаметное устройство, которое можно с легкостью оставить где-нибудь и использовать удаленно.
Контроллер зарядаDeauther OLED V3.5 — в этом варианте ты дополнительно получишь разъем для подключения внешней антенны и держатель для аккумулятора на 18650 мА · ч. Управляется устройство при помощи кнопок и переключателя, а вывод поступает на экран, что позволяет использовать этот вариант без дополнительного оборудования.
Готовый jammer с экраномГлавное преимущество этих гаджетов — в возможности выбора определенной сети или всех сразу в радиусе действия устройства. Отмечу на всякий случай, что для проведения атак пароль от Wi-Fi не потребуется!
Установка Deauther 2.0
Начнем с Deauther 2.0 — той самой прошивки, которую разработал Spacehuhn. В его репозитории на GitHub ты можешь выбрать версию для конкретной платы.
Файлы с расширением bin — это скомпилированные скетчи. Их нужно устанавливать на плату через специальный загрузчик. Но если захочешь, то в архивах с исходным кодом ты отыщешь библиотеки и скетчи, которые можно поставить через Arduino IDE.
Загрузка .bin
Если ты выбрал вариант с загрузкой бинарника, то для начала запускай программу NodeMCU Flasher. Скачать ее можно в репозитории NodeMCU.
Устанавливаем драйверы для CP2102 либо для CH340. После этого подключаем плату к компьютеру, открываем программу NodeMCU Flasher, выбираем порт COM в диспетчере устройств в разделе «Порты (COM и LPT)». Теперь переходим во вкладку Config, жмем на шестеренку и выбираем скачанный файл .bin.
Программа для прошивкиПосле добавления файла в строке слева появится его путь. Переходи во вкладку Operation и нажимай на Flash — прошивка после этого будет загружена в плату.
Загрузка через Arduino IDE
Если тебе удобнее устанавливать через Arduino IDE, то процесс слегка другой. Первым делом точно так же качаем драйверы (CP2102, CH340). Затем открываем Arduino IDE и в меню «Файл» ищем «Настройки», нажимаем на «Добавление ссылки для менеджера плат» и вставляем две ссылки:
- https://arduino.esp8266.com/stable/package_esp8266com_index.json
- https://phpsecu.re/esp8266/package_deauther_index.json
Добавление ссылокОткрываем вкладку «Инструменты» и выбираем пункт «Менеджер плат» из меню «Плата: …».
Добавление платВыбираем «Внесены» и устанавливаем arduino-esp-8266-deauther и esp8266.
Открываем папку со скетчем и библиотеками, переходим в «Инструменты». Настройки должны стоять как у меня на скриншоте.
В строке «Плата» выбирай из списка ESP8266 Deauther Modules.
Загрузка прошивкиВ строке Flash size выбираем свой модуль. Прошивку и объем памяти ставь как на картинке ниже.
Версии модулейДалее загружаем прошивку.
После включения плата создаст точку доступа. Подключайся к ней и заходи по адресу 192.168.4.1 или deauth.me. Ты попадешь в конфигуратор и увидишь предупреждение.
ПредупреждениеВ разделе конфигурации в строке LANG указываем ru для включения русского языка в веб-интерфейсе. Чтобы настройки вступили в силу, нужно нажать на «Сохранить» и перезагрузить устройство. Теперь оно готово к работе, можно начинать портить жизнь соседям.
Обзор возможностей и настройки
Давай быстро пройдемся по приложению и посмотрим, на что теперь способна наша платка.
НастройкиЕсли подключить глушилку по последовательному порту, то с помощью команд можно управлять джеммером. Эту функцию можно отключить в настройках, если убрать галочку SERIAL.
Команды для управления по последовательному порту
- scan [<all/aps/stations>] [-t <time>] [-c <continue-time>] [-ch <channel>]
- show [selected] [<all/aps/stations/names/ssids>]
- select [<all/aps/stations/names>] [<id>]
- deselect [<all/aps/stations/names>] [<id>]
- add ssid <ssid> [-wpa2] [-cl <clones>]
- add ssid -ap <id> [-cl <clones>] [-f]
- add ssid -s [-f]
- add name <name> [-ap <id>] [-s]
- add name <name> [-st <id>] [-s]
- add name <name> [-m <mac>] [-ch <channel>] [-b <bssid>] [-s]
- set name <id> <newname>
- enable random <interval>
- disable random
- load [<all/ssids/names/settings>] [<file>]
- save [<all/ssids/names/settings>] [<file>]
- remove <ap/station/name/ssid> <id>
- remove <ap/station/names/ssids> [all]
- attack [beacon] [deauth] [deauthall] [probe] [nooutput] [-t <timeout>]
- attack status [<on/off>]
- stop <all/scan/attack>
- sysinfo
- clear
- format
- print <file> [<lines>]
- delete <file> [<lineFrom>] [<lineTo>]
- replace <file> <line> <new-content>
- copy <file> <newfile>
- rename <file> <newfile>
- run <file>
- write <file> <commands>
- get <setting>
- set <setting> <value>
- reset
- chicken
- reboot
- info
- // <comments>
- send deauth <apMac> <stMac> <rason> <channel>
- send beacon <mac> <ssid> <ch> [wpa2]
- send probe <mac> <ssid> <ch>
- led <r> <g> <b> [<brightness>]
- led <#rrggbb> [<brightness>]
- led <enable/disable>
- draw
- screen <on/off>
- screen mode <menu/packetmonitor/buttontest/loading>
Если в разделе сканирования нажать Scan APs, то глушилка находит все точки доступа Wi-Fi. Выбираешь одну или несколько сетей, и можно переходить в раздел атак. Режим Deauthотключает все устройства от выбранной сети. Режим Beacon позволяет создавать одновременно до 60 точек доступа.
Сканирование и виды атак
В разделе SSIDs создаются точки доступа для атаки Beacon.
Создание точек доступаВ прошивке предусмотрена возможность подключения дисплея — для версии устройства с ним. Но при желании ты можешь и сам припаять к плате экран и кнопки, а также обеспечить автономное питание, чтобы превратить ее в независимое устройство.
Также разработчики прошивки, помимо самого джеммера, продают и устройство, которое позволяет его обнаруживать.
ДетекторАвторы периодически обновляют прошивку и добавляют новые функции, так что следи за апдейтами!
Wi-PWN
Рассмотрим аналогичную прошивку Wi-PWN, которую разработал Сэм Денти (samdenty99). Он улучшил творение Spacehuhn и добавил функции детектора деаутентификации, а также создал сопутствующее приложение для Android. В итоге использовать Wi-PWN удобнее, чем Deauther 2.0.
После скачивания и распаковки архива потребуется прошить плату и установить приложение на телефон. В папке ты найдешь программу ESP8266Flasher. Запусти ее, выбирай COM-порт и в разделе Config — прошивку (она находится по пути *\Wi-PWN-master\arduino\Wi-PWN). Теперь жми Flash во вкладке Operation.
С телефона подключаемся к плате по Wi-Fi.
Сеть Wi-FiОткрываем скачанное приложение, соглашаемся с правилами, указываем имя и пароль сети. После настройки подключаемся к новому Wi-Fi.
Настройка точки доступа и завершение установки
В приложении есть несколько вкладок с говорящими названиями:
- Scan — раздел с поиском и выбором нескольких точек доступа;
- Users — функция сканирования определенного Wi-Fi на наличие подключений и создание собственных «пользователей»;
- Attack — атаки аналогичны версии Spacehuhn, но при клонировании сетей максимальное число пользователей — 48 вместо 60 (столько было в ранних версиях Deauther);
- Detector — функция, которая позволяет сканировать каналы и определять глушилки;
- Settings — настройка сервера Wi-Fi (имя, пароль сети). Здесь же можно включить клиент Wi-Fi и настроить параметры сканирования и атаки.
WARNING
Для стабильной работы устройства рекомендую прикрепить радиатор к греющейся части устройства. В противном случае джеммер может перегреться и выключиться.
Пара слов о защите
NodeMCU — это дешевое, универсальное, мощное и компактное решение для деаутентификации. Повторить весь проект можно быстро и без особых усилий. А раз это может сделать кто угодно, то неплохо подумать и о защите.
Большинство популярных роутеров используют стандарты IEEE 802.11b/g/n, которые подвержены глушению. Если хочешь исключить такую вероятность, то ищи роутер с поддержкой стандарта 802.11w, который полностью защищает пользователей от этой атаки.
В некоторых роутерах есть защита от спама, но она работает только с подключенными к сети устройствами, а Wi-Fi jammer к сети не подключается. Если у твоего роутера есть защита от спама, которая работает и с неподключенными устройствами, то советую ее активировать!
***
Источник: Как работает «глушилка» - JustPaste.it